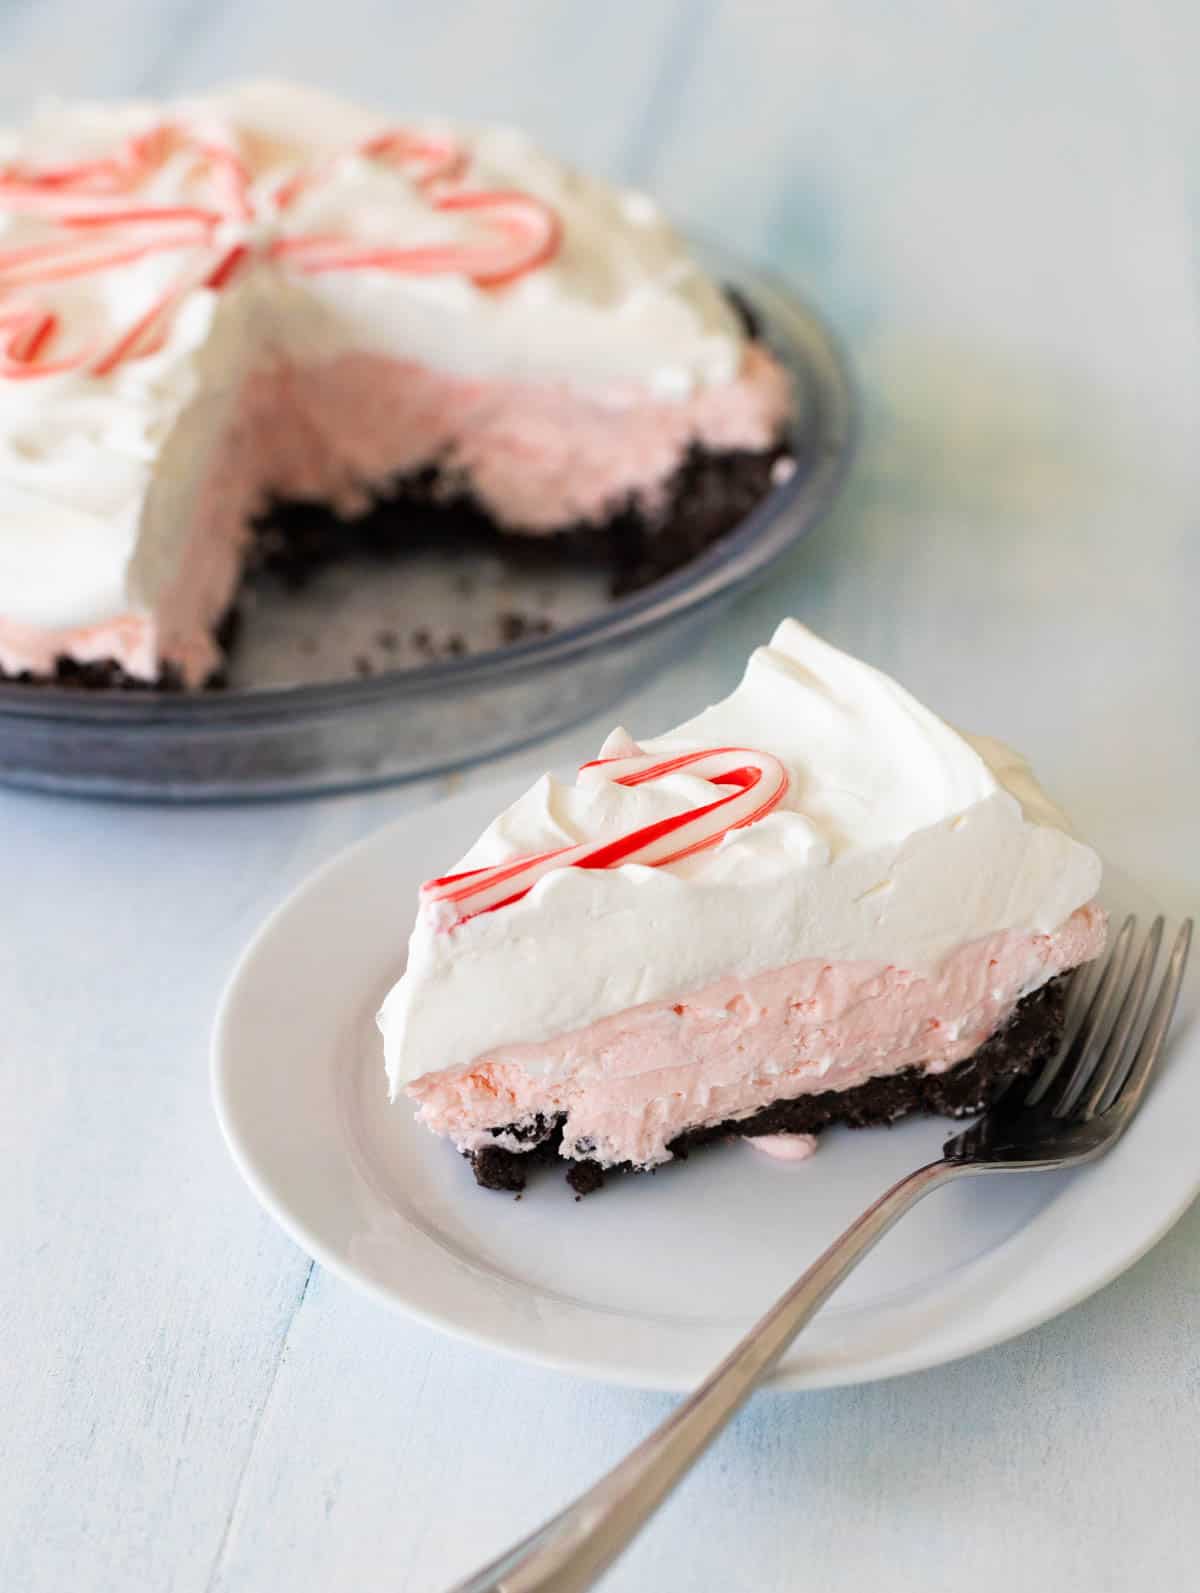
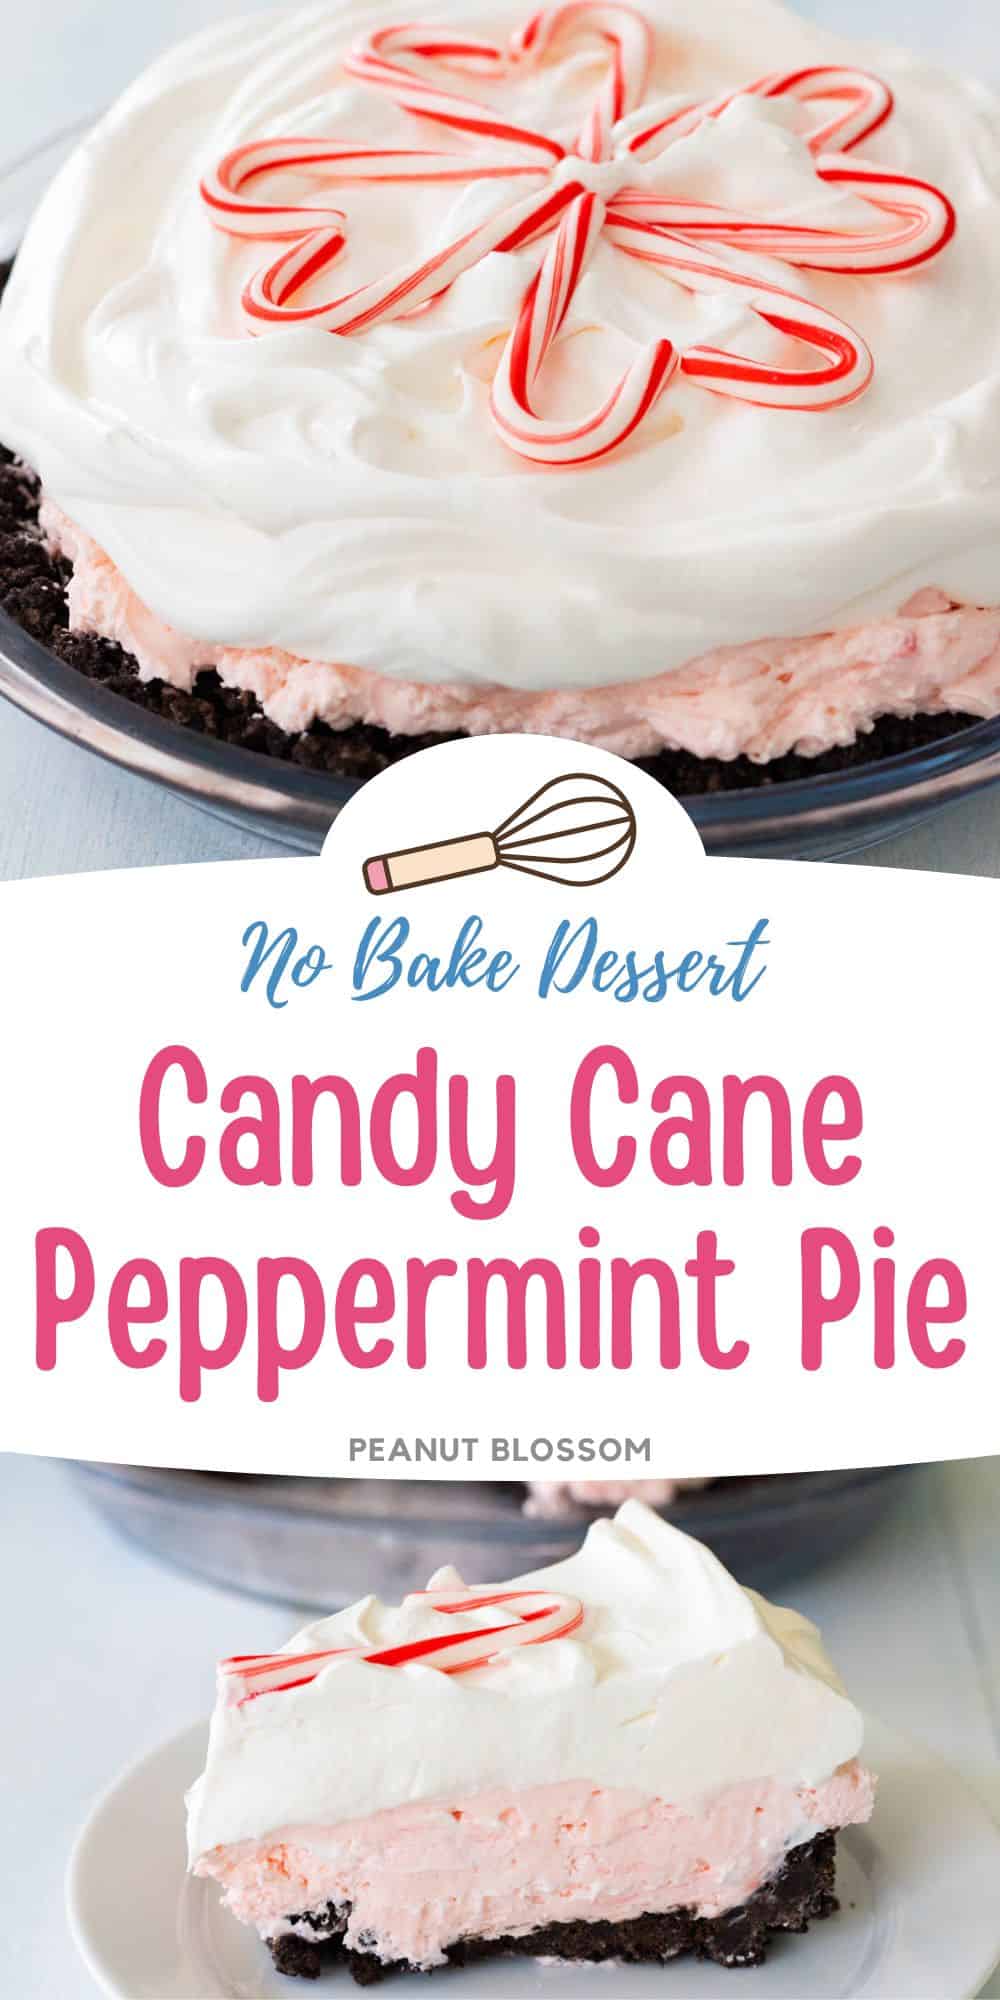
Candy Cane Pie

Easy candy cane pie has a chocolate cookie crust and a no-bake peppermint pie filling. Topped with Cool Whip and decorated with mini candy canes, this easy dessert is perfect for Christmas Eve.

Growing up, a no bake dessert made from a cookie crust and a creamy pie filling was something we called a "torte."
So whether you call this a "candy cane pie" or a "candy cane torte" would tell me whether you're from the Midwest or not. Ha!
Whatever you call it, it's hard to resist a cool and creamy slice of this sweet peppermint pie. It is just the cutest thing to serve for Christmas Eve!
Why This is the Best Recipe
I love an easy no bake dessert for the busy holiday season. I think this is the best candy cane pie recipe because:
- Easy Ingredients: There's nothing fussy about this recipe, you just beat up some cream cheese and powdered sugar and then do a little stirring. So easy!
- Cool and Creamy: There have been Christmases where we had to have our air conditioning running. Here in the south, it's nice to have a chilled dessert for our menu sometimes!
- Not Too Crunchy: Candy canes can be hard on teeth, I love the texture of the chopped candy cane bits in the pie filling. They absorb some of the moisture and are easy to bite.
- Pretty and Pink: I love pink as a Christmas color, it reminds me of Cindy Lou Who and our favorite Grinch Christmas special. This pie would look simply adorable on your dessert table.
Ingredients

To make the candy cane pie, all you need is:
- Oreo Cookies: For the chocolate cookie crust.
- Butter
- Cream Cheese: I love using store brands to save money, but if you want a neatly-sliced piece of pie, you might consider splurging on a name brand. The texture of the cream cheese is much firmer with the more expensive kind.
- Whipped Topping: Be sure to thaw it before you begin.
- Peppermint Extract
- Powdered Sugar
- Red Food Coloring (Optional): You don't have to use this ingredient, but it does make the filling a very pretty pink.
- Candy Canes: Yes, there are actual candy canes in the peppermint pie filling! And on top for decoration. I bought BOTH regular candy canes and mini candy canes.
Make the Oreo Cookie Crust
I'm pretty sure all the best no bake pies start with an Oreo cookie crust.
We love this easy pie crust so much, I shared a recipe for it all by itself with step-by-step photos if you need more visual details.
You can get the Oreo cookie crust recipe here but don't worry, I included all the instructions in the recipe card below, too.

Want to Save This for Later?
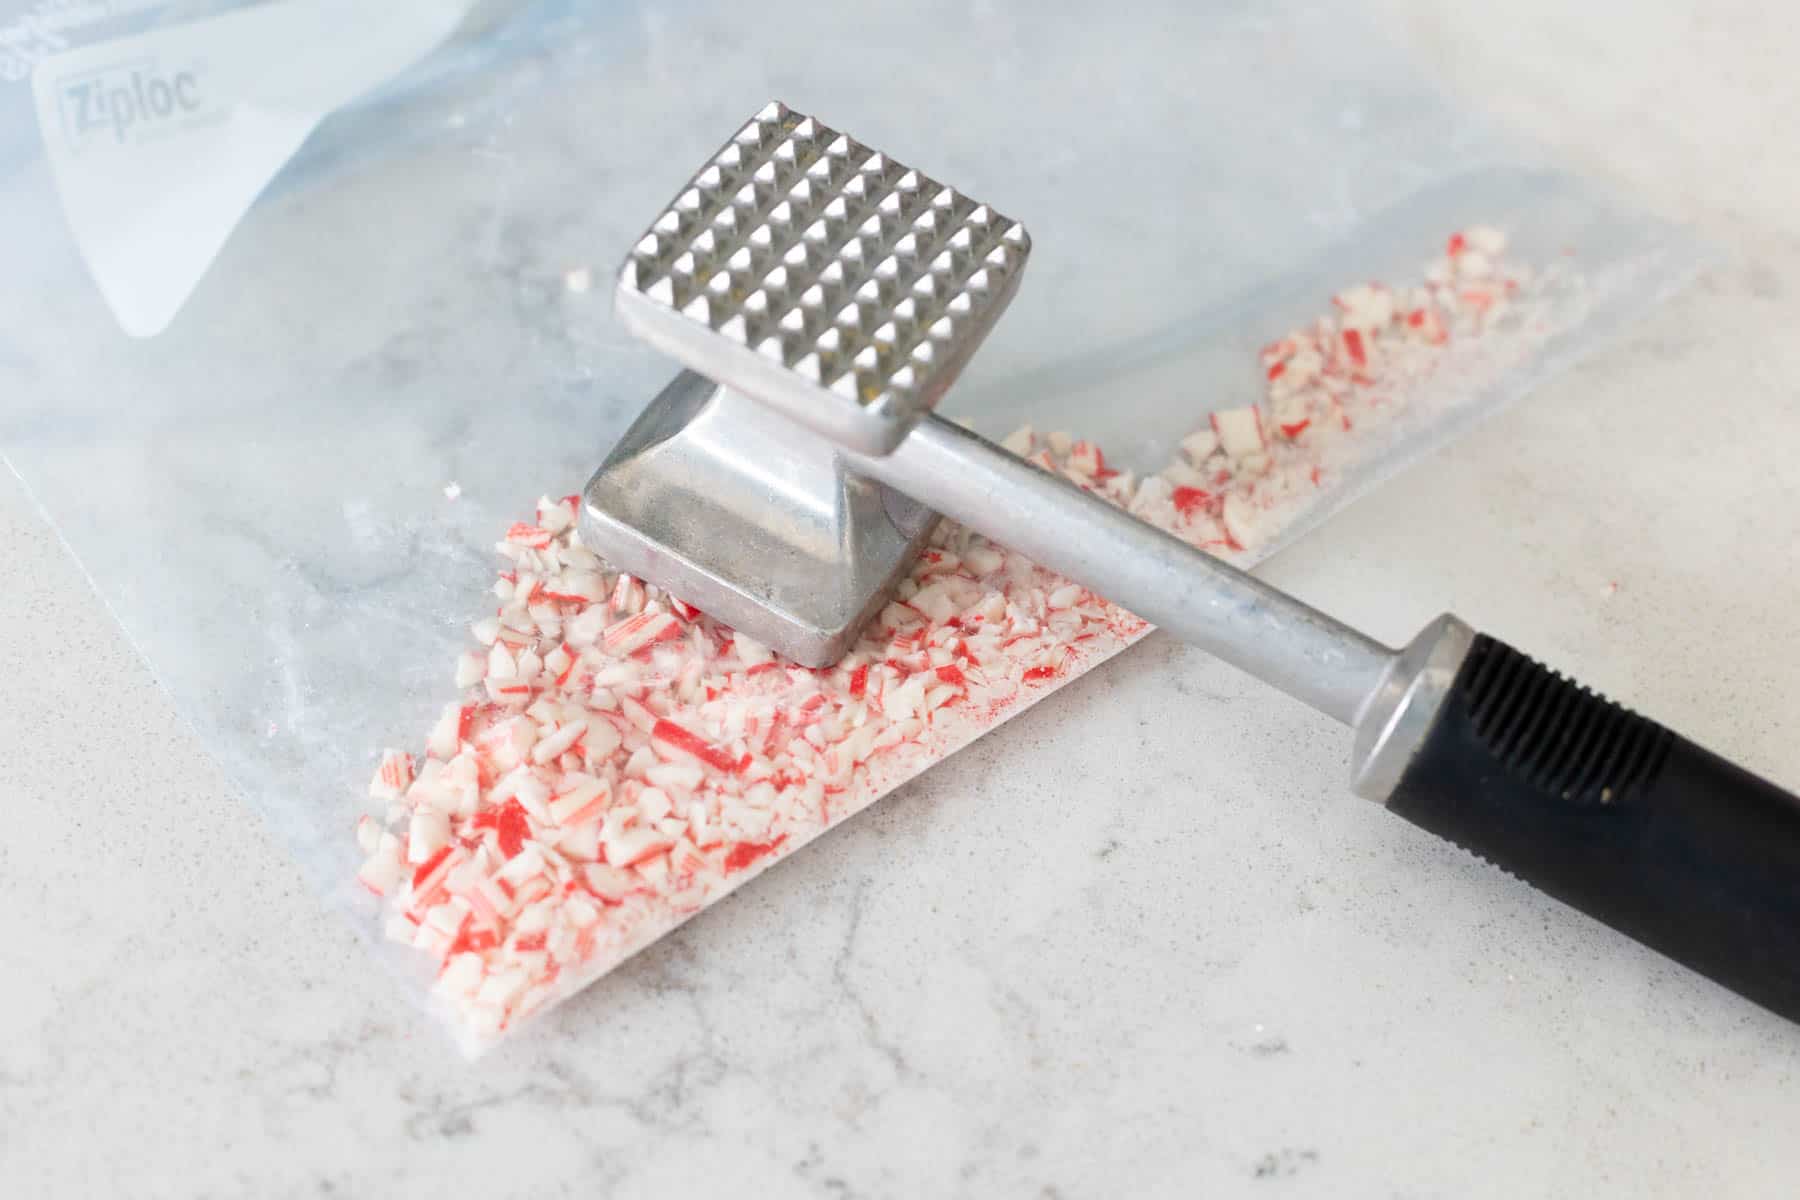
Crush the Candy Canes
Add the candy canes to a ziptop baggie and crush them with a cooking mallet.
You won't need to pound very hard, my candy canes crushed with a simple tap.
Make the Peppermint Cream Filling
Add the softened cream cheese and powdered sugar to a large mixing bowl and beat them together until smooth fluffy.
Add the peppermint extract and red food coloring and beat them in until smooth.
I suggest adding the food coloring to a butter knife or spoon and then adding it to the bowl instead of squeezing the bottle right over the cream cheese. You can always add more color but it is harder to remove it if you squeeze too much in.
With my favorite food gels, I only needed 2 drops of red food gel to get that light pink color.
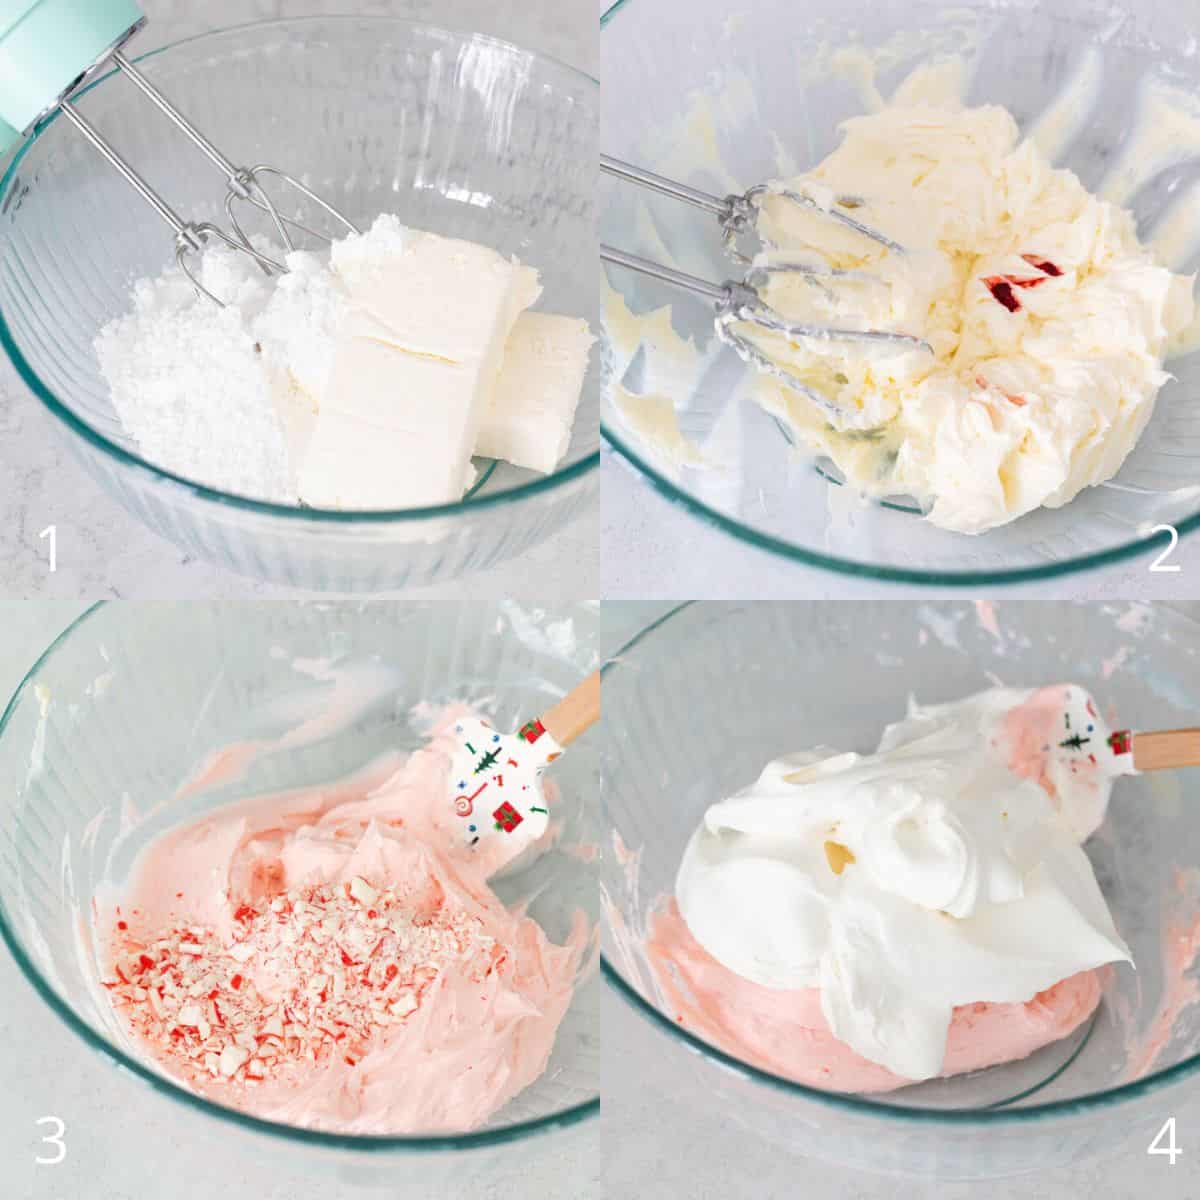
Add the crushed candy canes to the pie filling and stir them in.
Add the whipped topping to the bowl and gently fold it in until completely combined.
Assemble and Chill
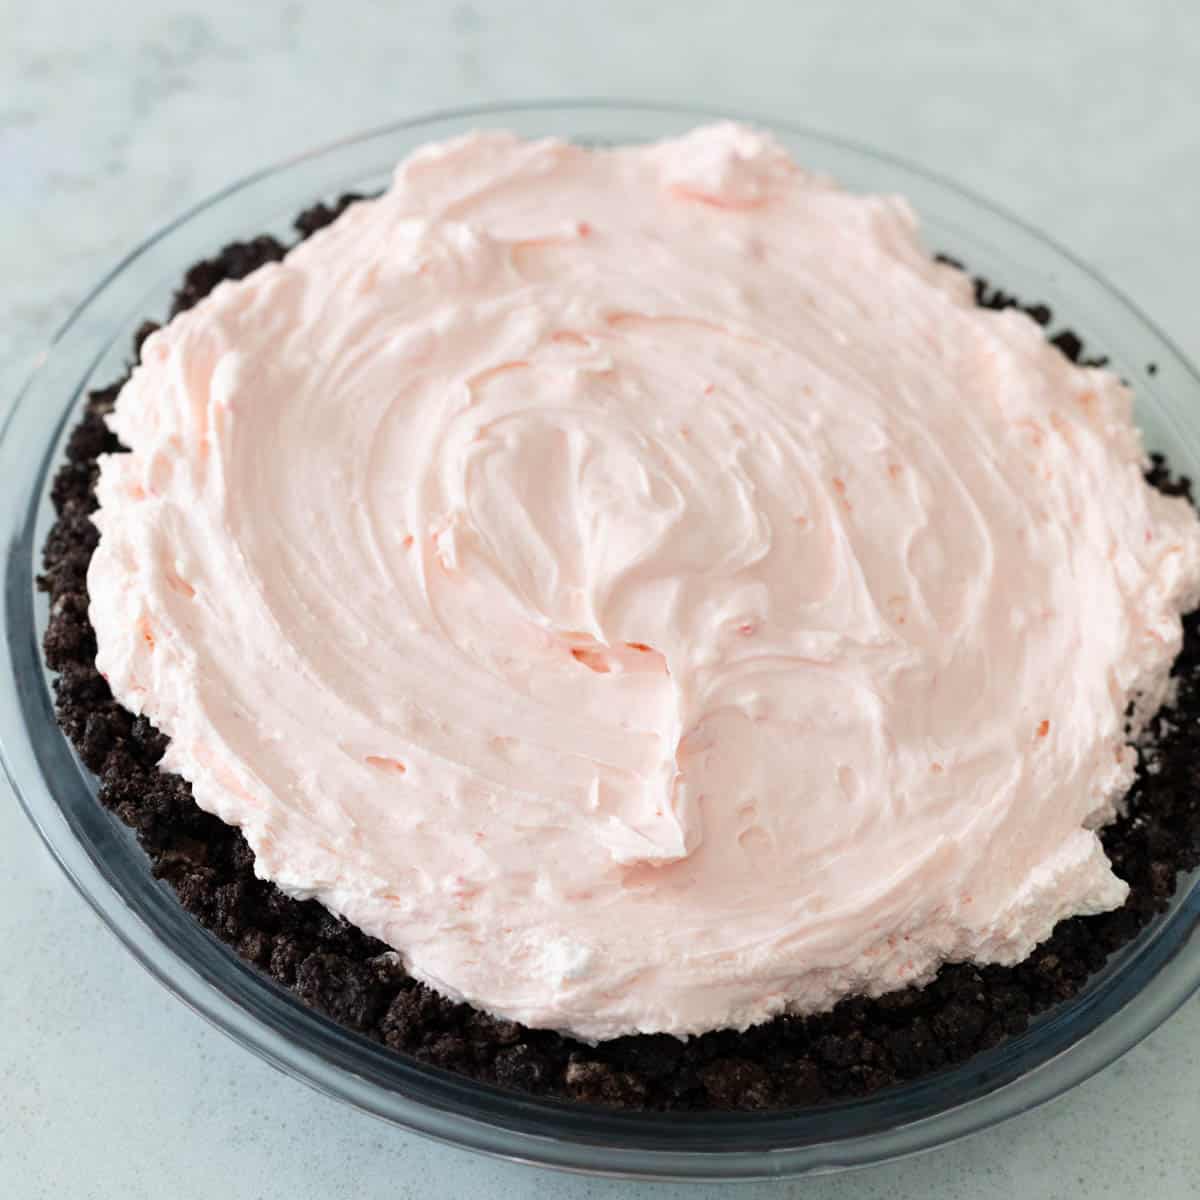
Spoon the peppermint pie filling into the chilled Oreo cookie crust.
Use the spatula or a butter knife to smooth it out into a pretty swirl.
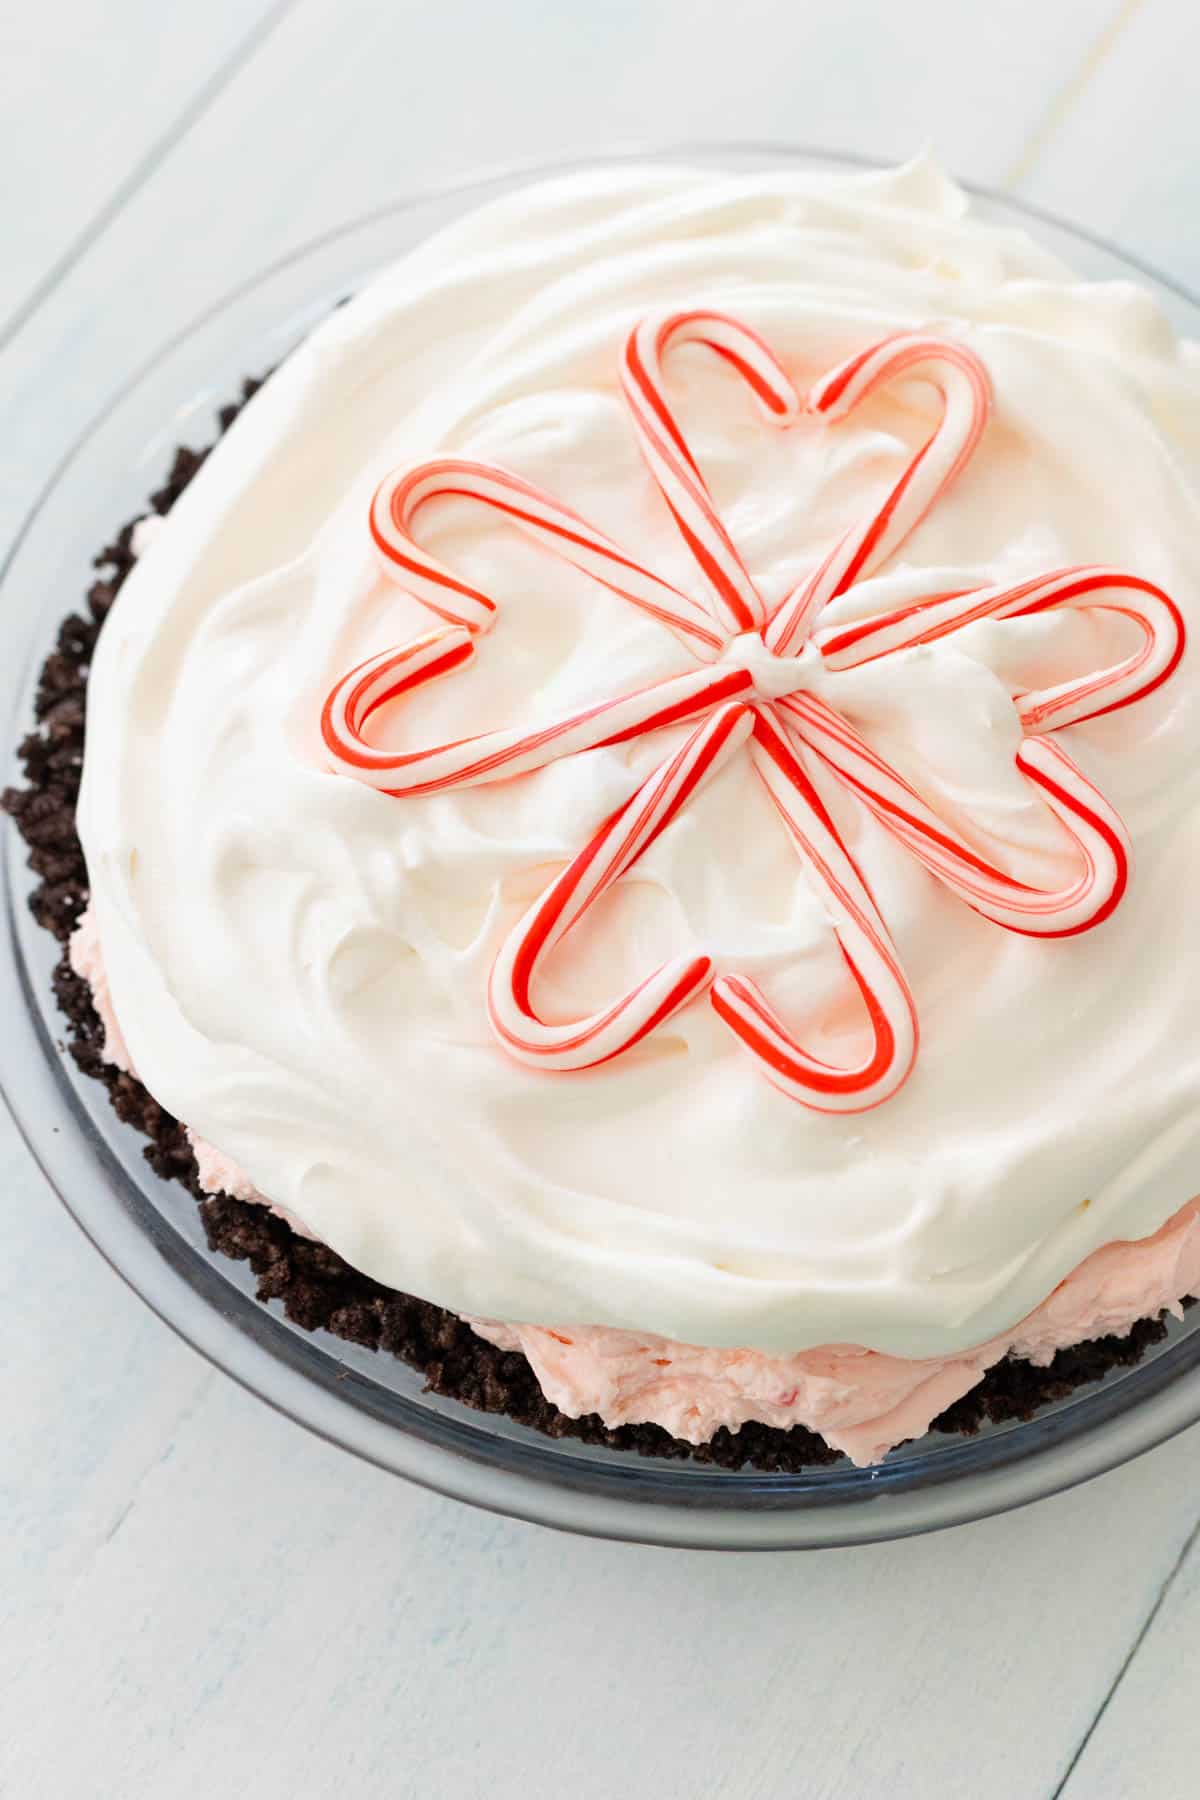
Frost the pie with the second container of whipped topping.
Decorate the top with candy canes.
I used 8 mini candy canes to form 4 sweet heart shapes and placed them pointing side towards the center like a sweet little snowflake:
NOTE: If you place the candy canes on the pie and let it sit in the fridge for longer than a few hours, the color from the candy may run into the Cool Whip.
They will also soften a bit as they absorb some moisture from the whipped topping.
I recommend adding the candy canes shortly before serving the dessert.
Make Ahead Tips
This easy cream pie is a perfect make ahead dessert for a party.
You can prep the chocolate cookie crust and even fill it with the prepared peppermint pie filling up to 24 hours in advance.
I recommend waiting to frost it with the final container of whipped topping and decorating it with the candy canes on top until just before serving.
Serving Suggestions
This sweet little holiday dessert would be just adorable served for Christmas Eve or Christmas Day.
But if you're like me, you will have leftover candy canes well into January. Save the mini candy canes and use the heart-shaped top decorations to be right at home during your Valentine's Day party in February.


More Easy Christmas Desserts
Looking for more easy Christmas desserts? Don't miss these family favorites:


📖 Recipe

Candy Cane Pie
Ingredients
For the Chocolate Cookie Crust
- 24 Oreo cookies crushed into crumbs
- 5 tbsp butter melted
For the Peppermint Cream Filling
- 2 (8 oz) bricks of cream cheese
- 1 cup powdered sugar
- 2 tsp peppermint extract
- 2 drops red food gel
- 3 candy canes crushed
- 1 (8 oz) container of whipped topping like Cool Whip
For the Whipped Cream Topping
- 1 (8 oz) container of whipped topping like Cool Whip
- 8 mini candy canes for decorating the top
Instructions Start Cooking
Prep the Oreo Cookie Crust
- Combine the crushed Oreo cookies and melted butter in a large mixing bowl. Toss with a fork until all the crumbs are coated in butter and then spread into a pie plate. Press firmly into place and chill for 15 minutes.
Prep the Peppermint Cream Filling
- Add the cream cheese and powdered sugar to a large mixing bowl and beat them together with a hand mixer until smooth.
- Add the peppermint extract and food coloring and beat them in until smooth.
- Stir in the crushed candy cane pieces with a spatula.
- Fold in the whipped topping.
- Spread the peppermint filling into the prepared Oreo cookie crust and chill for one hour.
Decorate and Serve
- Spread the remaining container of whipped topping over the top of the pie. Garnish with mini candy canes.
Save This Recipe to Your Recipe Box
Find this delicious recipe next time you visit by saving it to your very own recipe box on my site. All your favorites stored in one easy place!
Comments
No Comments