Bread Machine Pizza Dough


This foolproof bread machine pizza dough recipe is ready with just 5 minutes of hands-on time. Add a few basic ingredients to your bread machine, press START, and after a 90-minute cycle you will have homemade pizza dough that's ready to use by dinnertime. This dough makes pizza with a perfectly chewy, crispy crust!
Pizza is practically it's own food group in our family. My husband's love for it is so strong, it got mention during the Best Man's speech at our wedding. So to say we are picky about our pizza would be an understatement.
While we may argue about which toppings make the best pizza, we can all agree you can't have a perfect pizza without a perfect pizza crust.
I've spent years perfecting all of the ways to use my bread machine—so much so that I wrote an entire bread machine cookbook! And this has become my family's favorite pizza dough, making a pizza crust that is chewy and crispy with very little effort.
This bread maker pizza dough recipe allows even beginner bread makers to make restaurant-style pizza dough with the press of a button. I have tested this recipe in 5 different models of bread makers, and for each one I only needed 5 minutes of hands-on time before letting the machine run a 90-minute dough cycle..
Your homemade pizza dough will be ready by dinnertime for all of your family pizza nights!
Love bread machine recipes? You need...
The Ultimate Bread Machine Cookbook
These aren't your mama's recipes! Enjoy everything from bakery-style loaves to breads featuring unique fruity fillings, savory mix-ins and streusel swirls. With just a handful of ingredients and the press of a button, you can make delicious, freshly baked bread a daily occurrence, no matter how hectic your schedule is.
Why This Recipe Works
I love each of my easy bread machine recipes, but this pizza dough recipe is one of my very favorites. Here's why it works even for beginner bakers:
- Easy Prep: The ingredients are simple. If you don't already have them in your pantry, they're easy to find at any grocery store. All you have to do is measure out the ingredients, add them to the bread machine in order, and press start.
- Perfect Texture: Bread flour gives this dough more structure for a chewy texture, while the oil helps the dough bake up nice and crispy.
- Incredible Flavor: I always make this recipe with one of my family's favorite garlic-and-herb seasonings, which adds an extra boost of flavor to the pizza crust. Even if you choose to omit the optional seasoning, the dough has the perfect classic flavor that you'd expect at your favorite pizzeria—no bland pizza crust here.
- Fun to Bake: Because making the dough itself is so easy, you'll have more energy when it comes time to turn it into pizza. It's perfect for a fun Friday Night Pizza Night with your kids!
What Readers are Saying
"We have tried A LOT of different pizza dough recipes that don’t measure up to what we want, so we buy dough balls from our local pizzeria. After making this today, we finally have a recipe both my husband and I deem perfection!" -Kathy
"Wow...thank you for this recipe! I made the dough today for the best home pizzas we've ever had. ...Perfect mix between thin and medium crust with just the right blend of crunch to chew. Had those big burnt looking pillow bubbles like the pizza in Italy. We enjoyed it so much! " -Alan
"Tried this for the 1st time today and it was perfect!!! ...Easy and the taste can't be beat." -Tricia
Recipe Yield and Crust Texture
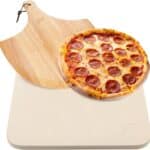
The dough makes 2 12-inch pizza crusts. At that size, the thickness of the pizza crust is similar to a hand-tossed pizza at your favorite pizza delivery place. If you roll your pizzas out larger or smaller, this will affect the bake time and final texture.
The texture of the crust is crispy on the outside and chewy on the inside if you follow my baking instructions in the recipe card.
Timeline Overview
If you're planning to make pizza for dinner tonight, here's an overview of the timeline for making this pizza dough and baking with it:
- Prep the dough: 5 minutes
- Bread machine Dough cycle: about 90 minutes
- Second rise: 1 hour
- Shaping and baking the pizza: about 30 minutes
Ingredient Notes
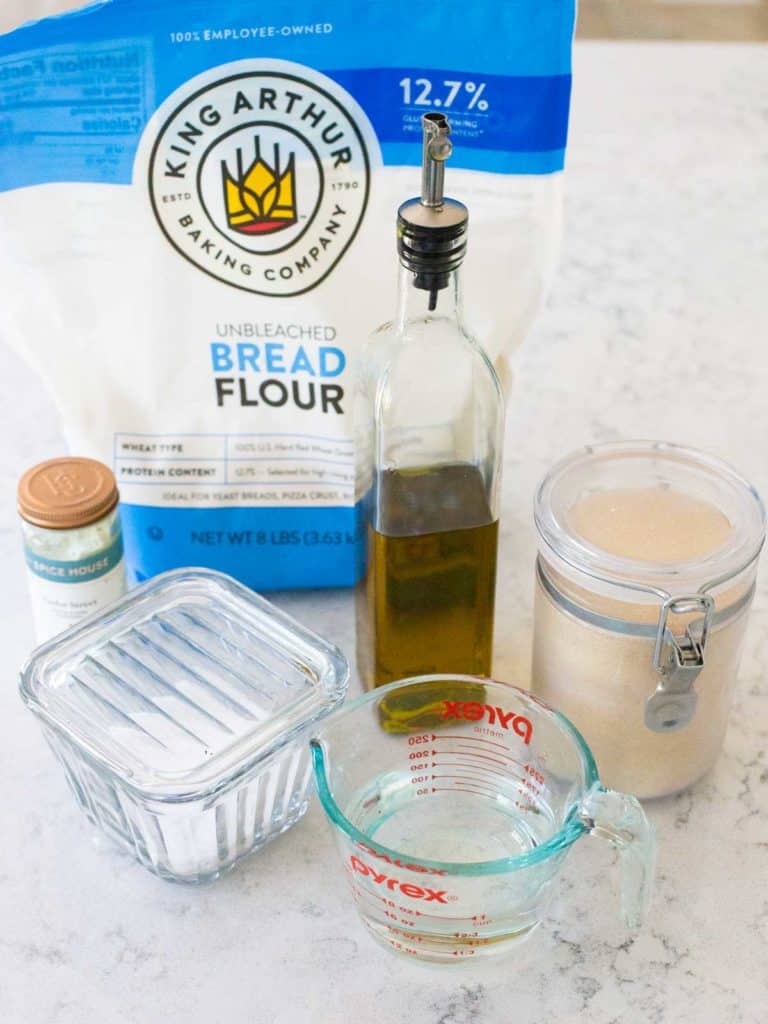
This perfectly seasoned bread machine pizza dough has a very short list of ingredients:
- Bread Flour: Bread flour provides the chewy structure that a good pizza crust needs. We use King Arthur Baking flour for almost all of our bread machine recipes. It gives consistent results and I find it rises better than other brands we've used. If you don't have bread flour on hand, check out the Recipe FAQs for notes on using all-purpose flour. I recommend weighing the flour with a food scale to ensure accuracy and get the best results.
- Extra Virgin Olive Oil: The olive oil will go inside the dough itself as well as get brushed over the pizza crust edge before baking, making a crispier crust. Make sure you use a high-quality extra virgin olive oil for the best flavor in your crust.
- Instant Yeast: This is the only yeast we use in our bread makers. I buy Saf-Instant yeast in bulk and keep it in a storage container in our freezer. If you don't plan to bake often, the individual packets are fine. Store it in the freezer to keep it fresh and extend the shelf life.
- Water: Straight from the tap will be just fine. If you don't like the flavor of your tap water, you can use filtered water.
- Kosher Salt: Do not substitute table salt. The grains are much finer than kosher salt, which will cause your dough to be too salty.
- Herbs and Spices (OPTIONAL): I've fallen in love with the Taylor Street Garlic & Herb Seasoning from The Spice House. I add just a teaspoon to the dough and it gives it a little hint of extra savory flavor. It isn't essential but my whole family loves it. You could substitute your favorite pizza seasoning, any dry Romano cheese blend, or even just 1/2 teaspoon of garlic salt.
If you prefer a whole wheat dough, check out my bread machine whole wheat pizza dough recipe.
How to Fill the Bread Pan
If you've never used your bread maker before, the most essential thing to know before you begin is that you ALWAYS add the ingredients to the bread pan in the order they are listed in the recipe.
If you add them in a different order, it will negatively affect the way the bread machine mixes the dough.
The liquids always go in first: Make sure the paddle attachment is in place before you add the water and the olive oil to the pan.
Next, the flour gets added to the pan. If you're weighing the flour, as I suggest doing, you can do this right in the pan.
I place the bread pan on the food scale and then turn the scale on. The scale should read "0" but if it doesn't, look for a button that says "Tare" to zero-out the scale. Now you'll be able to add the flour one large spoonful at a time until you get the proper weight.
Add the salt in the corners of the pan—don't dump it right in the middle of the flour. This helps to make sure the yeast and the salt don't touch directly which can kill the yeast and prevent your pizza dough from rising.
If you're using the optional seasoning, add that to the corner of the pan as well.
Lastly, use the back of a spoon to dig a shallow well in the center of the flour. This is where you'll put the yeast.
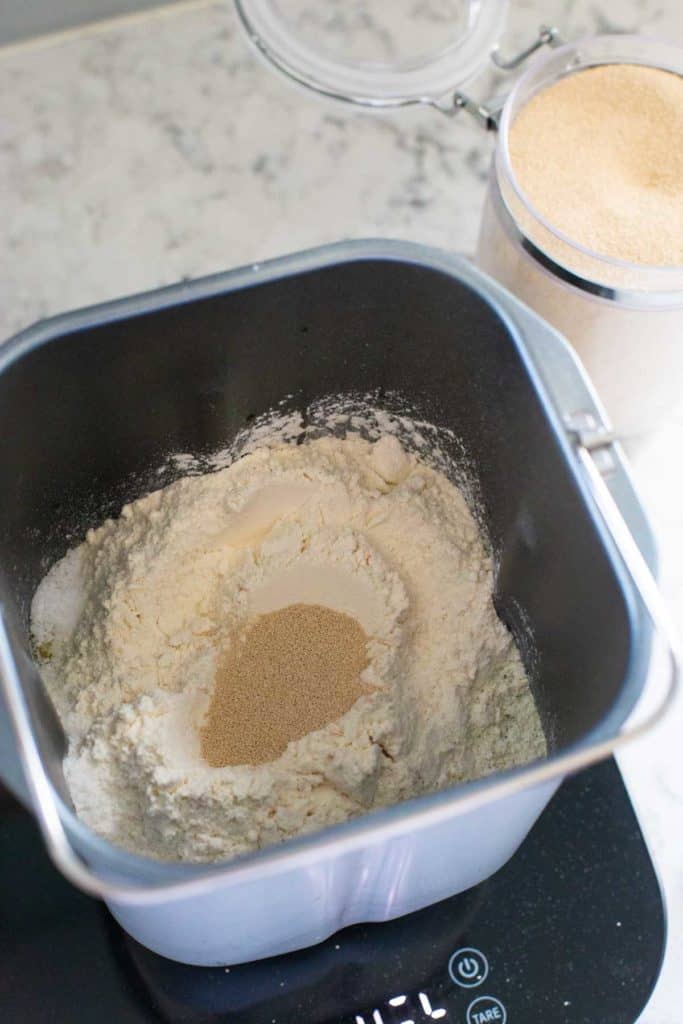
Once you've added the yeast, the pan is ready for your bread maker.
Want to Save This for Later?
Tips for Using A Bread Maker to Make Pizza Dough
Secure the bread pan into place and then select the DOUGH program. Some machines have multiple options for making dough. You don't need "Artisan Dough" or "Crusty Bread", just the regular "Dough" option will be perfect.
For the 5 models of bread machines we tested, the Dough program took 1 hour and 30 minutes on each of them.
First, you bread machine will mix together the dough and form a rough dough ball. This takes just a few minutes and is really the only stage where you should keep an eye on the progress.
What to do if your dough is too dry
Even if you measure correctly and weigh your flour, sometimes there's just not enough moisture for the dough ball to properly mix. If your dough is looking dry and shaggy, add a little extra water just 1 teaspoon at a time until the dough comes together and isn't sticking on the sides of the bread pan.
This is what the dough looks like when it is too dry:
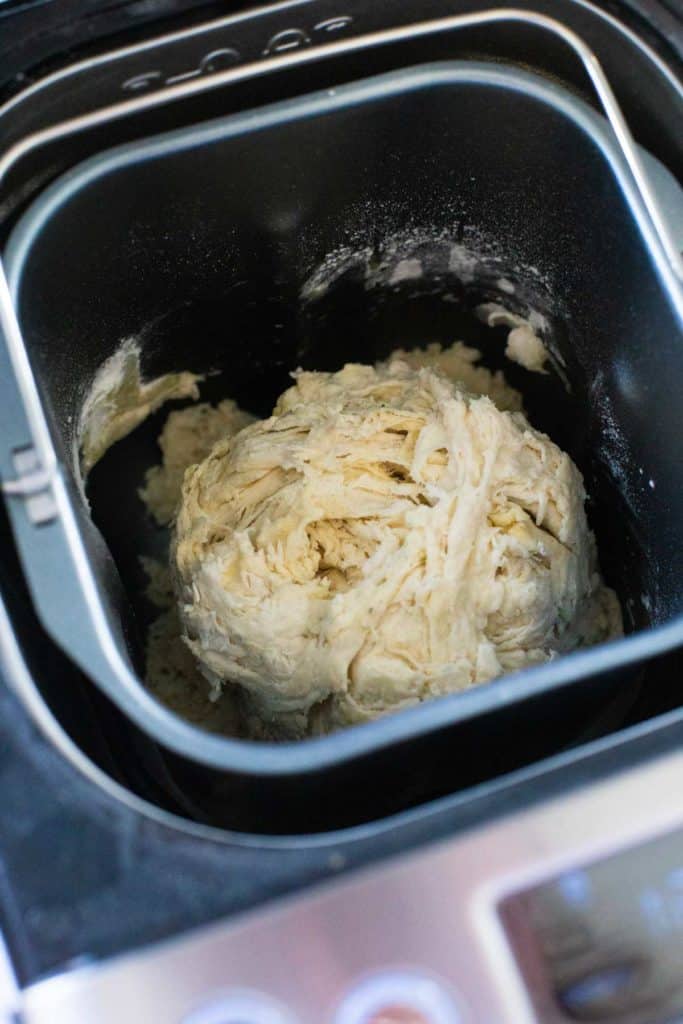
See how the dough is sticking to the sides of the pan? Also notice how the dough looks craggy and clumpy.
I added just ONE teaspoon of extra water and then dough came together. This is what the dough should look like when it is hydrated properly:
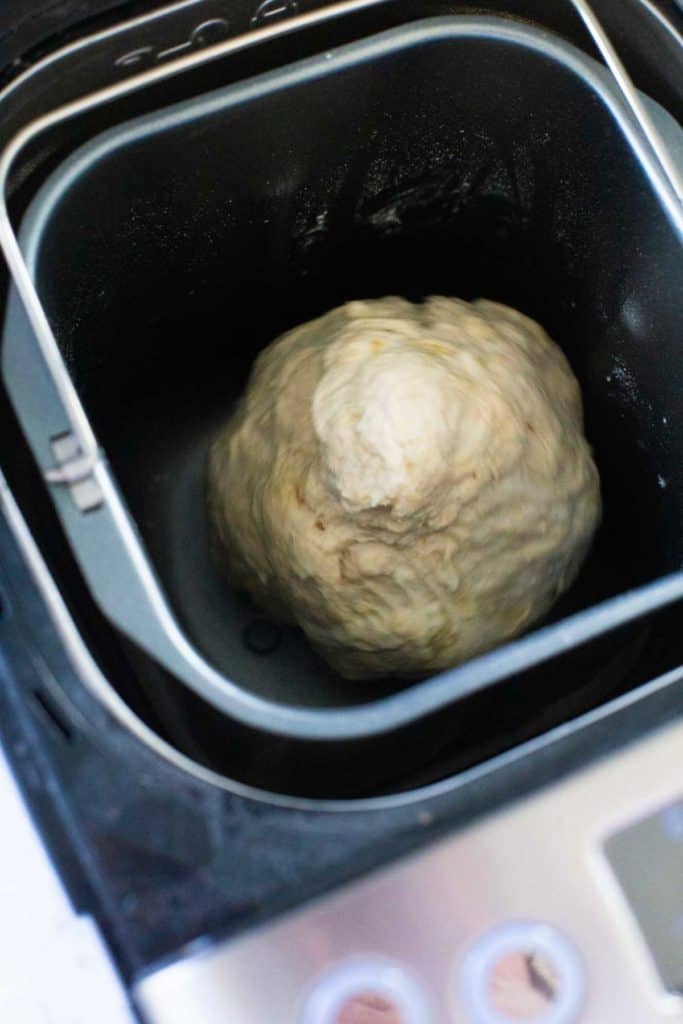
See how there's no more dough sticking to the sides of the pan? Now the dough ball looks smooth and complete.
Once your dough ball has come together, shut the lid of the bread maker and you're free to do anything else you want for the next hour and thirty minutes.
When the dough is done
When the Dough program is complete, your pizza dough should have risen and mostly filled your bread maker pan. The dough should be soft and smooth looking, like this:
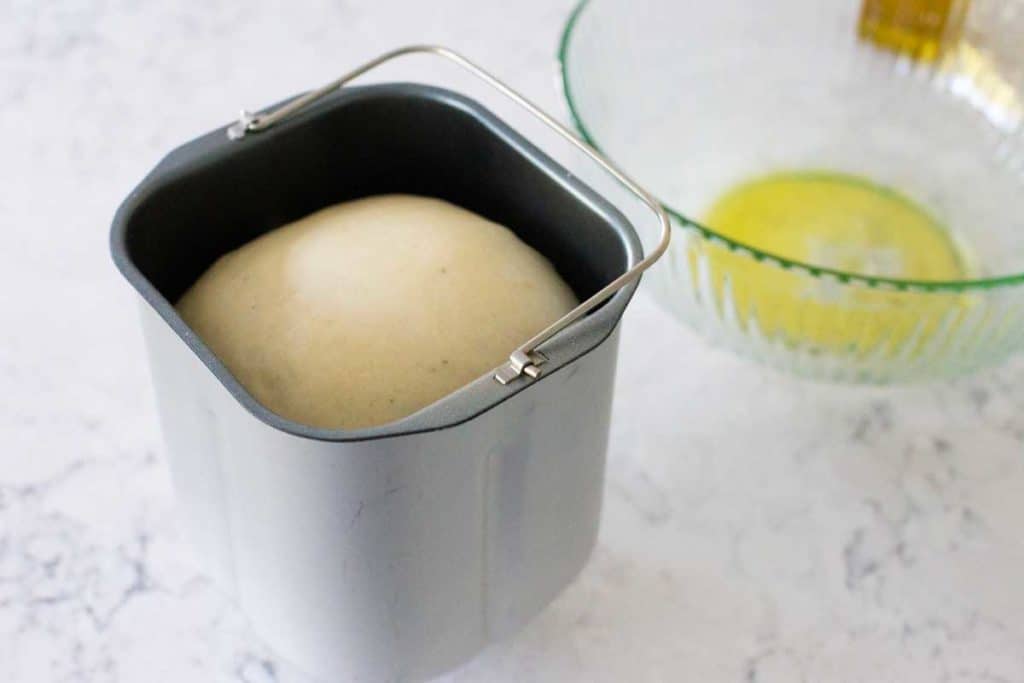
Now you can either store the dough to use later or prepare to bake with it.
How to Use the Pizza Dough
You're almost there! Your pizza dough is now properly prepared but it needs one more little step before you bake with it.
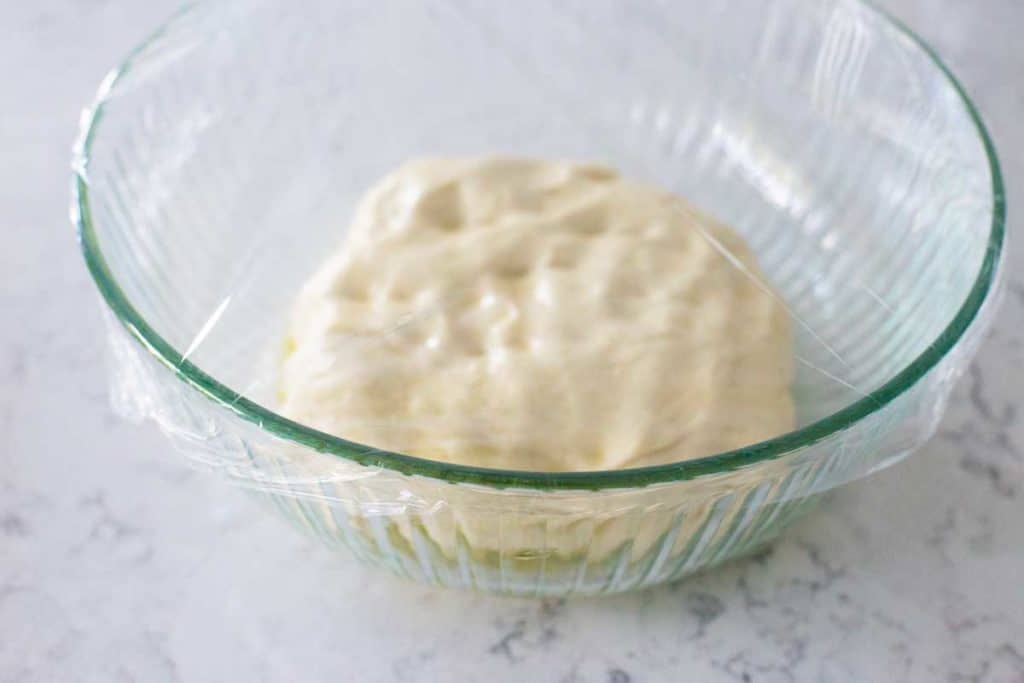
Brush the inside of a large mixing bowl with extra virgin olive oil. Transfer the pizza dough to the bowl and gently press it with your fingers to deflate it.
Cover the bowl with plastic wrap and place it in a warm place to rise for 1 hour, or until doubled in size.
I like to place the bowl on my stovetop. When I preheat the oven for baking the pizza, the bit of warmth helps the dough rise just a little more before I work with it.
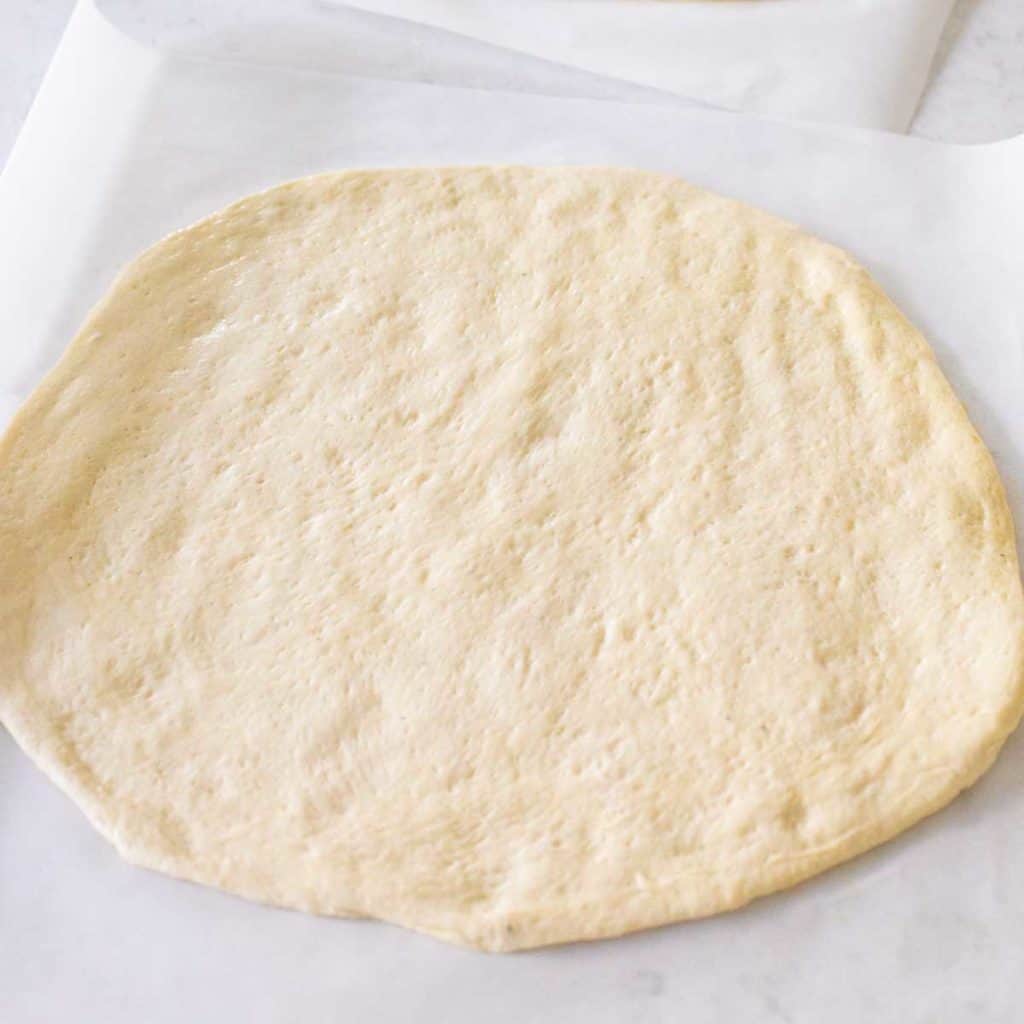
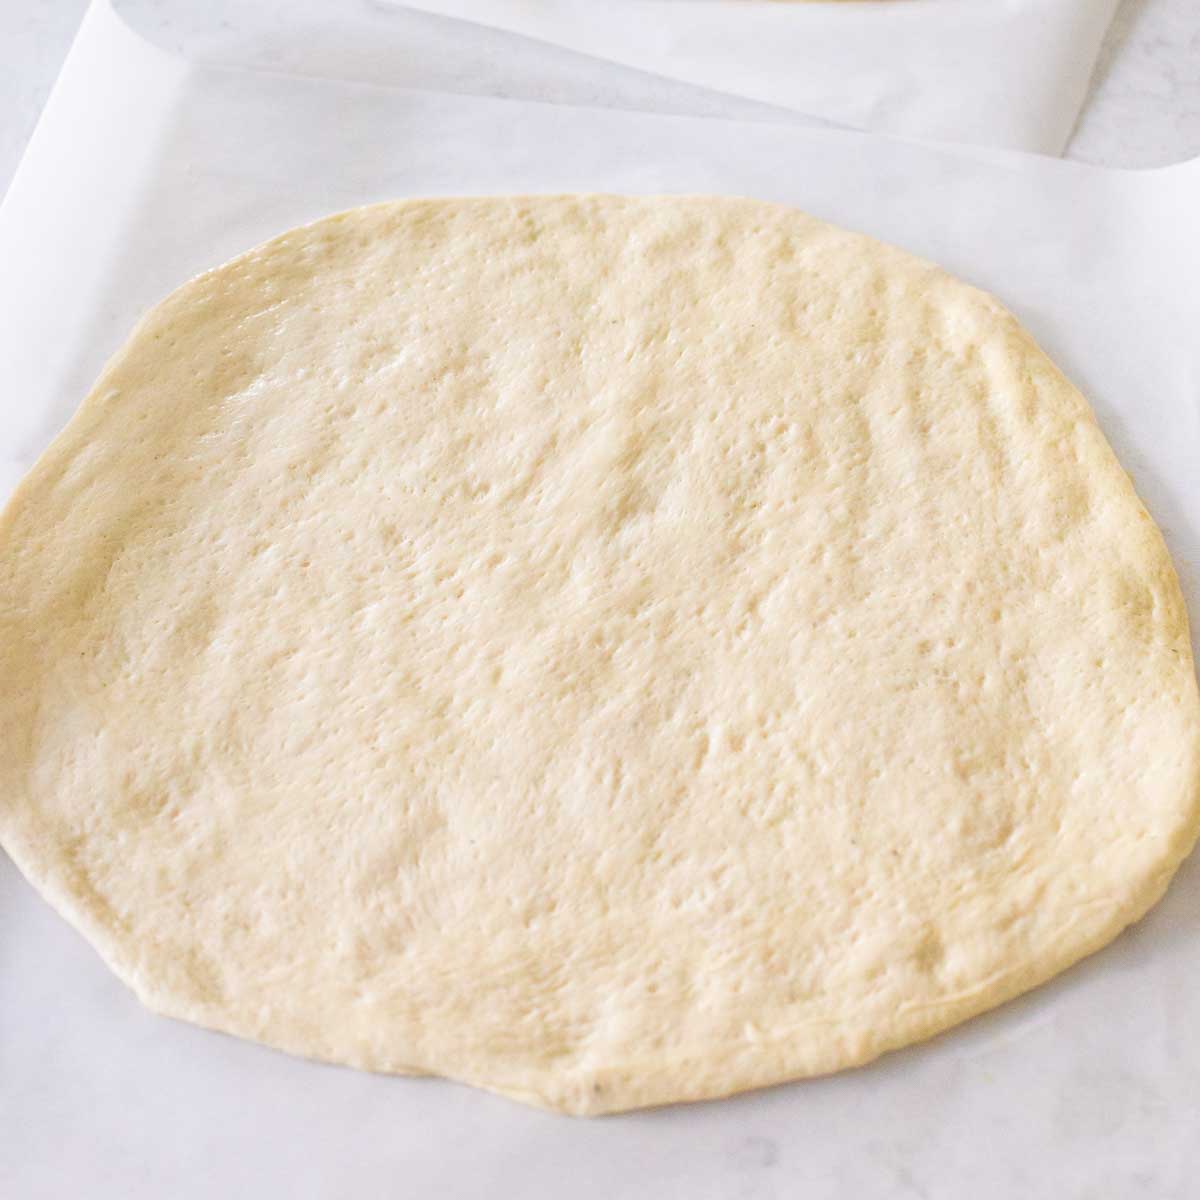
The dough is ready to bake with when it has doubled in size, like this:
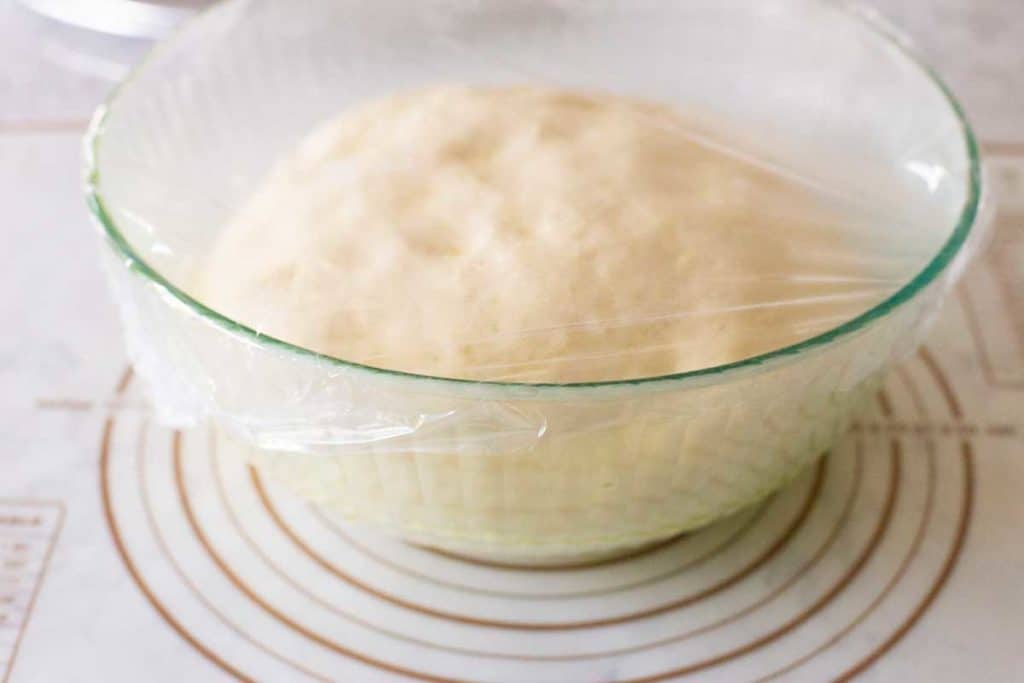
If your kitchen is colder, it may take longer for the dough to rise. It's always best to rely on visual cue to know when it's ready and consider the time to be a best estimate.
Now you're ready to use the dough in your favorite pizza, calzone, or stromboli recipes.
Shaping and baking
The cooks at your favorite pizza place make shaping pizza dough look complicated, but it's actually really easy. I put together an entire guide on how to shape pizza dough with your hands to help you with this process.
My family prefers the crisp texture you get from baking pizza on a pizza stone. If you've never used a pizza stone before, I walk you through how to bake pizza on a pizza stone using a few simple tricks.
Make-Ahead and Store for Later
If you don't want to bake pizza right away, this dough keeps perfectly in the fridge or freezer. You can easily make the dough up to a month ahead of time and store it until you're ready to turn it into pizza.
Storing in the refrigerator
Follow the recipe right up to the point where the bread maker has completed the Dough program. Brush the inside of an airtight container, such as a Cambro container, or mixing bowl with a tight-fitting lid with olive oil.
Transfer the dough to the container. Turn the dough over once so the ball is coated in oil and cover the surface of the dough with plastic wrap. This will help keep the dough fresh and prevent it from drying out. Place the lid on the bowl and place the bowl in your fridge for storage.
Stored like this, the dough will stay fresh in the refrigerator for up to 3 days.
Storing in the freezer
Since this recipe makes two 12-inch pizzas, I recommend dividing the dough in half so it's easier to pull out exactly as much as you need later.
Shape the portions into rounds on a parchment-lined baking sheet. Lightly oil the surface of the dough, then place the baking sheet in the freezer until the dough portions are frozen solid.
Wrap each portion in plastic wrap, then place in a zip-top freezer bag. Freeze for up to a month.
When ready to use, unwrap the dough, place in a lightly oiled bowl, cover loosely in plastic wrap and thaw in the refrigerator overnight.
Using stored dough
Remember: The pizza dough was stored right after it came out of the bread maker, so it still needs to go through its final rise before shaping and baking.
Before baking, take the pizza dough out of the fridge 2 hours before you want to cook with it. Since the dough is cold, it needs the extra time to come to room temperature and rise.
Remove the lid of the container (if necessary) and the plastic wrap pressed to the surface. Cover the bowl with a clean towel or fresh piece of plastic wrap and place the bowl in a warm place until the dough has doubled in size.
Serving Suggestions
For a classic pizza with tomato sauce, my family's favorite is my easy marinara pizza sauce or a simple Napoli sauce. If you prefer a white pizza sauce, give my white garlic pizza sauce a try!
With this easy pizza dough, you can make an endless combination of homemade pizzas or flatbreads, including breakfast pizza or grilled pizza. Making homemade calzones or stromboli is also an option.
You could even use this pizza dough to make homemade pizza buns or easy, buttery garlic knots! You really can use it any recipe that calls for fresh pizza dough.
Recipe FAQs
Bread flour has a higher protein content than regular all purpose flour does. If you substitute them, it may affect the rise of the dough and will produce a crust that is not quite as chewy, but it can still work. Keep an extra careful watch on the mixing phase of the bread machine; the dough may be dryer with all purpose flour and you may have to add a little more water to get the right consistency.
Yes, bread machine yeast is the same as instant yeast and can be used interchangeably in your bread maker in a 1:1 ratio.
Yes, I have used active dry yeast in place of instant yeast many times in this recipe. You can use active dry yeast interchangeably in a 1:1 ratio in this recipe. You do not need to proof the yeast first—just add it to the bread pan as noted in the recipe.
There are 2 1/4 teaspoons in a single packet of instant yeast. This recipe calls for just 2 teaspoons, so you won't want to use the entire packet. Measure out the 2 teaspoons and discard the remaining yeast. This is the greatest benefit of buying your yeast in bulk. You can always measure just what you need without wasting any leftover.
You will use the Dough setting for this recipe. If your bread maker has several options, such as Artisan Dough or Crusty Dough, skip those and just use the standard Dough setting.
The most common reason that your dough is too dry or too sticky is not properly measuring the flour. Since flour can easily compact when measured by volume (using measuring cups), I recommend weighing the flour using a food scale. This will give you the most consistent, accurate results.
Even if you weigh the flour, you may still want to watch the dough during the initial mixing cycle, as the weather can affect how hydrated your dough is. If your dough is too dry and shaggy, add about 1 teaspoon of water to bring it into a smooth ball.
The dough failing to rise is usually either because the yeast was expired or because the yeast and salt mixed together too early. Make sure to use new yeast (or store your yeast in the freezer to keep it fresh), and be sure to add the salt to the corners of the bread maker pan and the yeast to a well in the center of the flour. This will keep the salt and yeast from touching, which can kill the yeast.


📖 Recipe

Bread Machine Pizza Dough
Ingredients
- 1 cup water lukewarm
- 2 tbsp extra virgin olive oil plus extra for oiling the dough and baking
- 3 cups (411 g) bread flour
- 1 1/4 tsp kosher salt
- 1 tsp Taylor Street seasoning optional, see note
- 2 tsp instant yeast
Instructions Start Cooking
To Make the Dough
- Add the ingredients in the order they are listed to your bread machine's bread pan fitted with the paddle attachment. Add the water and olive oil, followed by the flour. Add the salt and seasoning (if using) to the corners of the pan. Use a spoon to make a shallow well in the center of the flour; place the yeast in that well.1 cup water, 2 tbsp extra virgin olive oil, 3 cups (411 g) bread flour, 1 1/4 tsp kosher salt, 1 tsp Taylor Street seasoning, 2 tsp instant yeast
- Select the Dough program and press "Start". Most machines take about an hour and a half to complete the cycle.
- When the Dough cycle is complete, brush olive oil around the inside of a large mixing bowl. Transfer the dough from the bread pan to the bowl and remove the paddle. Gently punch the dough down and turn it over in the bowl so that it is covered in the oil. Cover the bowl with plastic wrap or a clean towel.
To Use the Dough
- Place the covered bowl of dough on your stovetop or another warm spot in your kitchen and let the dough rise until doubled in volume, about 1 hour.
- Place a pizza stone on a rack in the center of your oven and preheat to 450°F for at least 30 minutes.
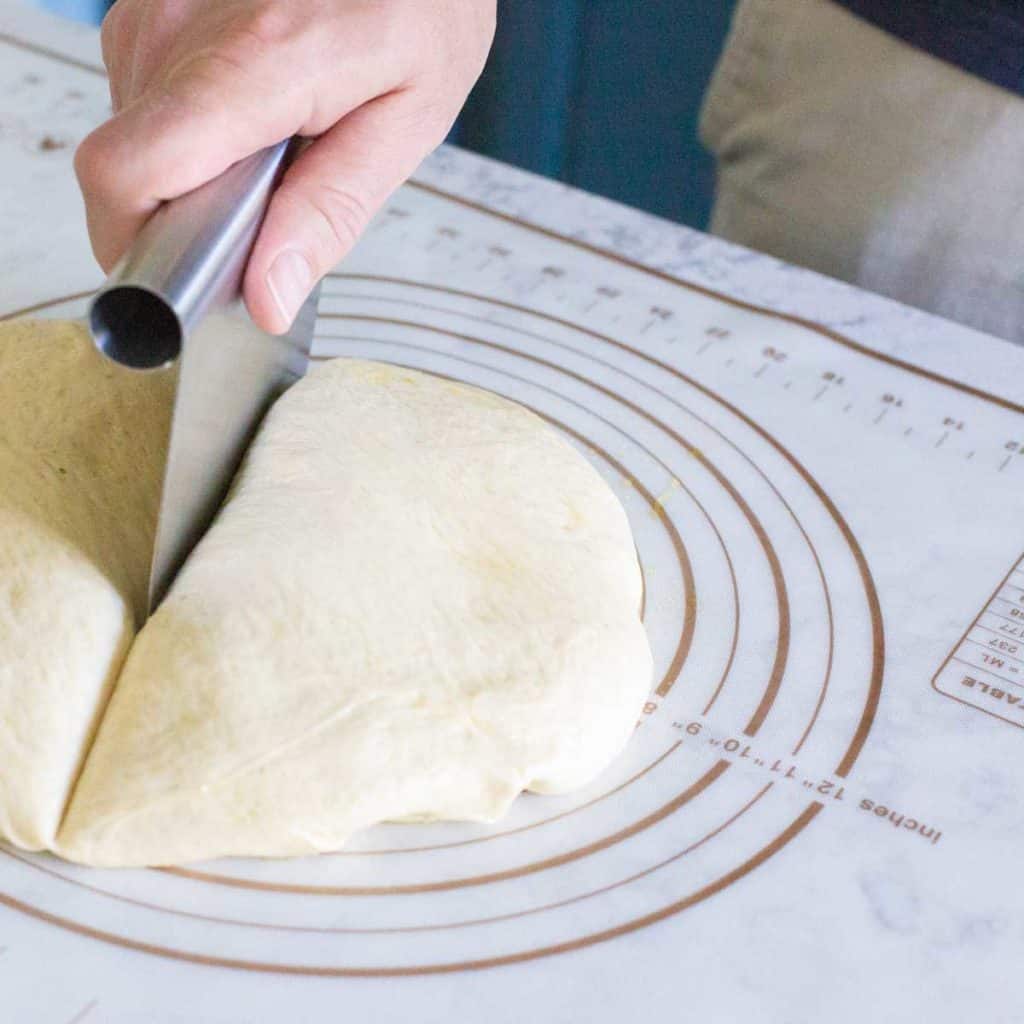
- Transfer the pizza dough to a baking mat. Do not flour the mat; you want the dough to stick a little bit so it is easier to pat into shape. Use a bench scraper or pizza wheel to divide the dough in half. Put one half back in the oiled bowl while you pat out the first crust.
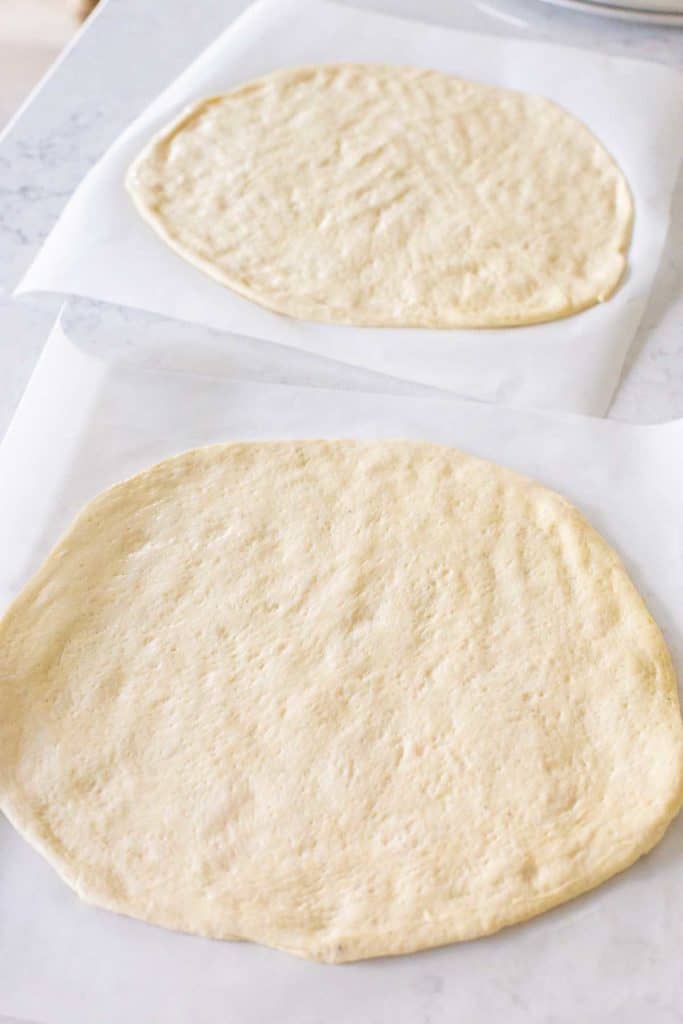
- Use your fingers to pat the dough into a 12-inch circle. If the dough insists on shrinking, let it rest for 5 to 10 minutes and try again.
- Place a piece of parchment paper over the pizza crust and smooth out the air bubbles. Roll up the baking mat, flip it, and unroll the mat so the parchment paper is now on the counter and the baking mat is on top. Peel back the baking mat — you should now have the pizza crust sitting on parchment paper.
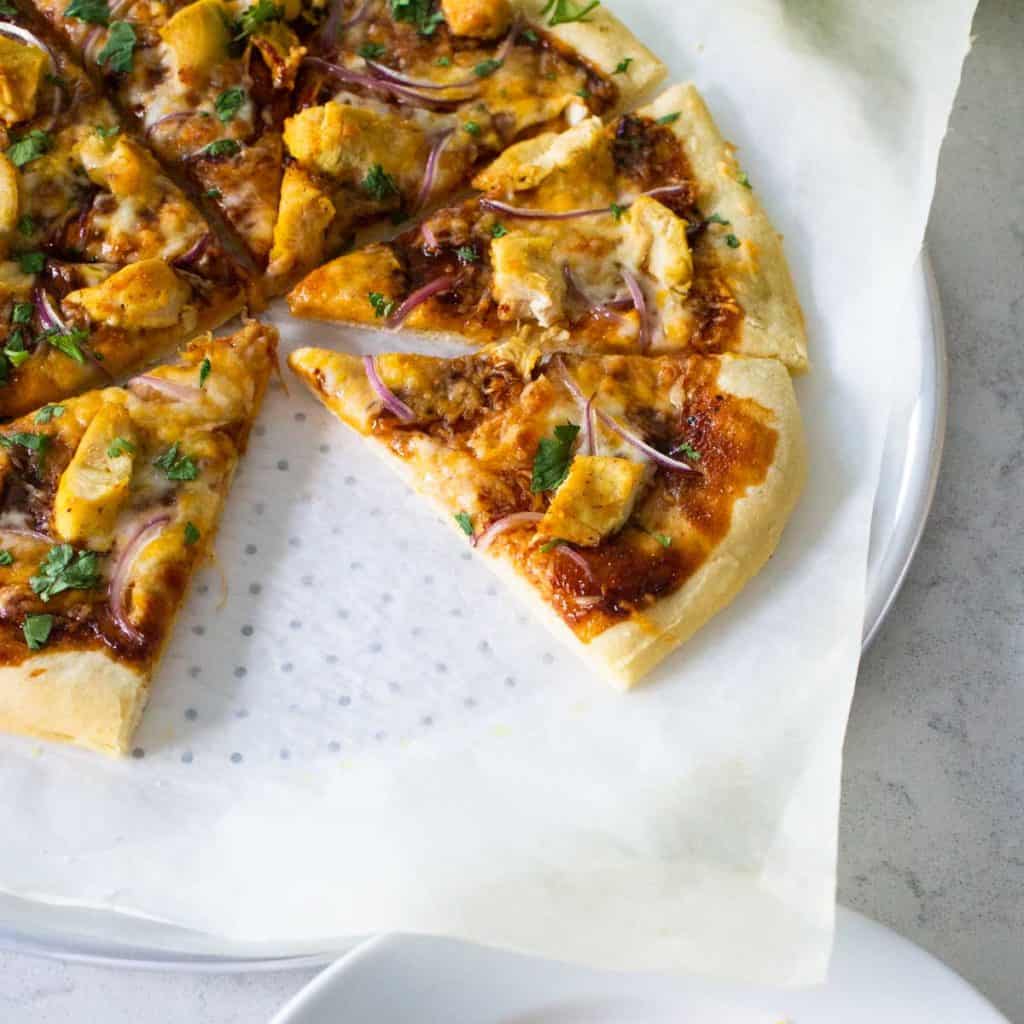
- Brush olive oil around the edges of the crust and then top with your favorite sauce and pizza toppings.
- Repeat with the second half of the dough.
To Bake the Pizza
- To get the crispiest crust, you'll want to bake the pizza on the parchment paper directly on the hot pizza stone in the oven. For a softer crust, you can place the pizza on a metal pizza pan and bake it on the hot stone.
- To get the pizza onto the hot stone without spilling, it is a good idea to slide the pizza on the parchment to a metal pan and use it as a "pizza peel" to carry it to the oven. Rest one edge of the pan on the hot stone and carefully slide the parchment off the pan and onto the stone.
- Bake the pizza for 12 to 15 minutes, or until the edges are golden brown, the cheese has melted, and the sauce and toppings are gently bubbling.
- To remove the pizza from the stone, use a metal pan and slide the parchment off the stone onto the pan.
To Store the Dough
- If you don't want to bake with the dough the same day you make it, place the dough in a lightly oiled airtight container or bowl with a lid. Press a layer of plastic wrap directly on top of the dough. Refrigerate for up to 3 days.
- Before baking, move the bowl to a warm spot in your kitchen 2 hours before you want to bake so that the dough can come to room temperature and then rise. Uncover the dough, replace with a fresh piece of plastic wrap, and allow to rise until doubled in size.
Recipe Notes
Seasoning the Dough:
- Our family loves the Taylor Street Seasoning by The Spice House which is available for ordering online. It adds a savory cheese and garlic flavor to the crust but is completely optional.
- You can substitute 1 teaspoon of any dried romano cheese blend or pizza seasoning or 1/2 teaspoon garlic salt for the Taylor Street Seasoning.
Making the dough:
- I recommend keeping an eye on the dough during the first few minutes of the Dough cycle as the bread machine does the initial mix. If the dough looks shaggy and dry and is not forming a smooth ball, sprinkle in up to 1 teaspoon of water, adding it 1/2 teaspoon at a time.
Freezing and thawing:
- Dough can be stored in the freezer for longer-term storage. Divide the dough in half and form into two rounds on a parchment-lined sheet pan. Lightly oil the surface of the dough, then place the pan in the freezer until solid. Wrap each round in plastic wrap and store in a zip-top freezer bag. Freeze for up to 1 month.
- To thaw, unwrap the dough and place in a lightly oiled bowl. Cover loosely with plastic wrap and thaw in the refrigerator overnight. Once thawed to rise & bake as directed above.
HELPFUL TOOLS

Save This Recipe to Your Recipe Box
Find this delicious recipe next time you visit by saving it to your very own recipe box on my site. All your favorites stored in one easy place!
I made this tonight using beer as the liquid and let me tell you...IT IS SOOOOO good! I wish I could post a pic of the finished product. I have now found my go to pizza crust and method of making it!❤️ Thank you so very much for this recipe!
I don’t usually take the time to comment on recipes that I try, but I must with this one. We have tried A LOT of different pizza dough recipes that don’t measure up to what we want, so we buy dough balls from our local pizzeria. After making this today, we finally have a recipe both my husband and I deem perfection! I followed your recipe exactly as written, except for brushing olive oil on the edges before baking - which I will do next time just to add a little color to the crust - and the dough was very easy to work with, and flipping the dough from dough mat to parchment paper actually worked, as well.
I did want to reiterate what you said about measuring the flour. I weighed 3 cups, by fluffing the flour and spooning it into a measuring cup, and it was well over the 411 g. So I weighed out 411 g and it worked perfectly. Thank you for sharing this recipe. We now have a go-to pizza recipe, and no more trips to the local pizza place for dough balls.
Wow! Thank you so much for your kind words, Kathy! I'm thrilled to hear you love this pizza dough as much as we do!
Best wishes,
Tiffany
That is perfect pizza dough. You are my hero. Even my husband who hates pizza loved this!
Thank you!
This was exactly what I needed to hear today https://www.peanutblossom.com/blog/bread-machine-pizza-dough/ tnx for this
Wow...thank you for this recipe! I made the dough today for the best home pizzas we've ever had. Let mine rise a bit more than you wrote (2 hours instead of 1). Also use a cast iron pizza insert for the oven that really works well. It turned out amazing! Perfect mix between thin and medium crust with just the right blend of crunch to chew. Had those big burnt looking pillow bubbles like the pizza in Italy. We enjoyed it so much! The parchment paper trick is a total game changer. Thank you!
Yay! I'm thrilled to hear your pizza night was a success. Thanks for sharing your feedback!
Returned to add that I bought the Kindle version of your book "The Ultimate Bread Machine Cookbook" from Amazon based on this recipe and a few of your others that I've tried. Some really good tips and recipes there. Was definitely worth the purchase. Thank you for the delicious inspiration!
Oh my goodness, thank you so much for your comment Alan. You have no idea how much that means to me. I'm thrilled you enjoyed the cookbook and I hope you have plenty of tasty breads coming to your table soon.
Tiffany
I'll admit, I'm a bit new at this so please bare with me. I find it so confusing reading recipes that tell how much flour to use, in cups and grams. You say to use 3 cups, (411 grams), that would be 137 grams per cup. Most all bags of flour I've seen show that they are about 120 grams per cup. Also, see this web site on how to measure flour (King Arthur APF brand is shown but their bread flour shows the same weight - 30g per cup shown on bag):
https://www.webstaurantstore.com/blog/4372/how-to-measure-flour.html
So when I think of attempting to use your recipe, I'm left with a dilemma. Do I use 3 cups (360g) or your 411 grams?
Hello Alex, I'm just seeing this recipe, so excuse the late response. Firstly, I would use a dry (not liquid pyrex, etc...) measuring cup. Many people stick a dry measuring cup/scoop in the bag. Sadly, this is not effective and leads to issues re: bread density/rise due to inconsistent amounts of flour (often too much because of compaction).
Easy solution... grab a plate and place your measuring cup on it. Spoon in the flour until mound forms. Do not pat down... instead shake cup side-to-side and backward-to-forward until level. The excess flour will fall onto plate. You can then pour excess flour back into bag (after measuring all cups, of course).
I hope this helps. I make loads of fresh bread and the above technique never fails me. Years ago, I used the measuring cup in the bag option because it seemed simple.... dragging cup along inside of the bag and seemed perfect, until I realized that cup was really ~1.25 cups +/- and causing breads to fall short. No sense in wasting ingredients.
Tiffany, awesome recipe, thanks!
Do you have instructions for a mixer vs bread machine?
Tried this for the 1st time today and it was perfect!!! We've used the store bought pouch dough in the past and I'll never buy it again after doing this! Easy and the taste can't be beat. Next up is making and freezing the dough. Thanks for sharing your recipe. I wish I could post a photo of my pizza. 😉
Made just as the recipe instructed minus the seasoning mix which I didn’t have. Made three huge calzones. Dough got nice and crusty on the outside and soft on the inside. Super easy to make. Saved in my “best of” board so it will now be my go to. I’m adding pizza to my menu fir next week just to make this dough again. Thank you for sharing
Tried your bread machine pizza dough, it came out fantastic, in fact my family thinks it is better than pizza from Italian restaurant. Can you freeze the dough? I am making a few more batches of dough, to put away for next week.
I was thinking the same thing. Can it be frozen?