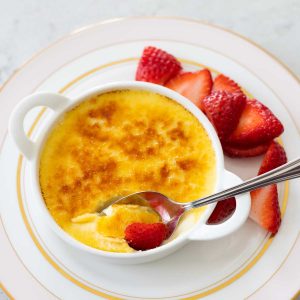
Grand Marnier Creme Brulee

This vanilla bean creme brulee (or crème brûlée if you're feeling fancy) has an amazing secret ingredient: Grand Marnier liqueur. Learn how to make the best creme brulee you've ever had right in a standard home kitchen.

When I spot creme brulee on any restaurant dessert menu, I know exactly what I'm ordering.
I love this simple French dessert with its sweet vanilla bean custard topped with a crispy caramelized sugar topping.
But did you know you can make this elegant dessert right at home in a basic kitchen?? You don't even need any especially difficult tools.
The only thing you really need to learn is a few very specific tricks to the method.
The best part is that you can make the vanilla bean creme brulee custard in advance and then just let your friends and family torch their own sugar topping when you serve it.
Editor's Note: This recipe was originally published September 1, 2010 and has been completely updated with new photos and instructions.
Jump to:
- Why This is the Best Recipe
- Tools You Need
- Ingredients
- How to Make the Creme Brulee Custard
- Prepare the Eggs
- Prep the Vanilla Bean
- Scald the Heavy Cream
- Temper the Eggs
- Troubleshooting Tips
- Flavor the Custard
- Prepare the Ramekins and Water Bath
- Bake the Custard
- Torch the Creme Brulee Topping
- Make Ahead Tips
- Serving Suggestions
- More French Desserts
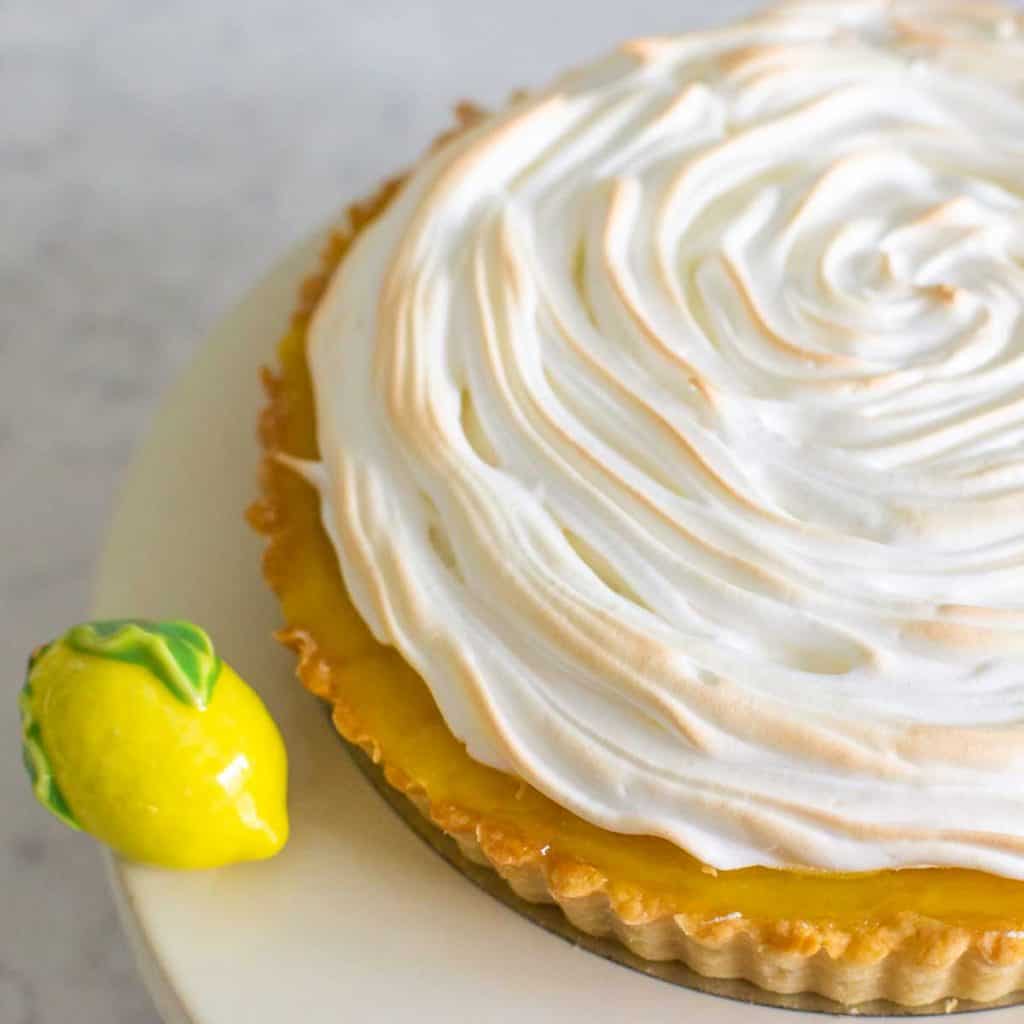
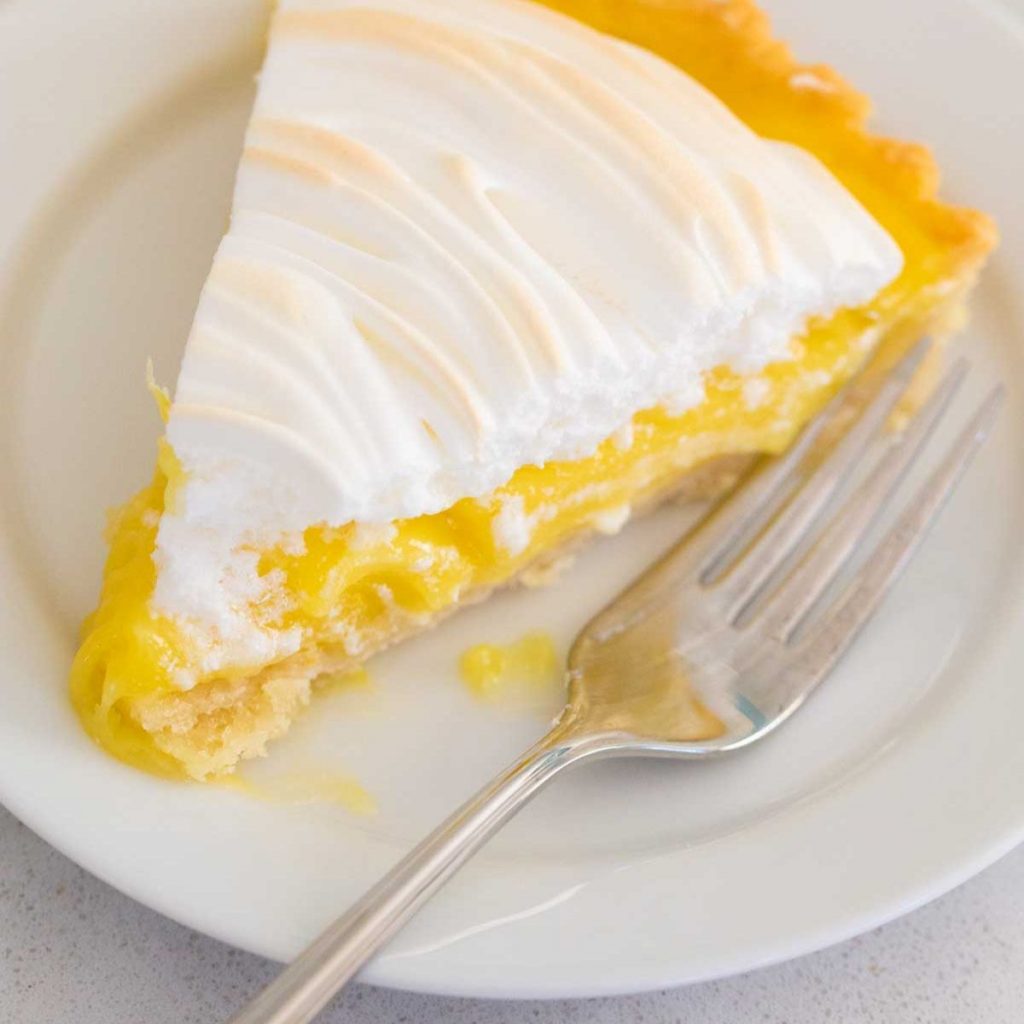
- Lemon Meringue Tart
- Make-Ahead Lemon Curd
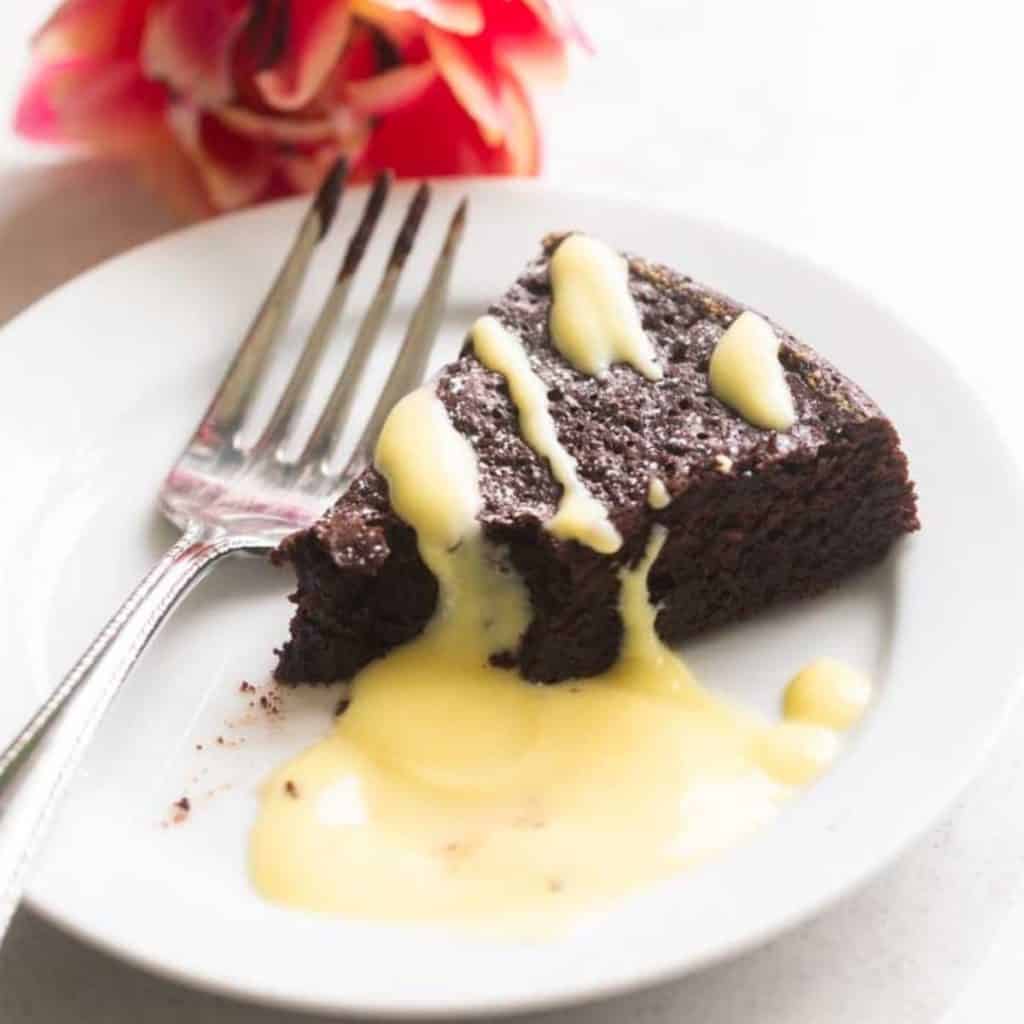
- Rich Chocolate Flourless Torte
- Creme Anglaise Vanilla Sauce
- 📖 Recipe
- 💬 Comments
Why This is the Best Recipe
Party guests are always wowed by my vanilla bean creme brulee dessert. It looks so crazy fancy and difficult, but it is shockingly easy to make.
I once served it as a book club party treat and my friends were blown away.
This is the best recipe because:
- Specific Instructions for Success: Follow my simple tricks and you're on your way to perfect baked custards.
- Specific Supply List: You don't need anything especially fancy, but I'm sharing exactly the tools I make so you can replicate this at your home, too.
- Delicate Vanilla Bean Custard: The base of the Crème Brûlée is so light and sweet. It's the perfect dessert when you don't want something too heavy.
- Crispy Caramelized Sugar Topping: This is the detail that really wows your dinner guests. It is such a fun party trick to let your friends toast their own desserts.
- Delicious "Secret Ingredient": The TOP reason this is the best recipe is the addition of orange flavored liqueur. It doesn't make the Crème Brûlée taste orange-y, but it gives it an amazing brightness that keeps it from being too rich.
Tools You Need
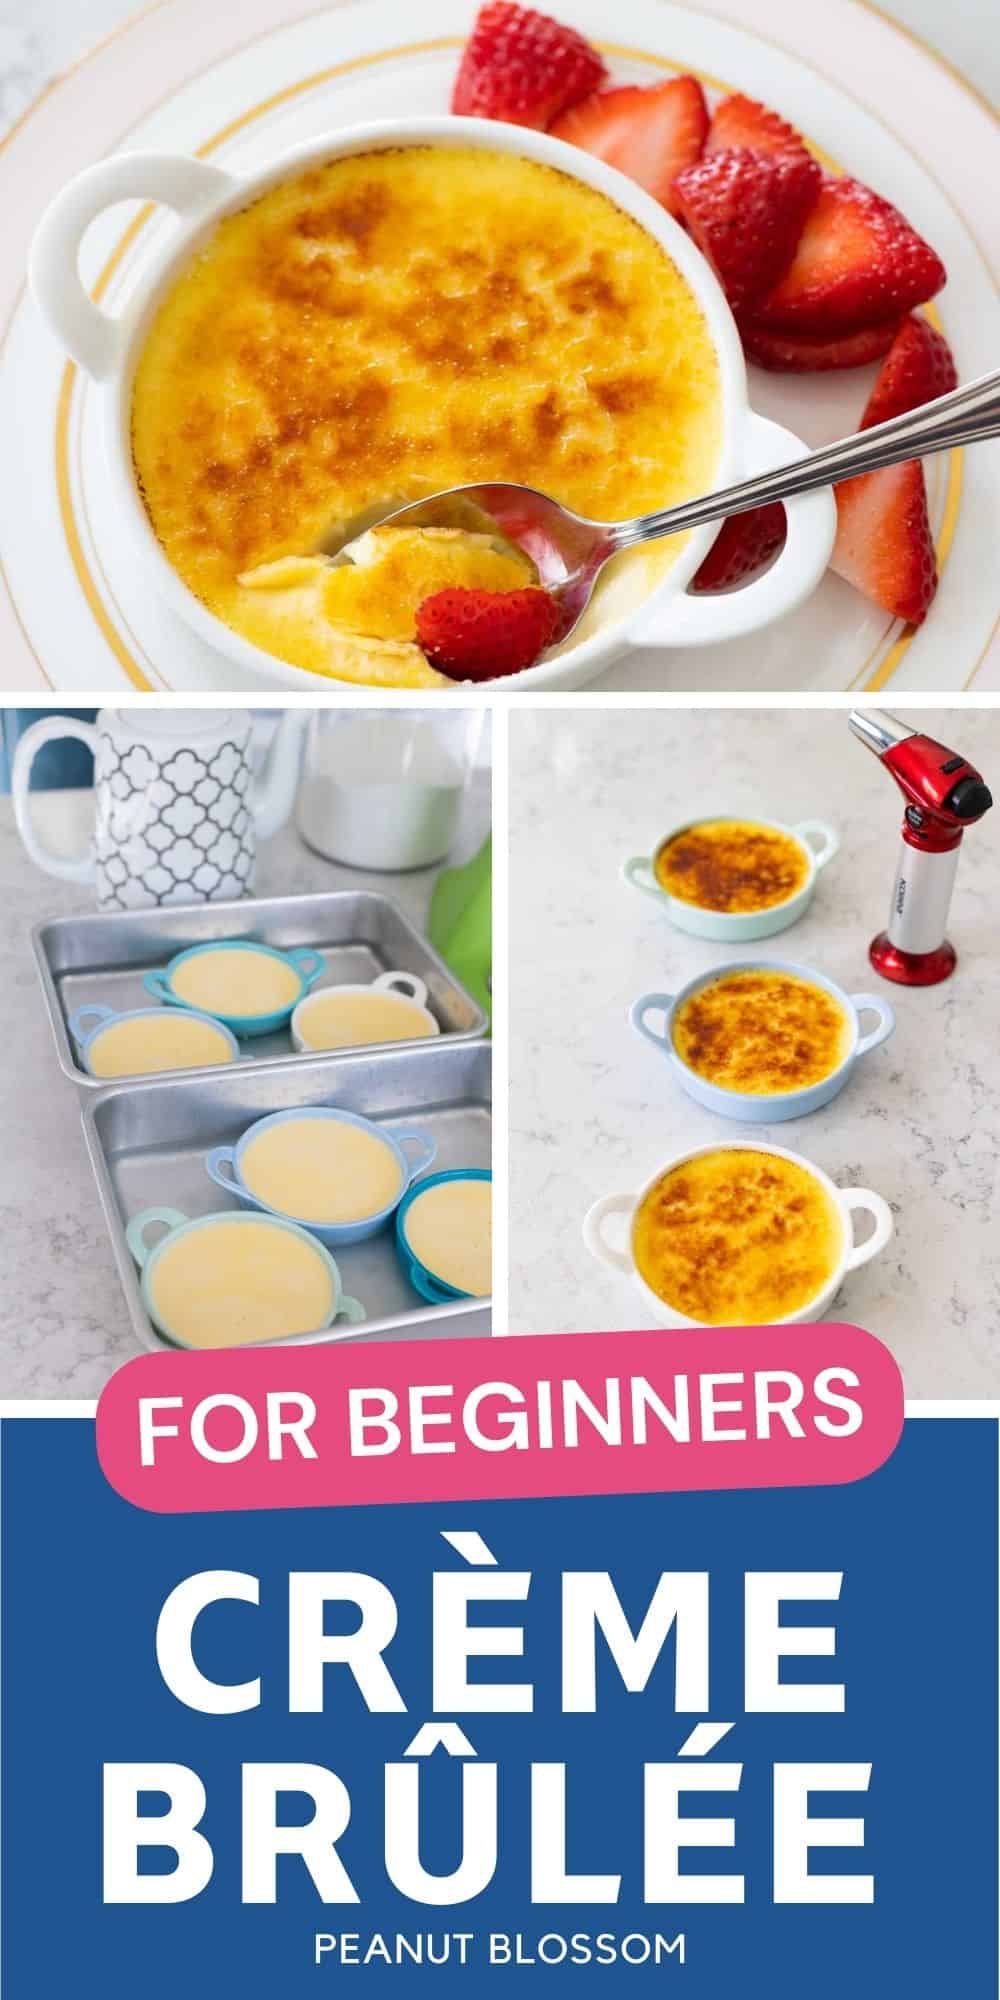
To get picture-perfect crème brûlée tops, you'll be baking the custards in a water bath in the oven.
To set up the perfect environment for baking the custards, I simply use regular baking items I already have in my kitchen:
- 2 (9 x 13-inch) Baking Pans: These metal baking pans are the most-used baking pans in my kitchen. They are super versatile for baking sheet cakes, brownies, cinnamon rolls and so much more. They also happen to make the perfect base for a water bath.
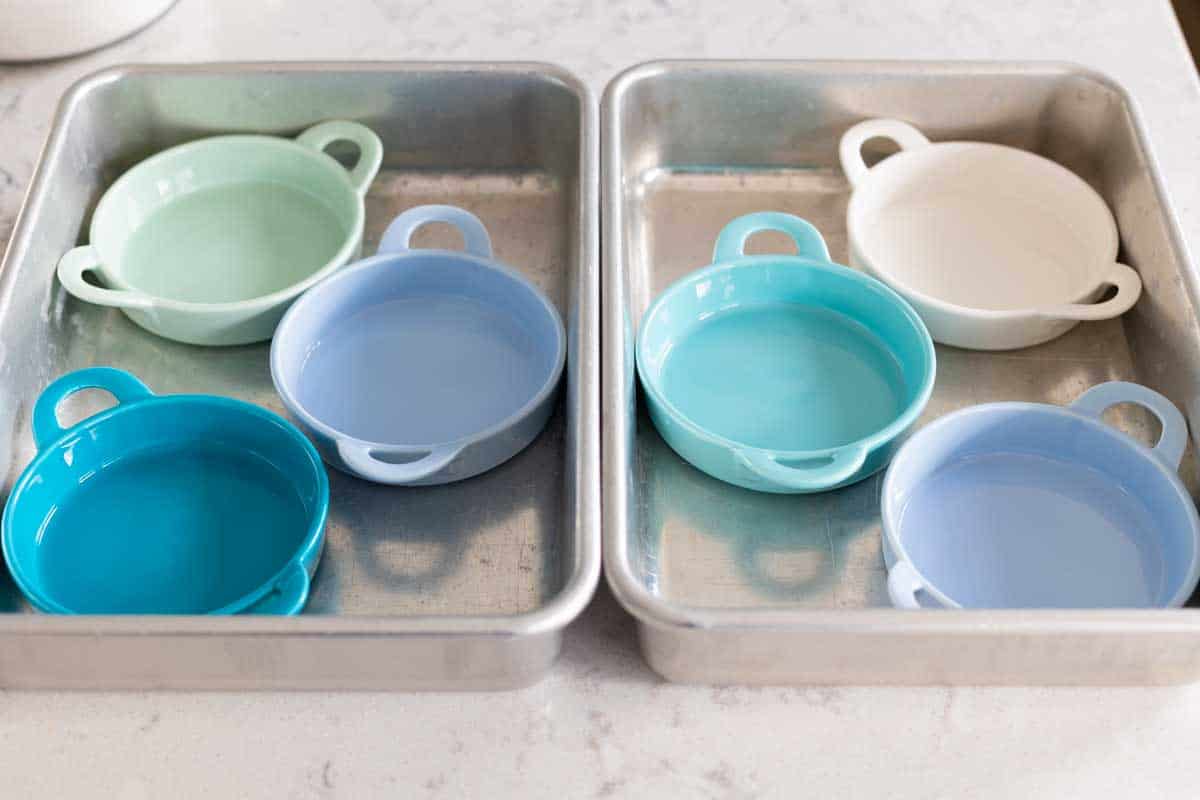
- Custard Ramekins: These individual porcelain baking cups come in a variety of shapes and sizes, but for the perfect ratio of custard to crispy sugar topping, this specific set is my personal favorite. The custards bake up wide and thin so you get just the right amount of cream to crispy topping in every bite.
- A Kitchen Torch: This is the most-fun kitchen tool you'll ever buy. Use it to gently caramelize the sugar topping and your dessert gets an amazing toasted marshmallow flavor on top!
If you already have these items at home, you'll just want to arrange your ramekins in your baking pans BEFORE YOU START to make sure they fit and lay perfectly flat on the bottom of the pan.
Ingredients
This elegant dessert is always such a surprise because you actually need so few things to make it!!
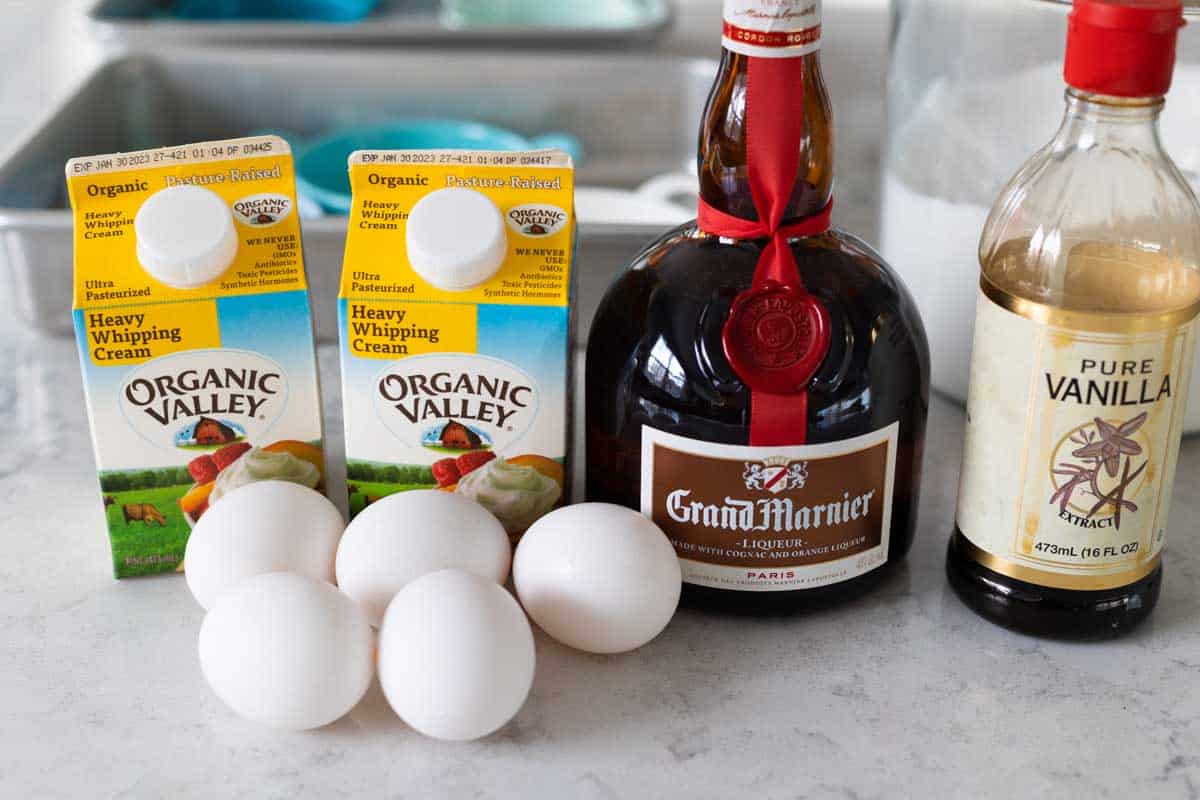
- Heavy Whipping Cream: Buy the best quality you can afford.
- Eggs
- Sugar
- Vanilla Extract and a Vanilla Bean: If the vanilla bean isn't in your budget, just use additional extract to flavor the custard. I love using the bean because I love to see those vanilla bean flecks in the custard.
- Grand Marnier: This orange-flavored liqueur is the secret ingredient that makes this recipe the best. You only need a tablespoon, so you don't need to buy a large bottle. It is worth the splurge to get one of the tiny single-serving bottles from the store. Or go ahead and get the big bottle because you could always use it to make these delicious pineapple mimosas for brunch.
How to Make the Creme Brulee Custard
The first step to making the vanilla bean creme brulee is to bake the vanilla custards.
Preheat your oven to 300°F.
Prepare the Eggs
Place one whole egg in the bowl of a stand mixer fitted with the paddle attachment.
Then separate 4 more eggs and just add the yolks to the bowl.
NOTE: Save those egg whites!! With egg prices being what they are right now, you don't want to waste one bit of egg.
You can freeze the egg whites for using later, maybe to make my lemon meringue tart.
Or, turn them into my easy Swiss meringue buttercream frosting now. The recipe freezes well so you can prep it now and use it for a cake later.
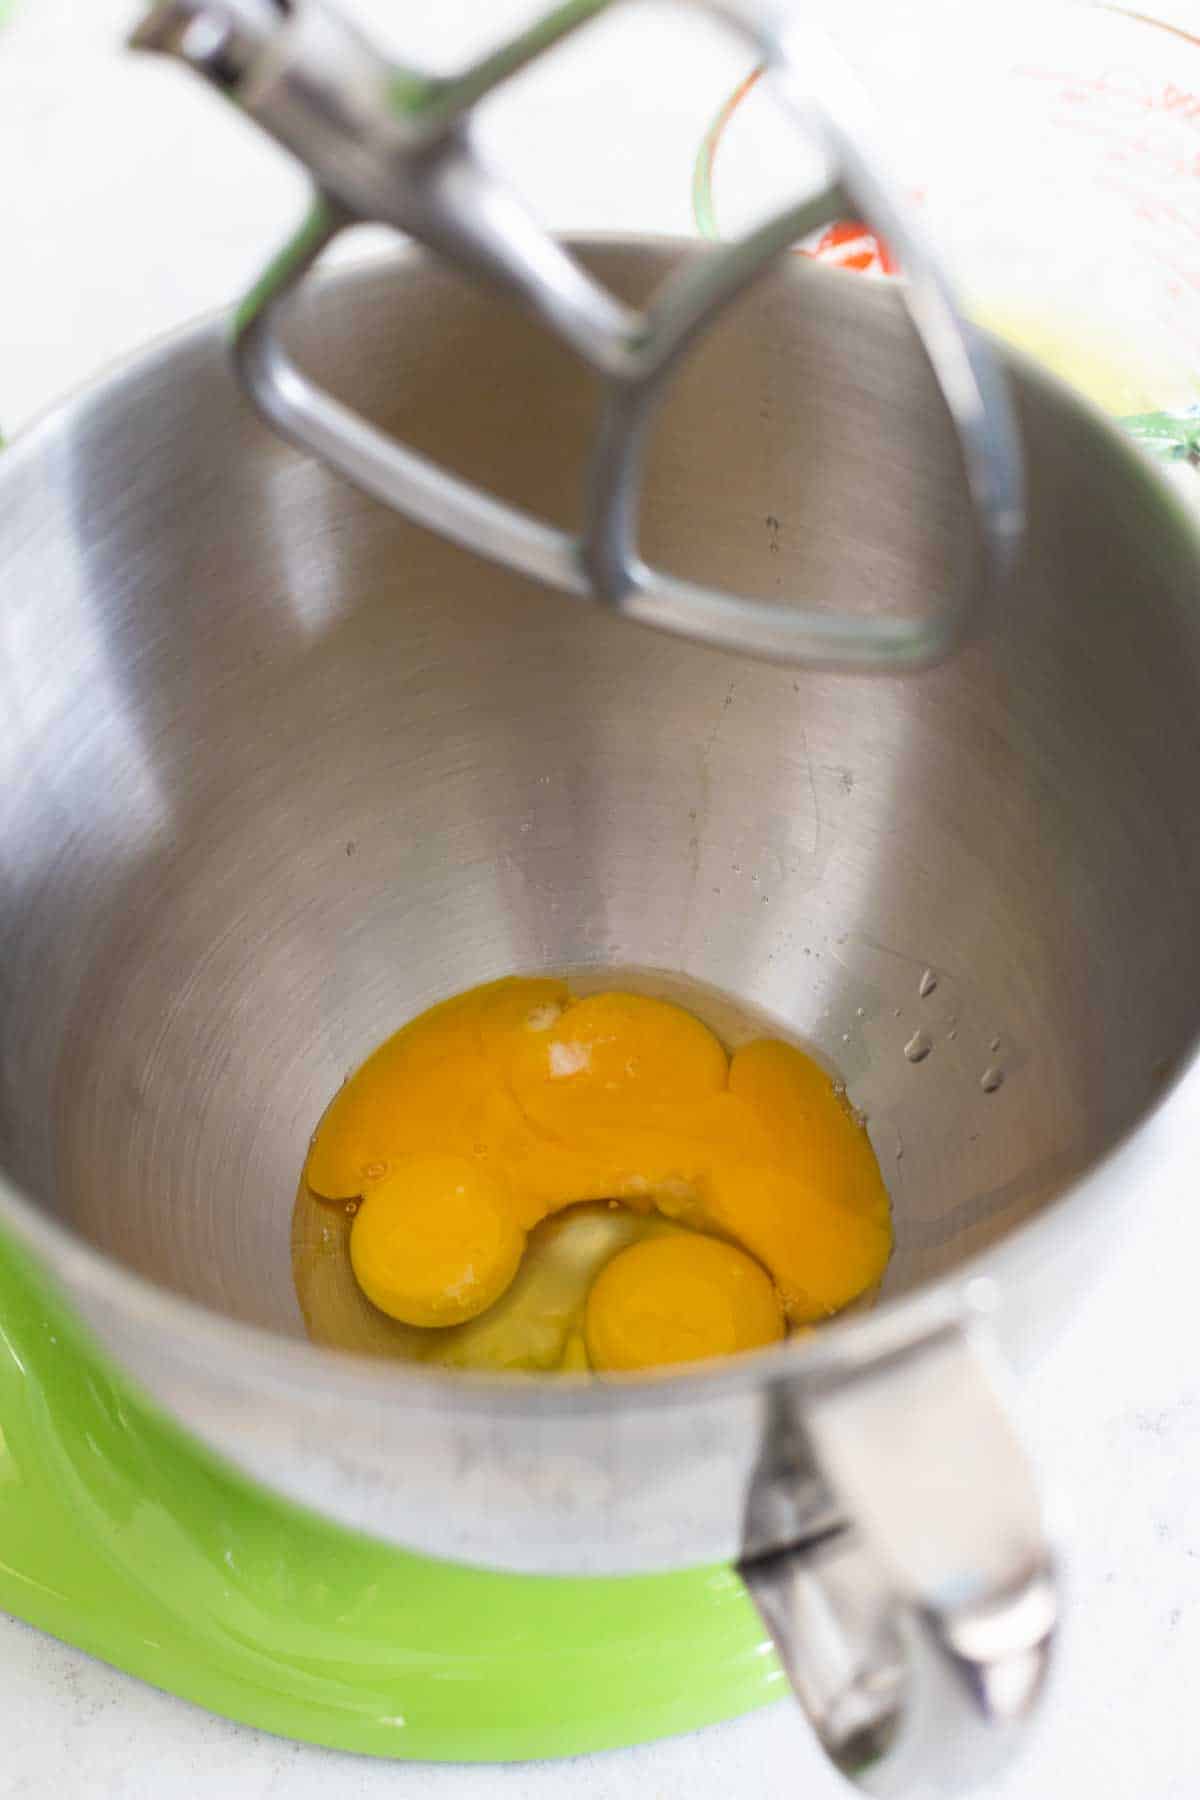
Add the sugar to the mixer and beat the eggs on low speed until the sugar is just incorporated.
Prep the Vanilla Bean
If you're using a vanilla bean in this recipe, at this point you'll want to slice it in half lengthwise and scrape out the tiny black vanilla bean seeds with the back of your knife like this:
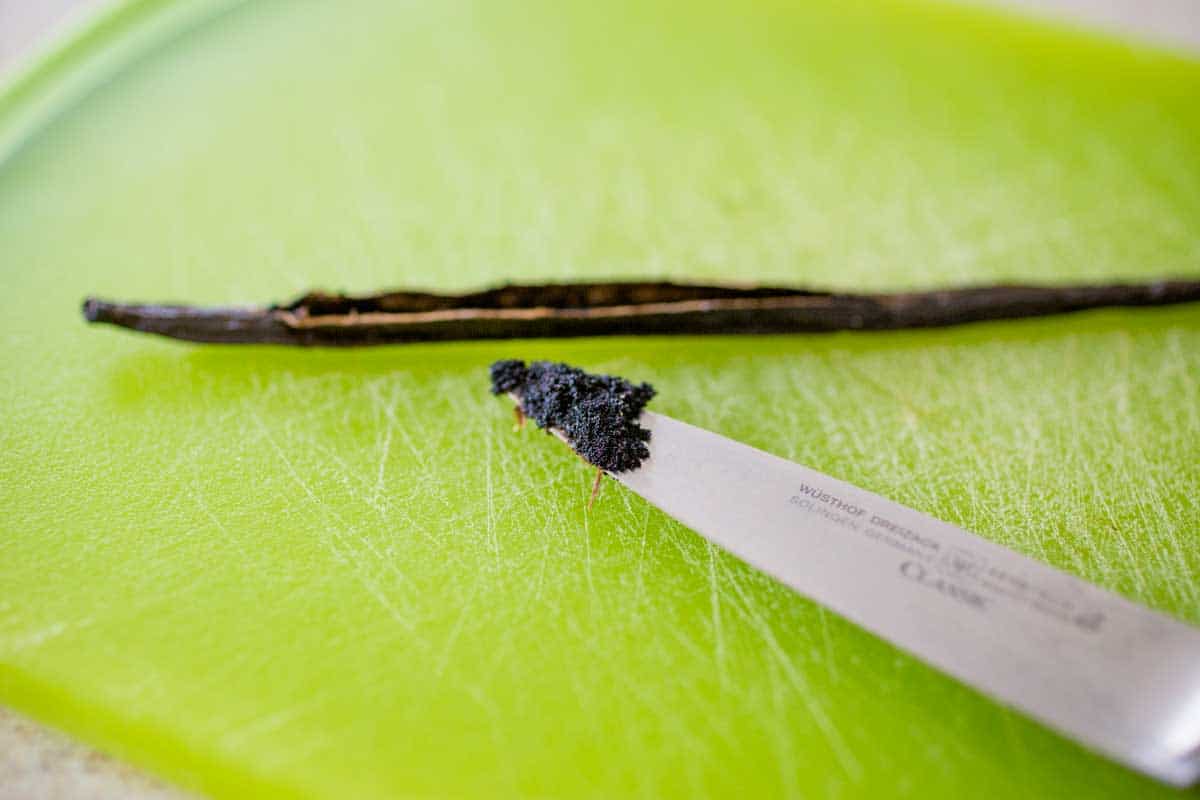
Add the seeds AND the pod to the heavy cream before you scald it.
Scald the Heavy Cream
Don't panic at the sound of this, to "scald the cream," you're just going to heat the heavy cream until it has almost boiled but hasn't bubbled. Easy peasy.
Pour the cream into a heavy bottomed sauce pan and heat over medium-high.
Stir it with a spatula the entire time so it doesn't burn on the bottom.
When the steam starts rolling off the cream and you can hear just the faintest start of a bubble boil at the bottom of the pan, pull the cream from the heat.
If you used a vanilla bean, now is the time to remove the pod and discard it.
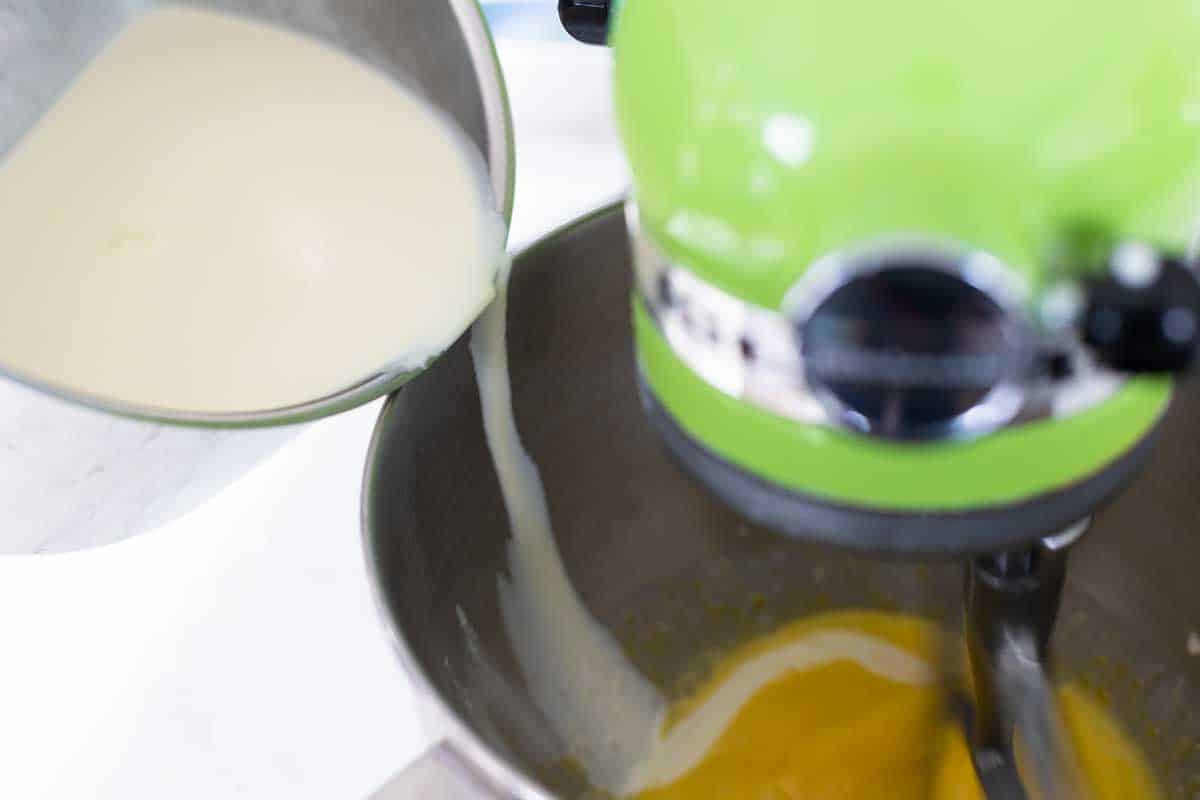
Temper the Eggs
If you just dump the hot scalded cream into the eggs at this point, they will scramble and cook.
In order to balance the custard, follow this specific trick:
- Turn the Mixer on Low: Keep that paddle moving in the eggs before you even start to add the cream.
- Drizzle the Cream SLOWLY: Drizzle the hot cream down the INSIDE side of the mixing bowl at a very slow trickle. This lets the eggs slowly warm up to the temperature of the hot cream without actually cooking, a method called "tempering eggs."
Troubleshooting Tips
If you've never tempered eggs before, don't be discouraged if you find bits of scrambled egg floating in your cream.
My mixer has a few trouble areas where it refuses to mix and I had some in my cream, too.
Thankfully, they usually cling to the bottom of the bowl and can be avoided when filling the ramekins.
However, you can also strain the cream through a fine mesh strainer over a clean bowl to remove any solids that may have built up.
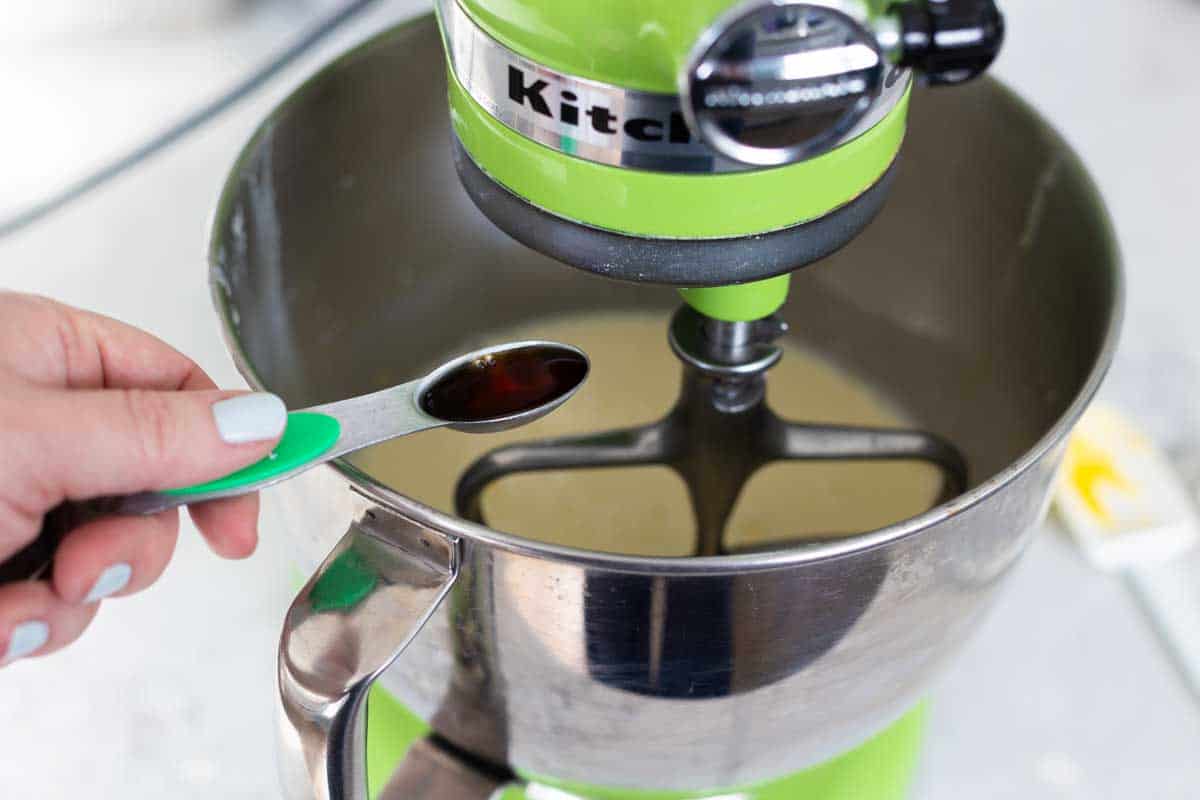
Flavor the Custard
Once the heavy cream has been completely stirred in, you can take a deep breath. The worst is over.
Add the vanilla extract and Grand Marnier to the custard and stir it in.
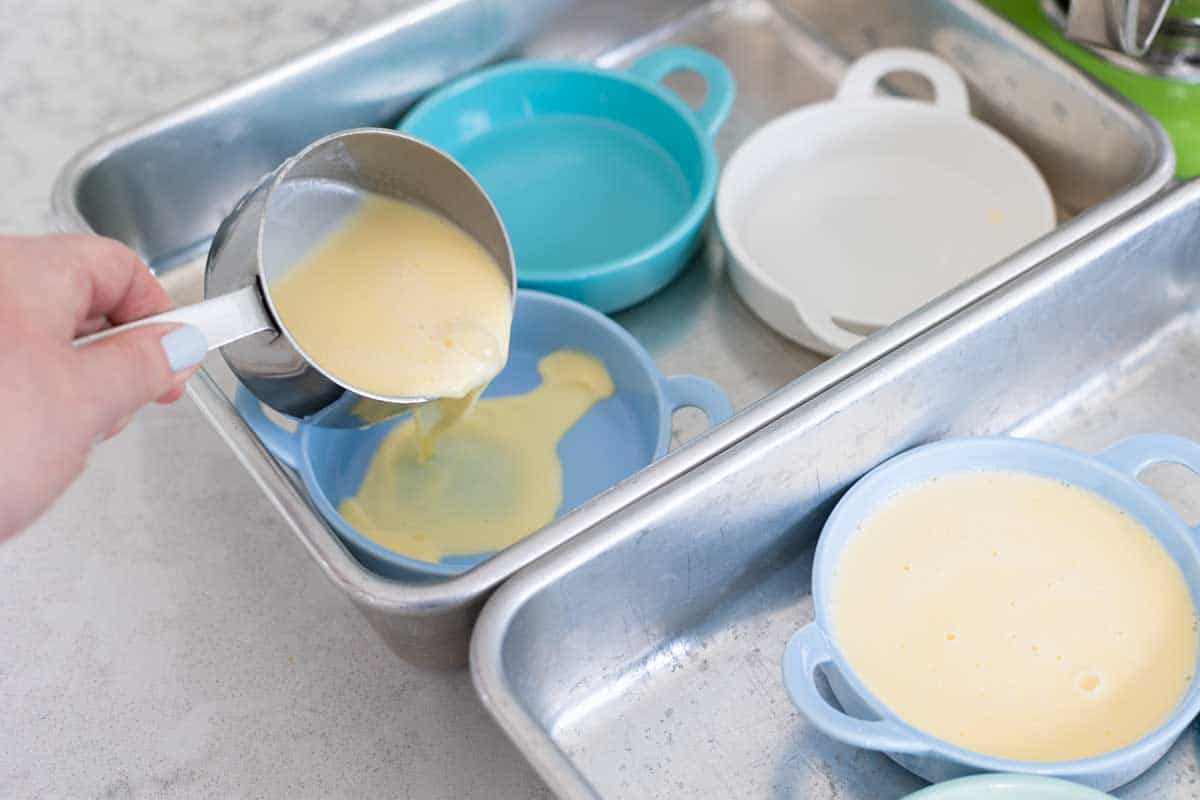
Prepare the Ramekins and Water Bath
Pour the vanilla bean custard into the prepared ramekins in your baking pans.
To keep things neat and tidy, I used a measuring cup to scoop the liquid and pour it into the cups rather than just trying to pour directly from the mixing bowl.
I didn't actually "measure" the cream as I ladled it in, the smaller cup was just easier to use.
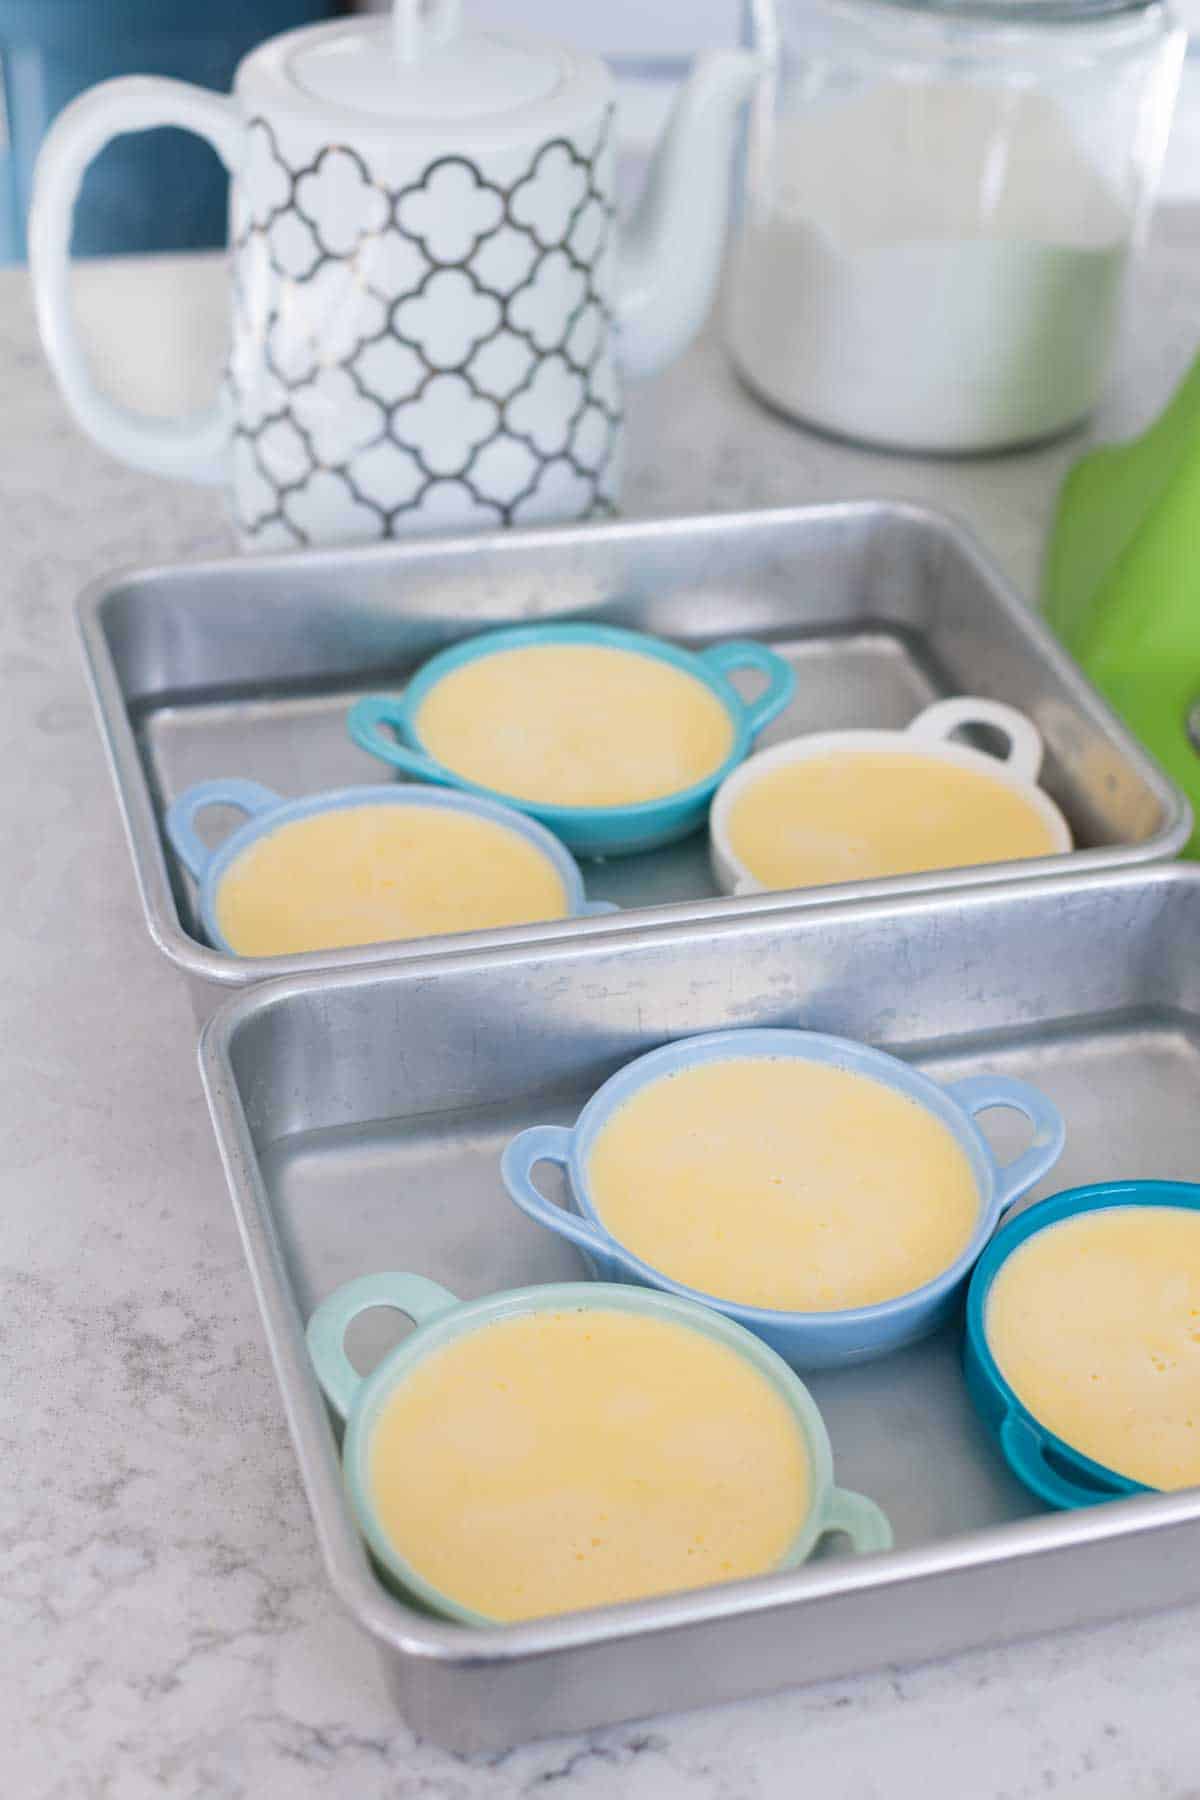
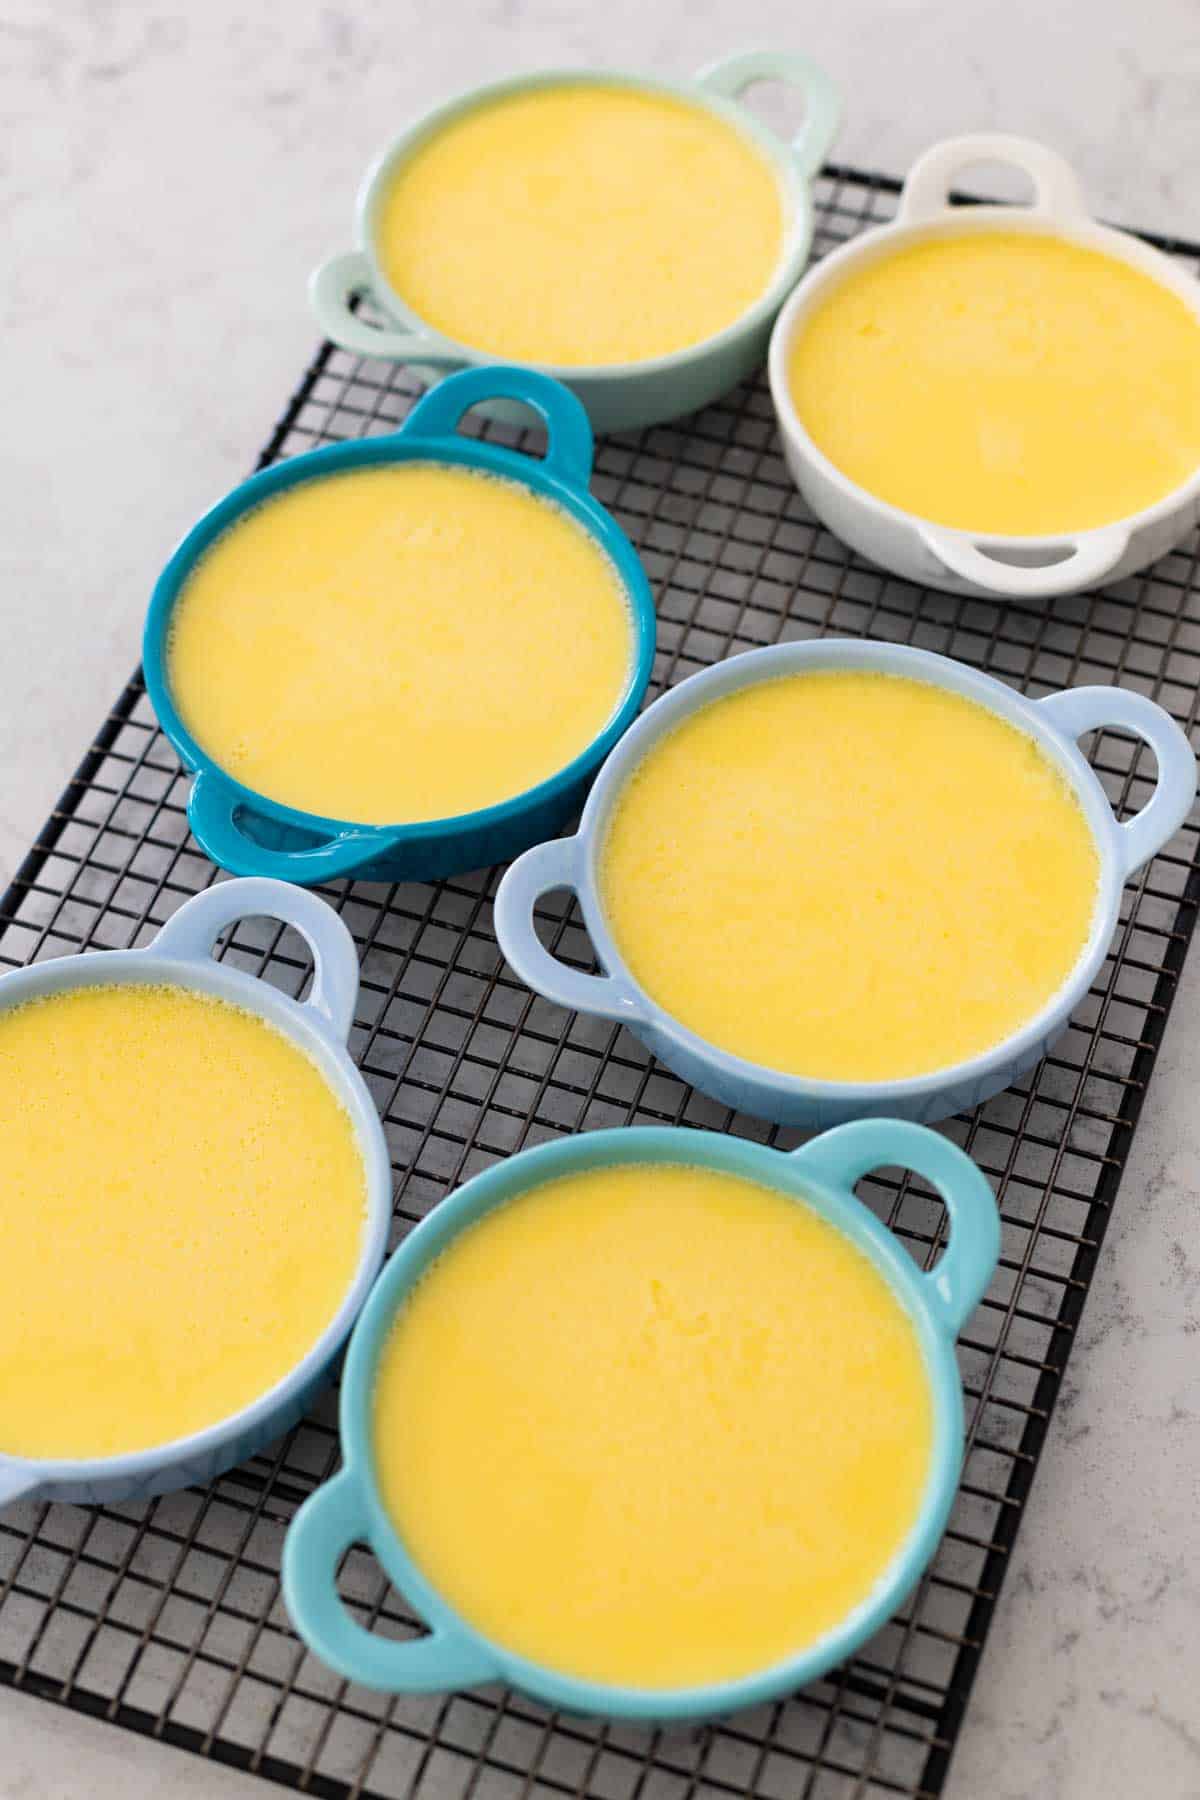
Fill the ramekins evenly. This recipe will fill six of these ramekins perfectly.
To finish assembling the water bath, I used my favorite electric kettle to boil water and drizzle it carefully into the pans.
The kettle spout helps prevent the water from splashing into the custards.
You want to pour the water into the baking pan, NOT into the ramekins.
The water should come up to half the height of the ramekins.
Bake the Custard
As soon as the hot water has been added to the pans, it is time to bake the custards.
Place the two baking pans side by side in the oven and bake for 30 minutes.
If you used different shaped ramekins that are deeper, you may need additional time.
The custards are done when they just barely jiggle when you gently shake the baking pans.
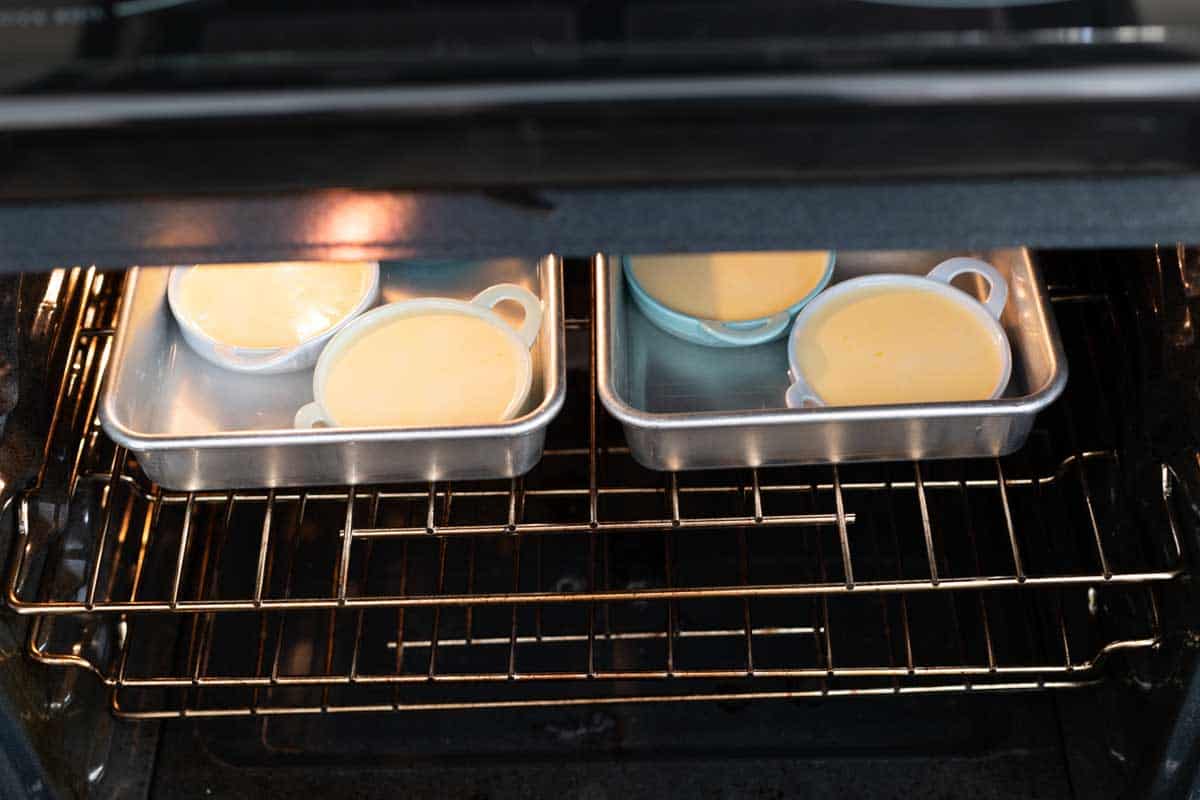
Remove the custards from the water bath and cool them to room temperature.
At this point, you can store them in the fridge for up to 24 hours. This makes such a great make-ahead dessert!
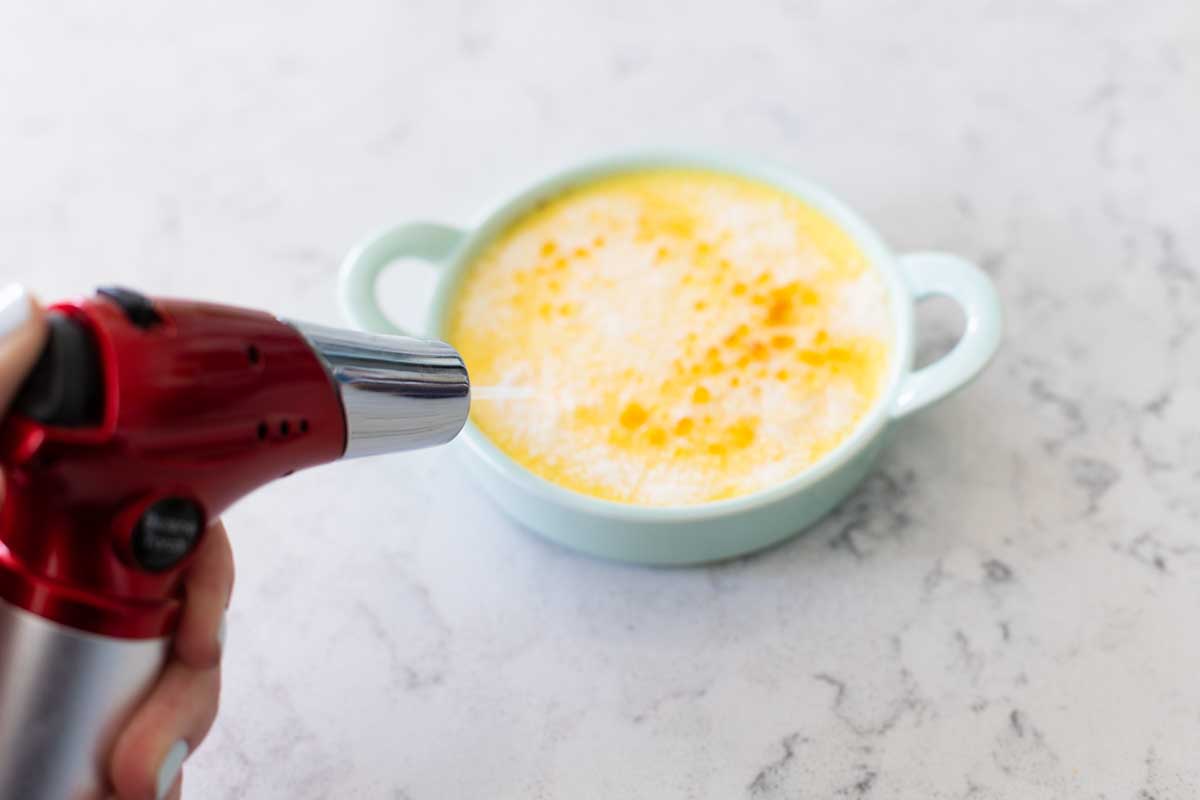
Torch the Creme Brulee Topping
The final step in making this jaw-dropping dessert is to prepare the caramelized sugar topping.
Your vanilla bean custards should be chilling in the fridge and nice and cold.
Gather your kitchen torch, sugar, and a spoon to finish it off.
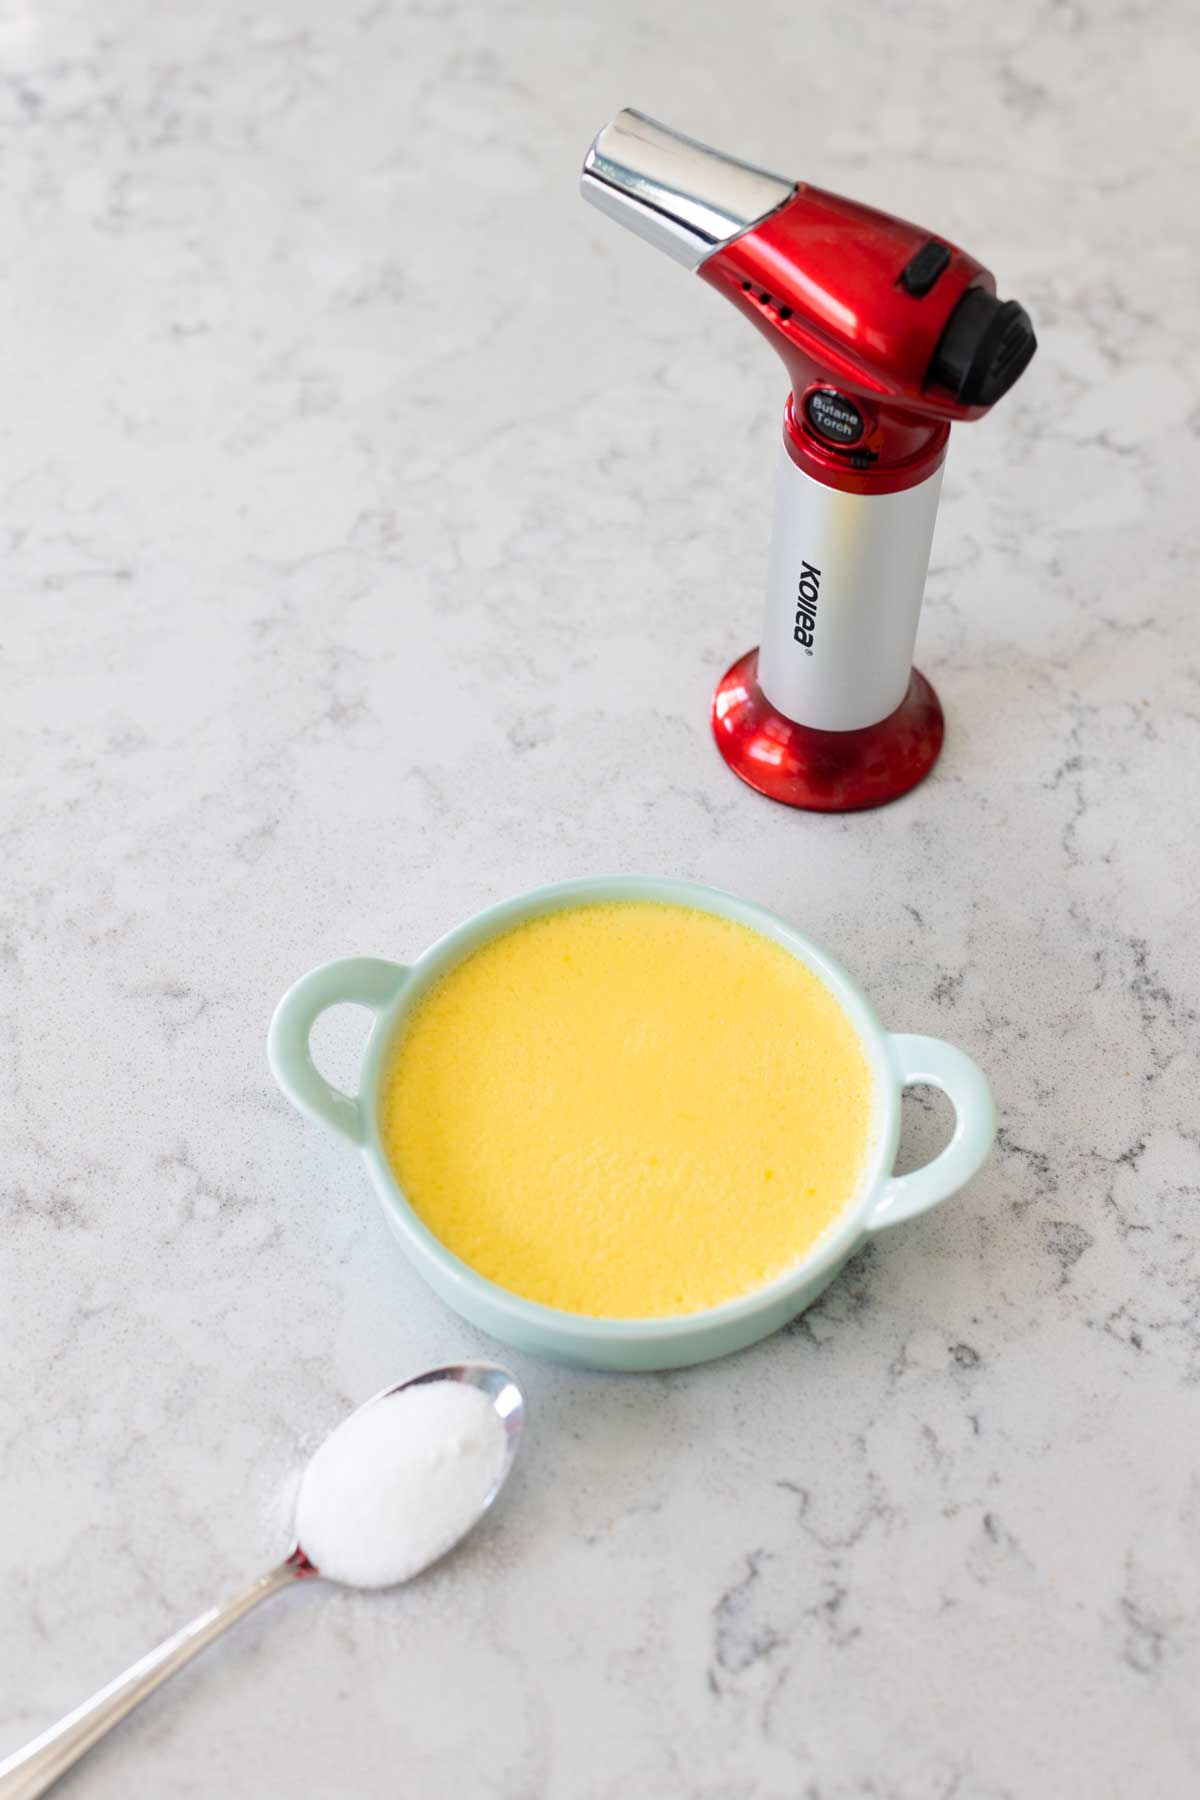
Spoon sugar over the top of each custard.
Smooth it evenly over the top by gently scraping with the back of your spoon:
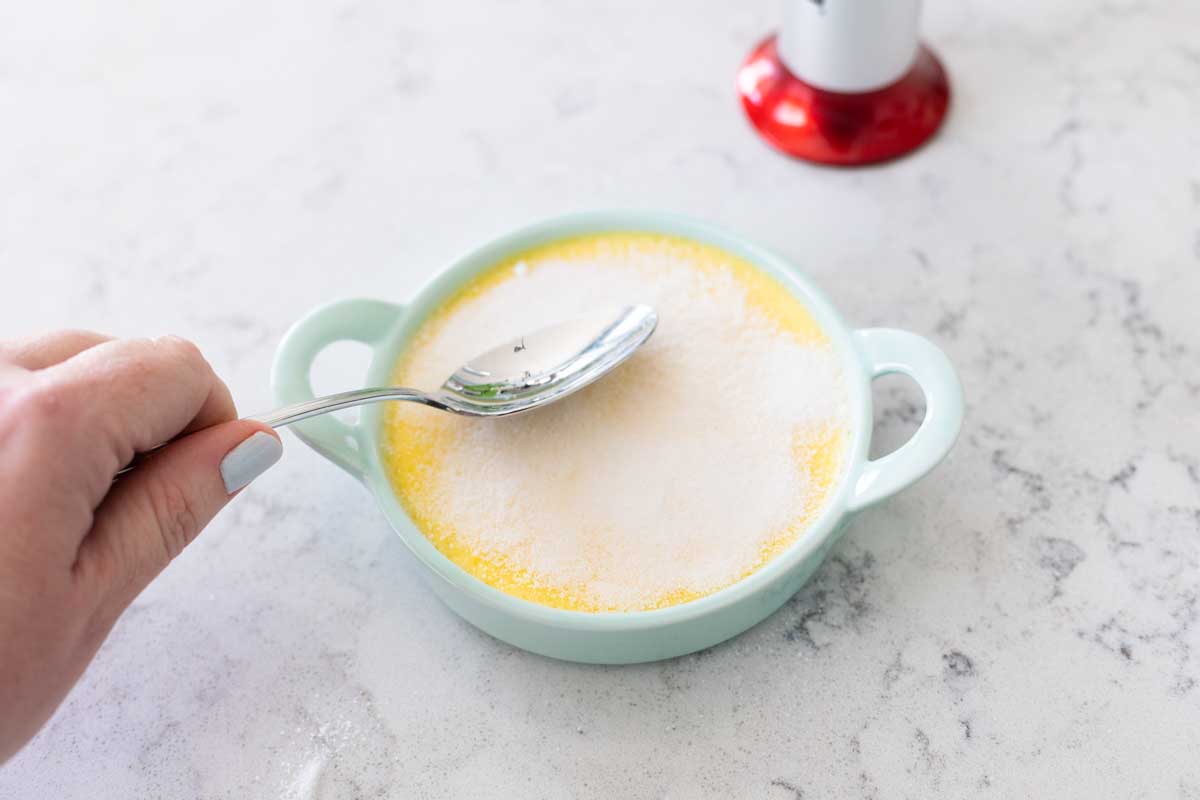
Turn on your kitchen torch and gently blow the flame back and forth over the sugar until it comes to a heated bubble/boil and starts to brown.
Be careful!! The sugar will burn quickly, remove the heat from the area as soon as it starts to darken, it will continue to burn for a moment more even after you remove the flame.
I like to work in patches over the top until the entire surface has been caramelized.
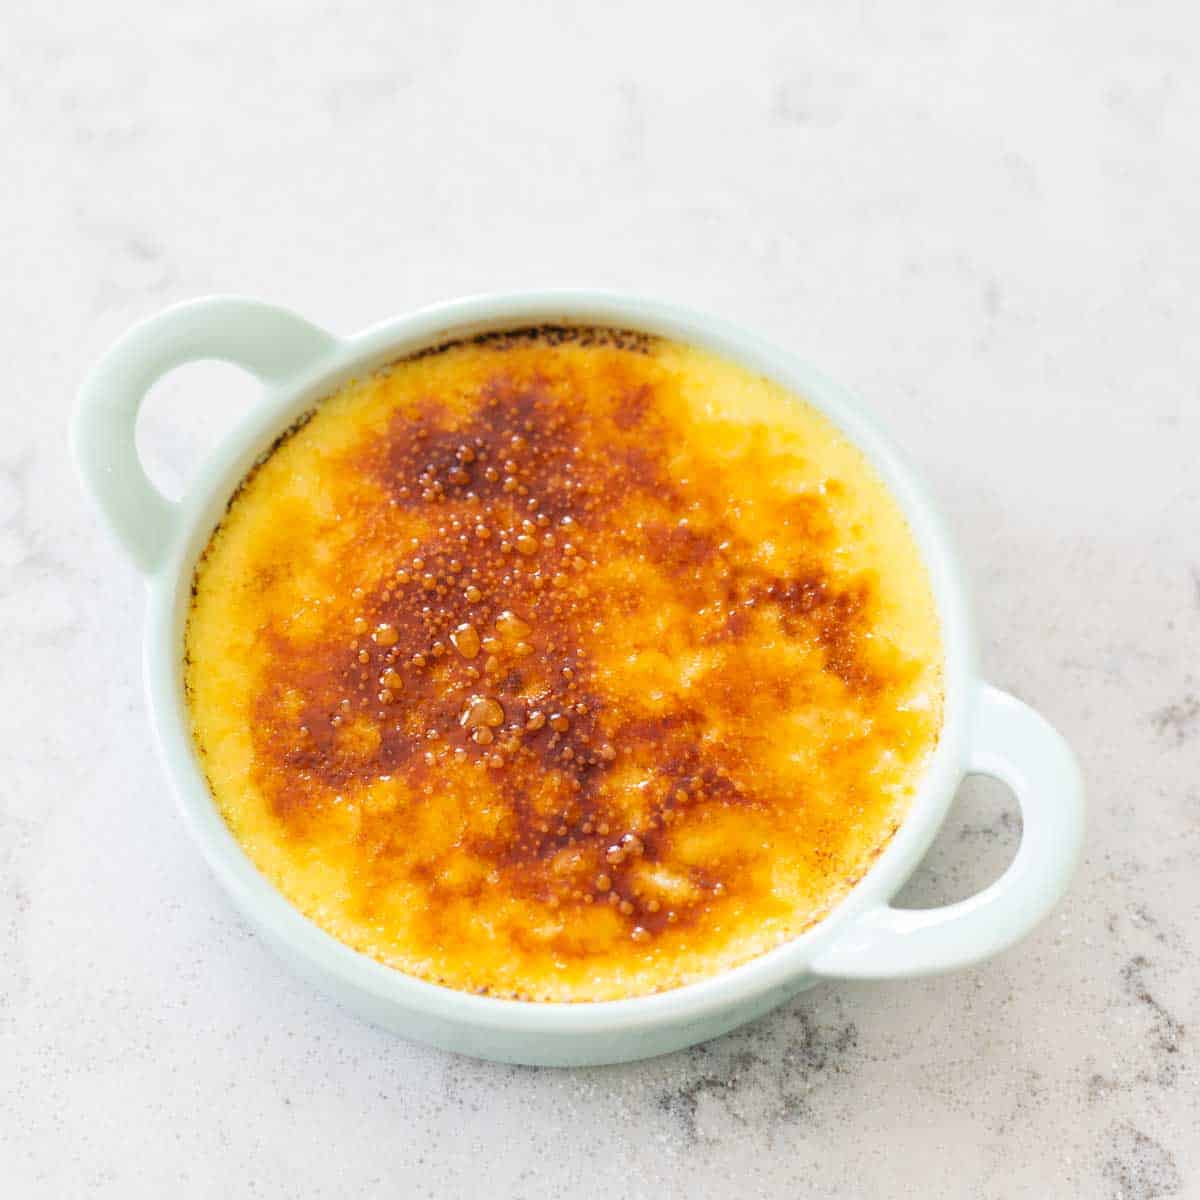
This is what the finished topping should look like.
Notice how the surface has delicious crispy bubbles? The golden brown color isn't perfectly even and that's ok. Some of it depends on how thick the sugar was in some areas.
Make Ahead Tips
You can easily prepare the vanilla bean custards up to 24 hours in advance and simply keep them in the fridge until just before serving.
DO NOT finish the torched sugar topping before refrigerating, the topping will not stay crispy and will be a watery mess by the next day.
ALWAYS torch the sugar just before serving.
Serving Suggestions
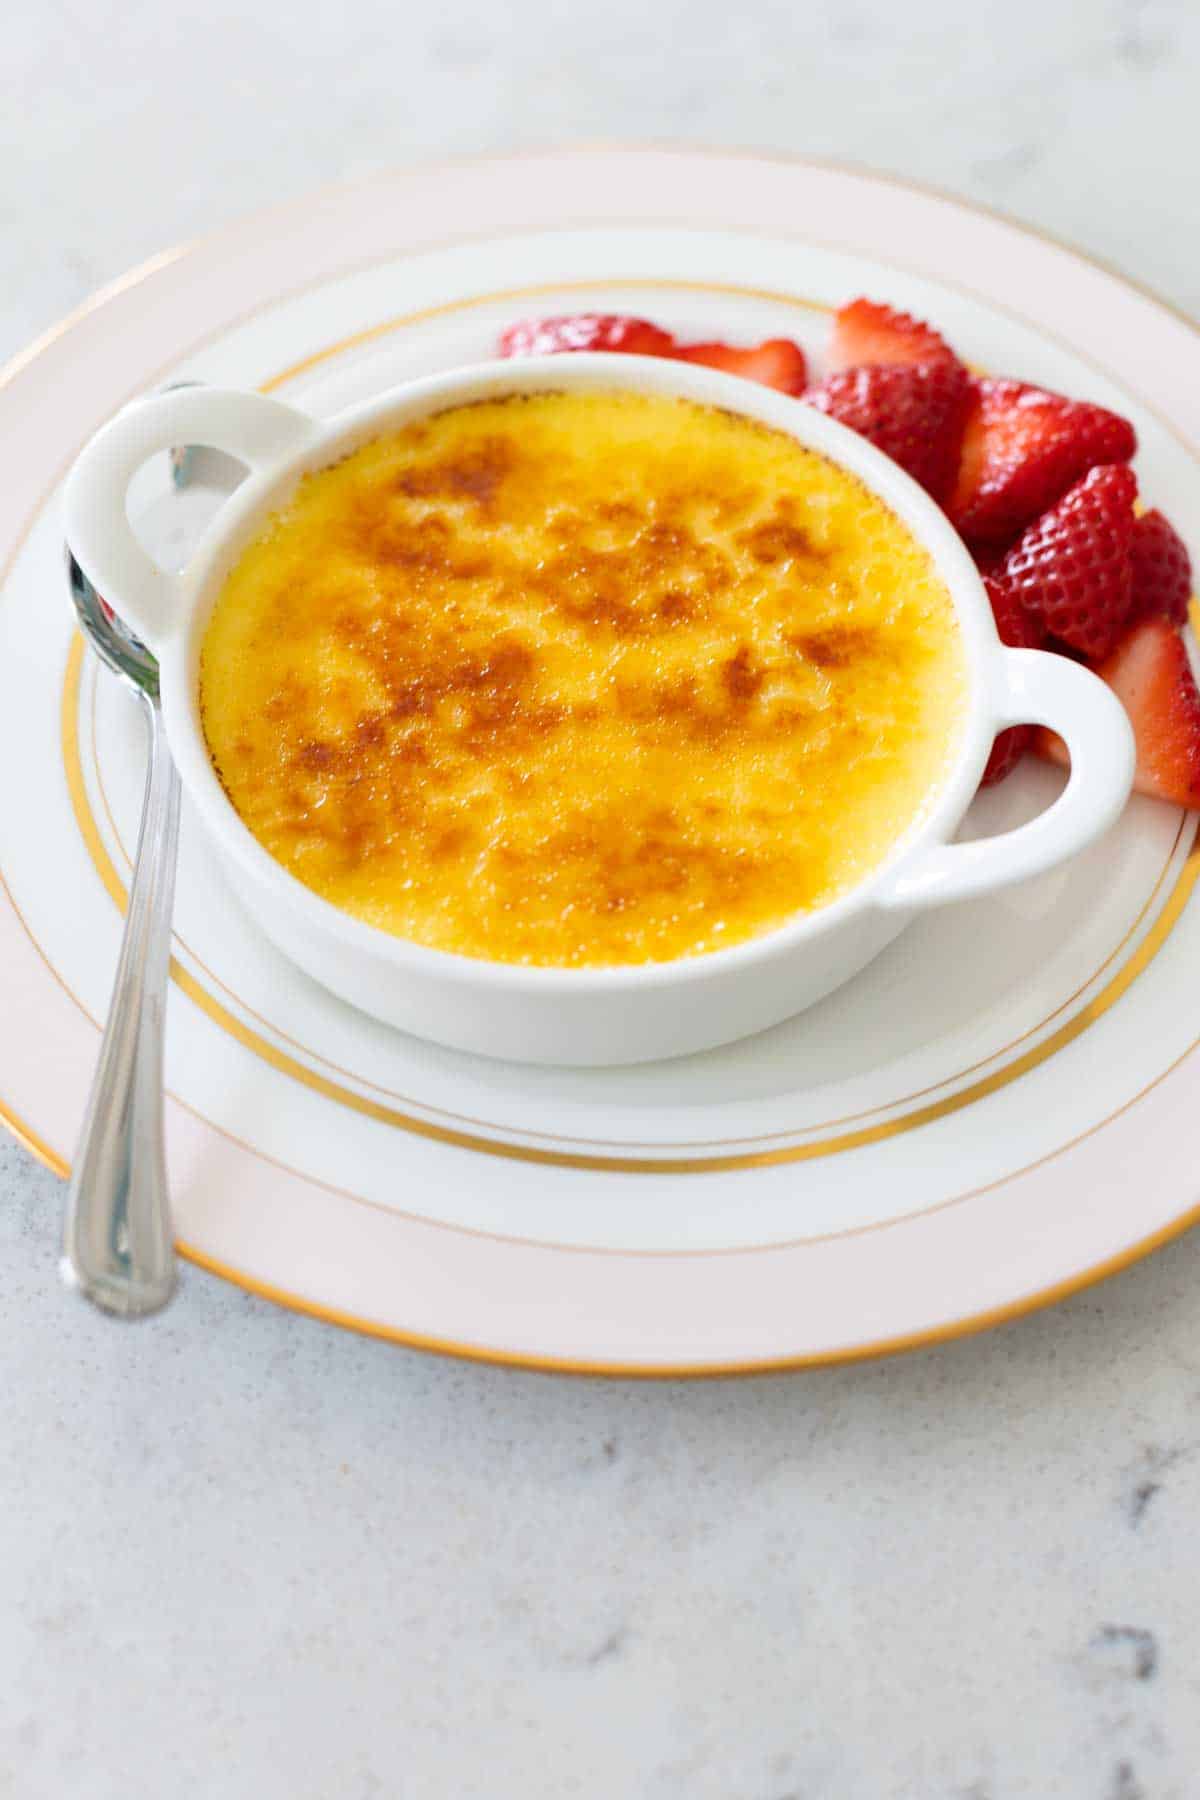
This delicious dessert is perfect all by itself, but if you want to really take it up a notch, serve it alongside some fresh in-season berries.
Strawberries, blackberries, blueberries, raspberries, any of them would be amazing.
More French Desserts
If you love this vanilla bean creme brulee, you would also love these additional elegant French desserts.
My mom always chooses lemon meringue tart for her birthday dessert.
Except for the years when she begs for my creme anglaise drizzled over a rich chocolate flourless torte! ha!

📖 Recipe
Grand Marnier Creme Brulee
Ingredients
- 1 large egg
- 4 egg yolks Save the whites, see Notes
- 1/2 cup sugar for the custard + 1 tablespoon for each finished ramekin
- 3 cups heavy whipping cream
- 2 teaspoons vanilla
- 1 tablespoon Grand Marnier
- Optional: 1 vanilla bean
Instructions
- Preheat the oven to 300°F.
- Place 6 ramekins in 2 9x13-inch baking pans and set aside. Place a hot water kettle on to boil.
- Add the egg and egg yolks to the bowl of an electric mixer fitted with the paddle attachment. Mix together on low speed until just combined. Be sure to scrape the very bottom of the bowl to make sure no sugar collected at the base.
- Scald the cream: Pour the heavy cream into a saucepan and place over medium-high heat. Stir it constantly and cook until it is steaming heavily and just about to boil but be sure to remove it from the heat before the bubbles begins.
- Temper the eggs: With the mixer running on low speed, carefully and slowly drizzle the scalded cream into the egg mixture by running it down the inside of the bowl. See photos for reference in post above.
- Flavor the custard: Once all the cream has been incorporated, add the vanilla and Grand Marnier and stir to combine.
- Prepare the ramekins: Use a measuring cup or ladle to neatly fill the ramekins with custard. By now, the kettle should be boiling. Carefully drizzle the hot water into the pans and fill them so the water comes up half way on the outside of each ramekin. Pour slowly so water doesn't splash into your prepared custards.
- Bake the custards: Bake the custards for 35 - 40 minutes or until the custard just barely jiggles when you gently move the pans. A deeper, narrower ramekin will need more time to bake than a wider, shallower ramekin, so add time as needed.
- Chill and Serve: Remove the ramekins from the water baths and let them cool to room temperature. Chill until firm and ready to serve. They can be prepared up to 24 hours in advance. To serve, sprinkle 1 tablespoon sugar over each custard and smooth it over the top with the back of a small spoon. Use a cooking torch to caramelize the sugar on top until golden brown by waving the flame back and forth over the top. Serve with berries.
- OPTIONAL: Vanilla BeanIf you want to make your creme brulee extra special, use a vanilla bean in place of 1 teaspoon of vanilla.
- Slice the bean in half lengthwise and scrape the vanilla bean seeds out with the back of your knife. Add the seeds to the heavy cream in the sauce pan and then drop in the vanilla bean pod, too.
- Scald the cream as directed but remove the pod halves before pour the cream into the mixer bowl.
- This will give your custard a wonderful fresh vanilla flavor and added visual appeal with the tiny vanilla bean flecks in the custard.
Recipe Notes
Leftover Egg Whites
With egg prices these days, don't let a single bit of your egg go to waste! If you add just one more egg white, you will have enough to make my Swiss Meringue Buttercream frosting. It freezes extremely well so you can make it now and use it for a special dessert another time. You could also freeze the egg whites in an airtight container and plan to make my Lemon Meringue Tart with store-bought lemon curd to keep it easy.Save This Recipe to Your Recipe Box
Find this delicious recipe next time you visit by saving it to your very own recipe box on my site. All your favorites stored in one easy place!
I am going to try and make this for Shad today. 🙂
I can't wait to try this! It was SOOOOO yummy. I'm going to need new ramekins and a kitchen torch, though. I should probably ask Santa for these things, since I have such a hard time coming up with a list each year 🙂