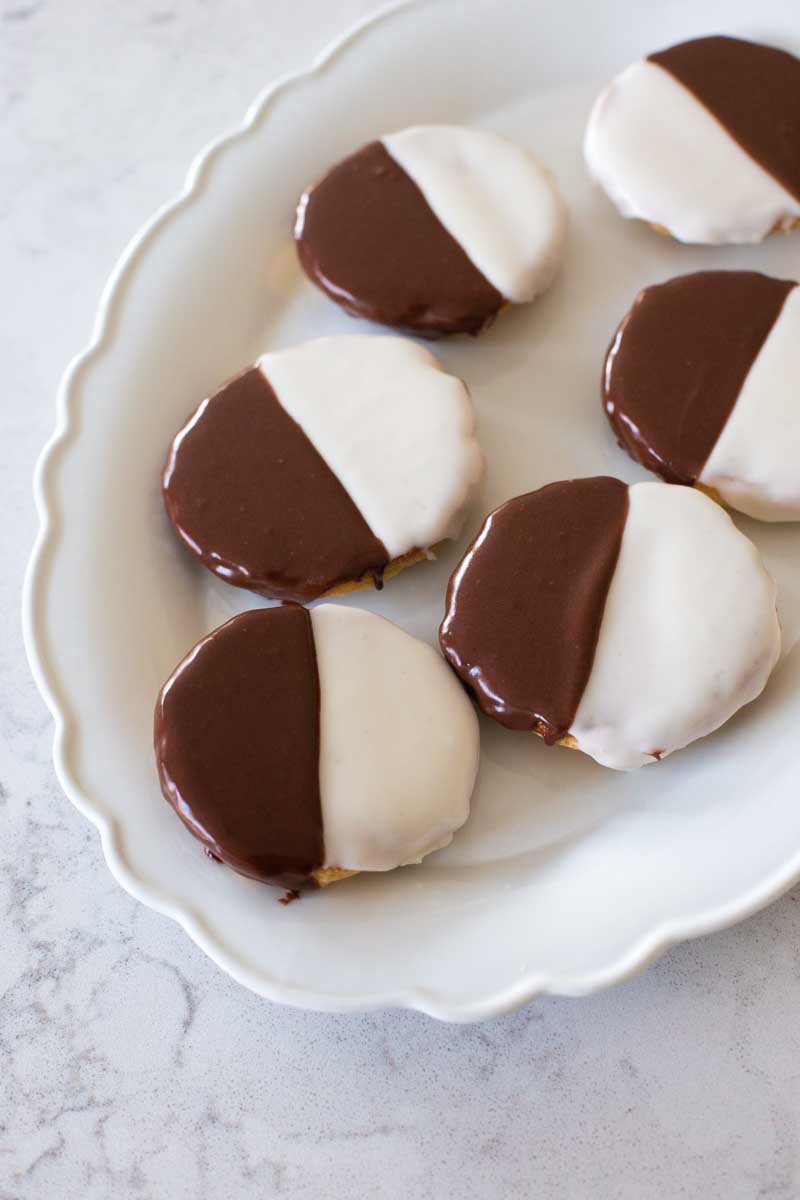
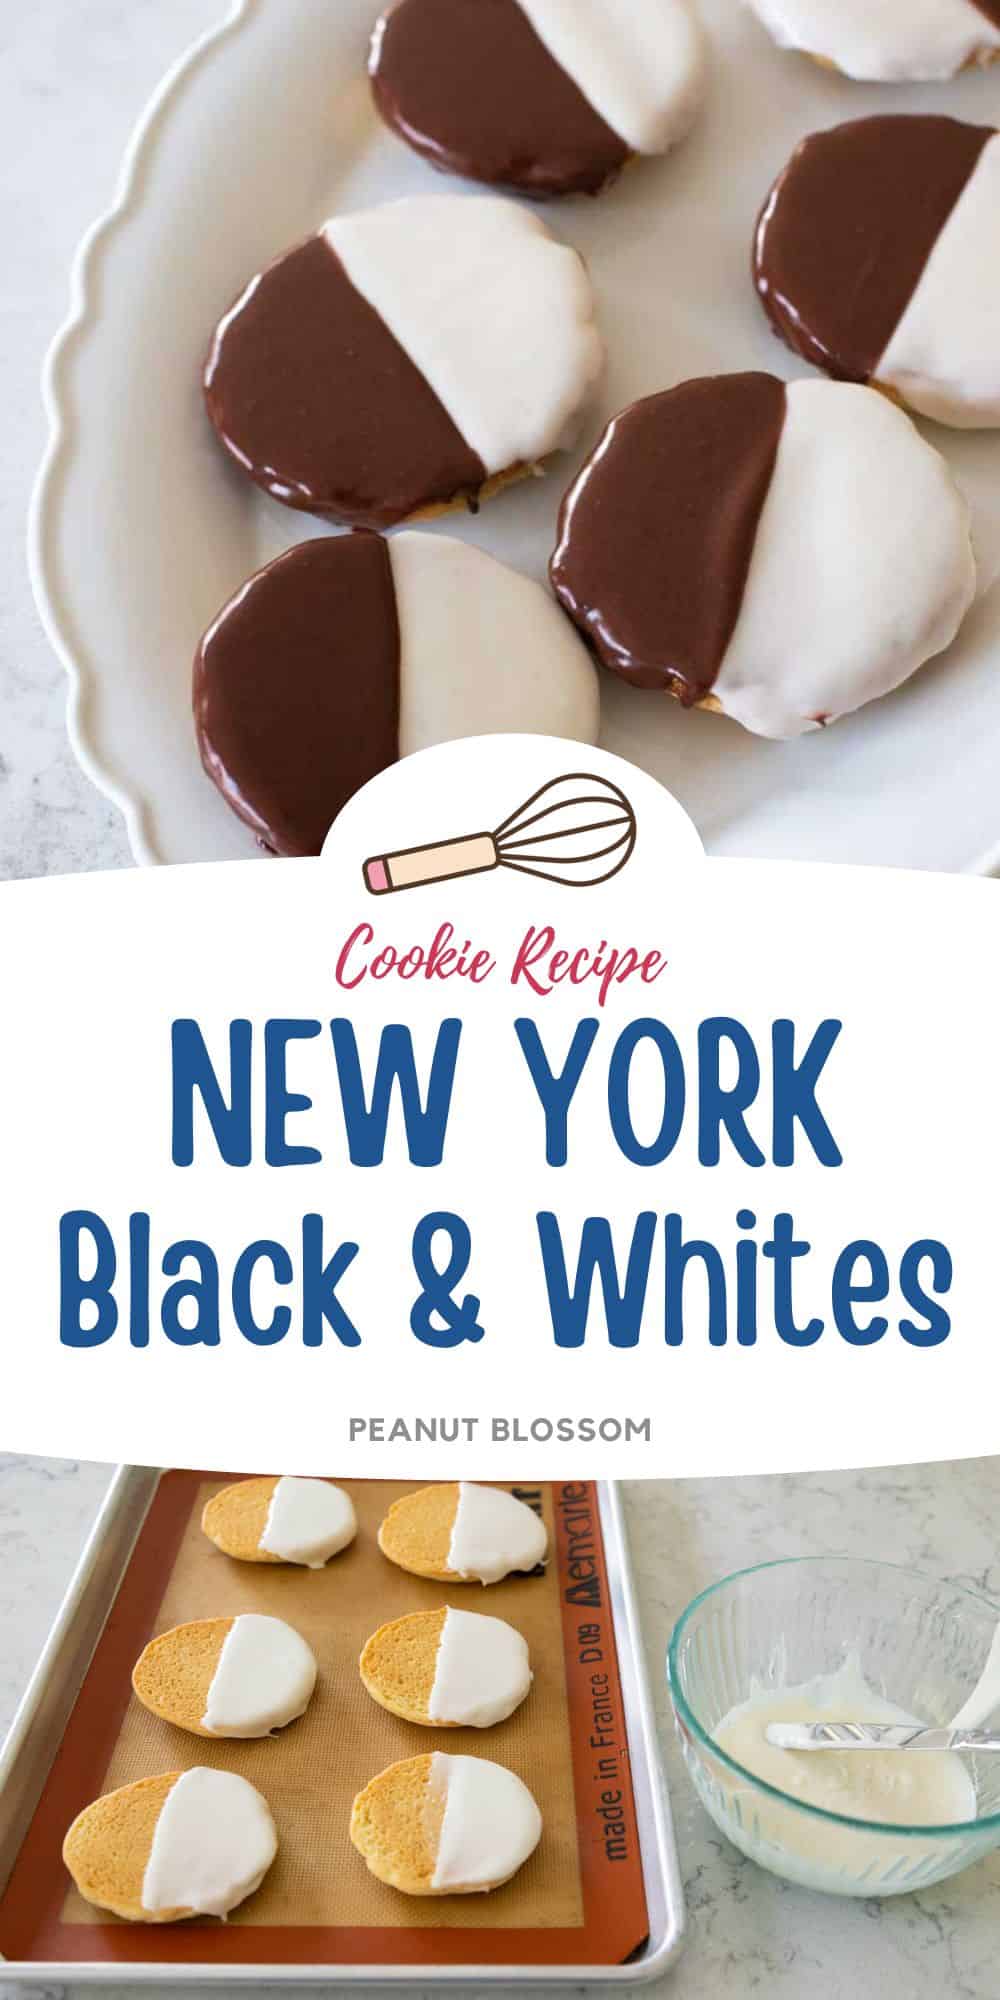
NYC Black and White Cookies


New York black and white cookies with a soft vanilla cookie base and vanilla and chocolate icing on top are a fun cookie to bake for your next party or special event.

As much as I love easy desserts that take 5 minutes to whip together, once in a while it is nice to take a little more time and make something truly delicious and pretty.
These elegant black and white cookies are a New York City classic for good reason.
Every time I serve them, my friends and family get so excited. What they don't know is just how easy they actually are to make!
The soft vanilla cookie base is one of the easier cookies to bake. The white and black icing only takes a minute to stir together.
As long as you've got the time for the icing to set? You can totally do this easy cookie recipe!
Jump to:
Why This is the Best Recipe
If you enjoy baking cookies, I think you will quickly agree that this is the best NYC black and white cookie recipe because:
- Authentic Taste: These taste just like the black and white cookies in New York with their vanilla and chocolate icing on top of a pillowy vanilla cookie.
- Just 1 Dozen Cookies: You are not getting stuck baking pans and pans of cookies here. You'll be making just one dozen gorgeous cookies for your favorite people.
- Easy to Bake: The cookie recipe itself is so easy to prep and bake.
- Easy Icing: That stunning line between black and white is so much easier to do than you think. All you need is a butter knife and a little patience!
Why Black and White Cookies are a New York Favorite
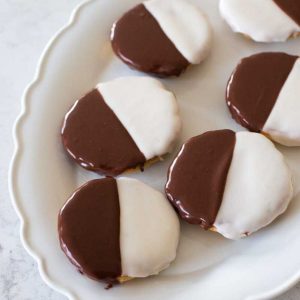
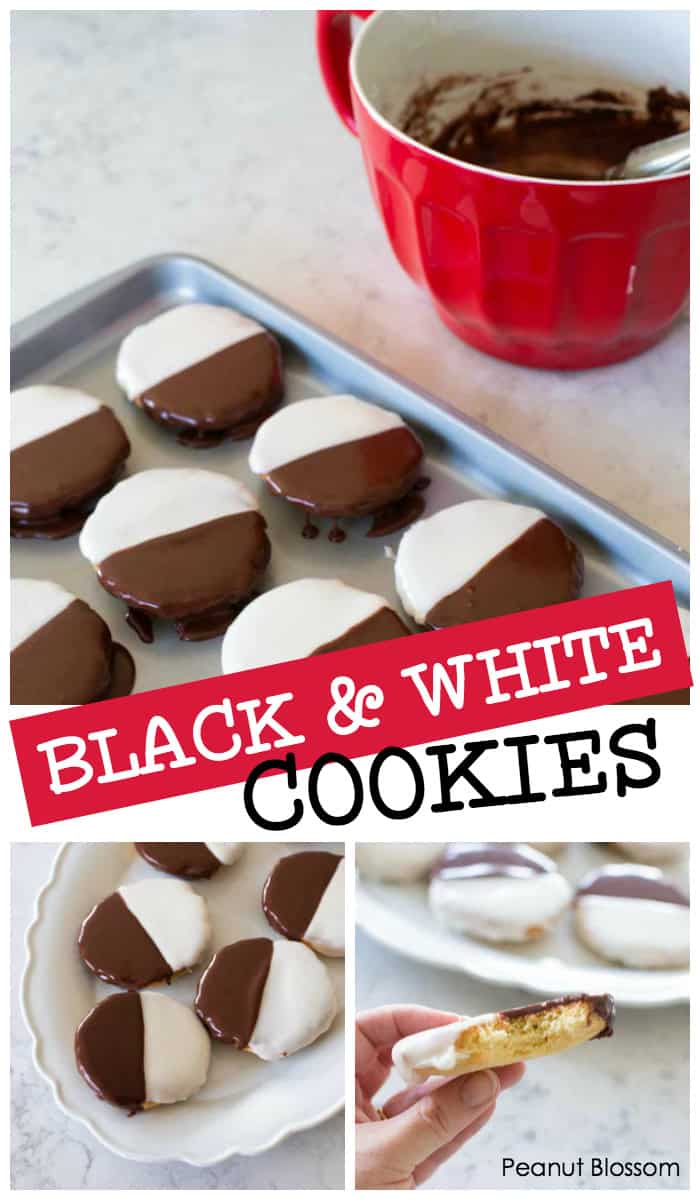
The classic NYC black and white cookie has a soft almost pillowy sugar cookie base that is topped with a perfectly straight line of frosting that divides one half of the cookie with a white vanilla frosting and the other half a dark almost black chocolate frosting.
The popular belief is that the cookie was originally invented by Glaser's Bake Shop in Manhattan in 1902 but Hemstrought's Bakery in Utica, New York has sold them as a "half-moon" cookie since 1920.
Any travelers heading through JFK in NYC are sure to spot packaged black and white cookies at almost any kiosk in the airport.
Cookie Ingredients
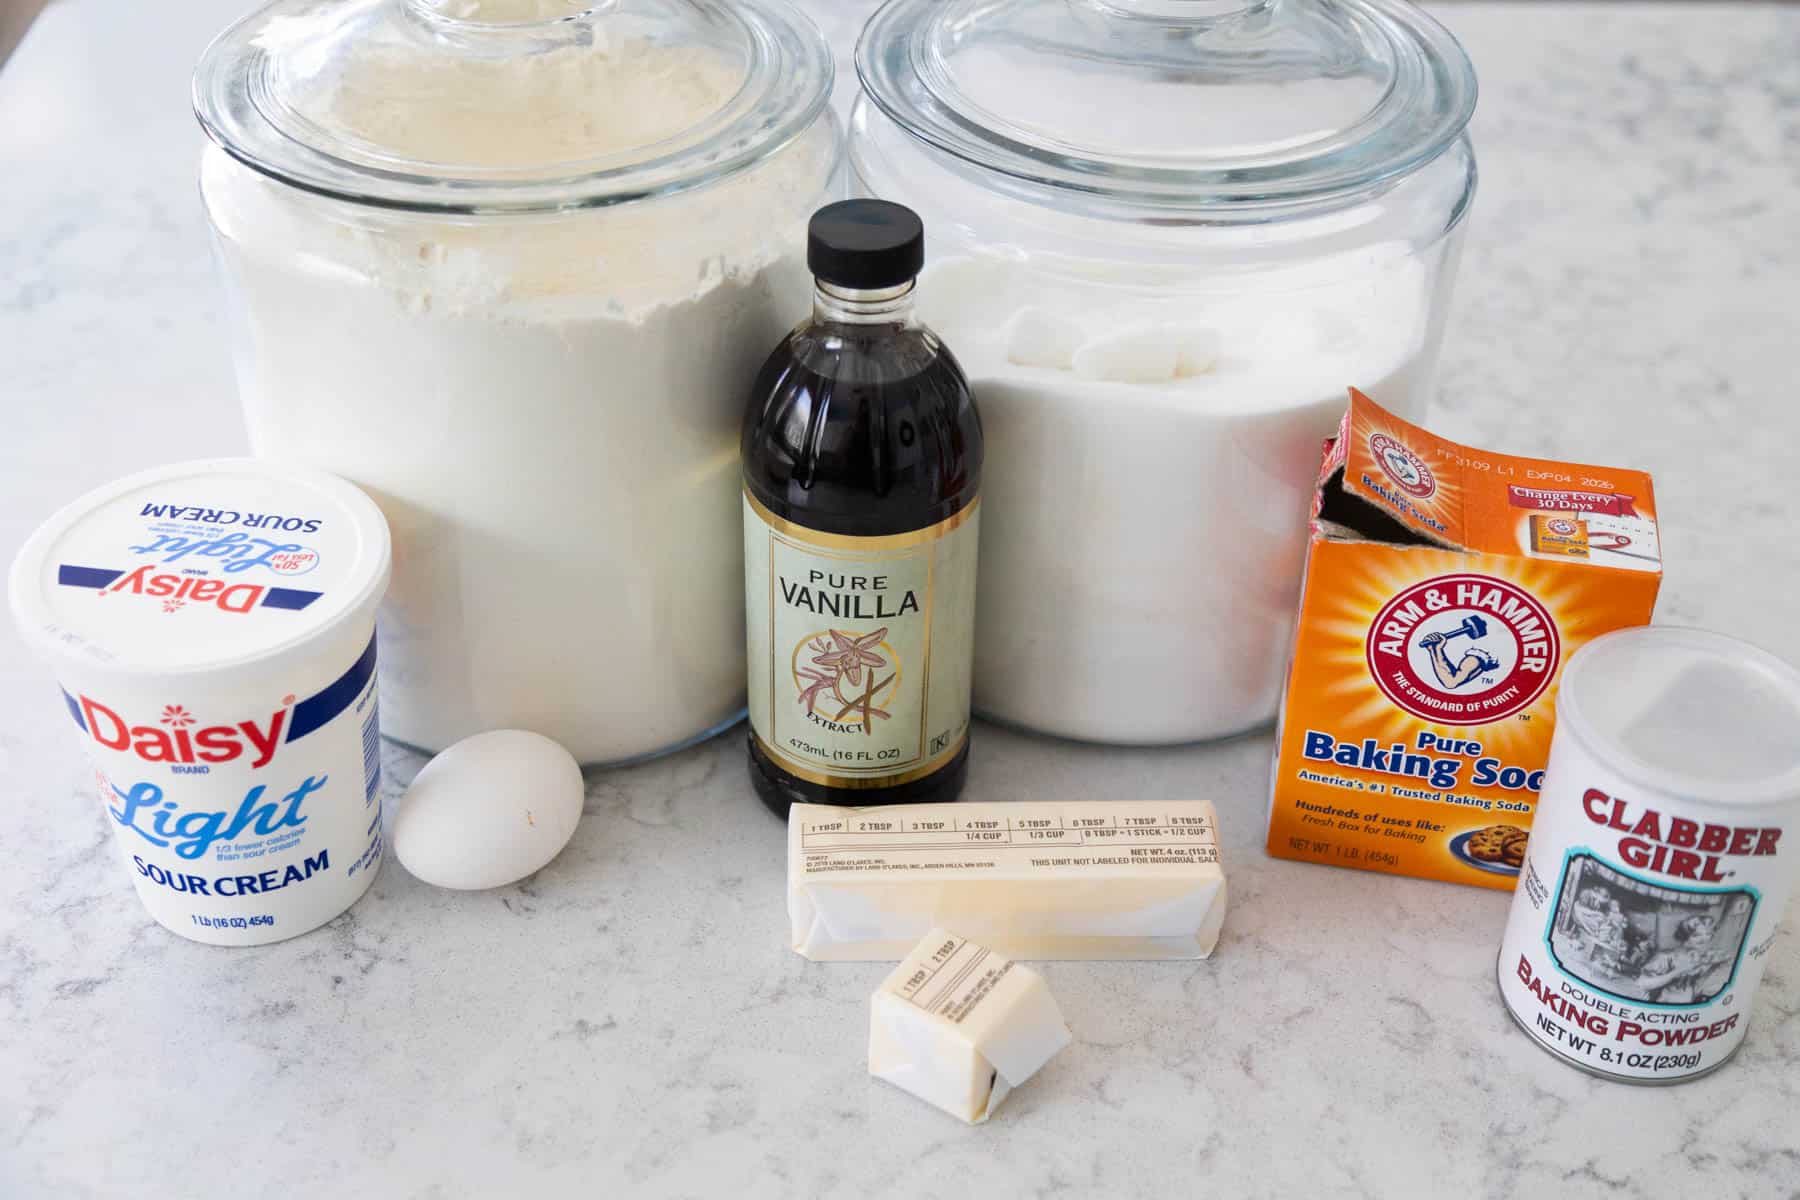
To make the soft vanilla cookie base for the black and whites, you will need:
- Butter: I always use salted. If you use unsalted, add just a pinch more salt to the recipe.
- Sour Cream: Light sour cream worked just fine for me, fat-free won't have enough fat content for the cookie. Full fat is a great choice.
- All Purpose Flour
- Sugar
- Egg
- Baking Powder
- Baking Soda
- Salt
- Vanilla Extract
Bake the Cookies
Preheat the oven to 350°F while you prep the cookie dough.
In a medium bowl, whisk together the flour, baking powder, baking soda, and salt. Set aside.
Add the softened butter and sugar to a large mixing bowl. Beat them together on medium speed with a hand mixer until fluffy. Scrape the sides of the bowl.
Add the egg and vanilla and beat them into the butter until just combined.
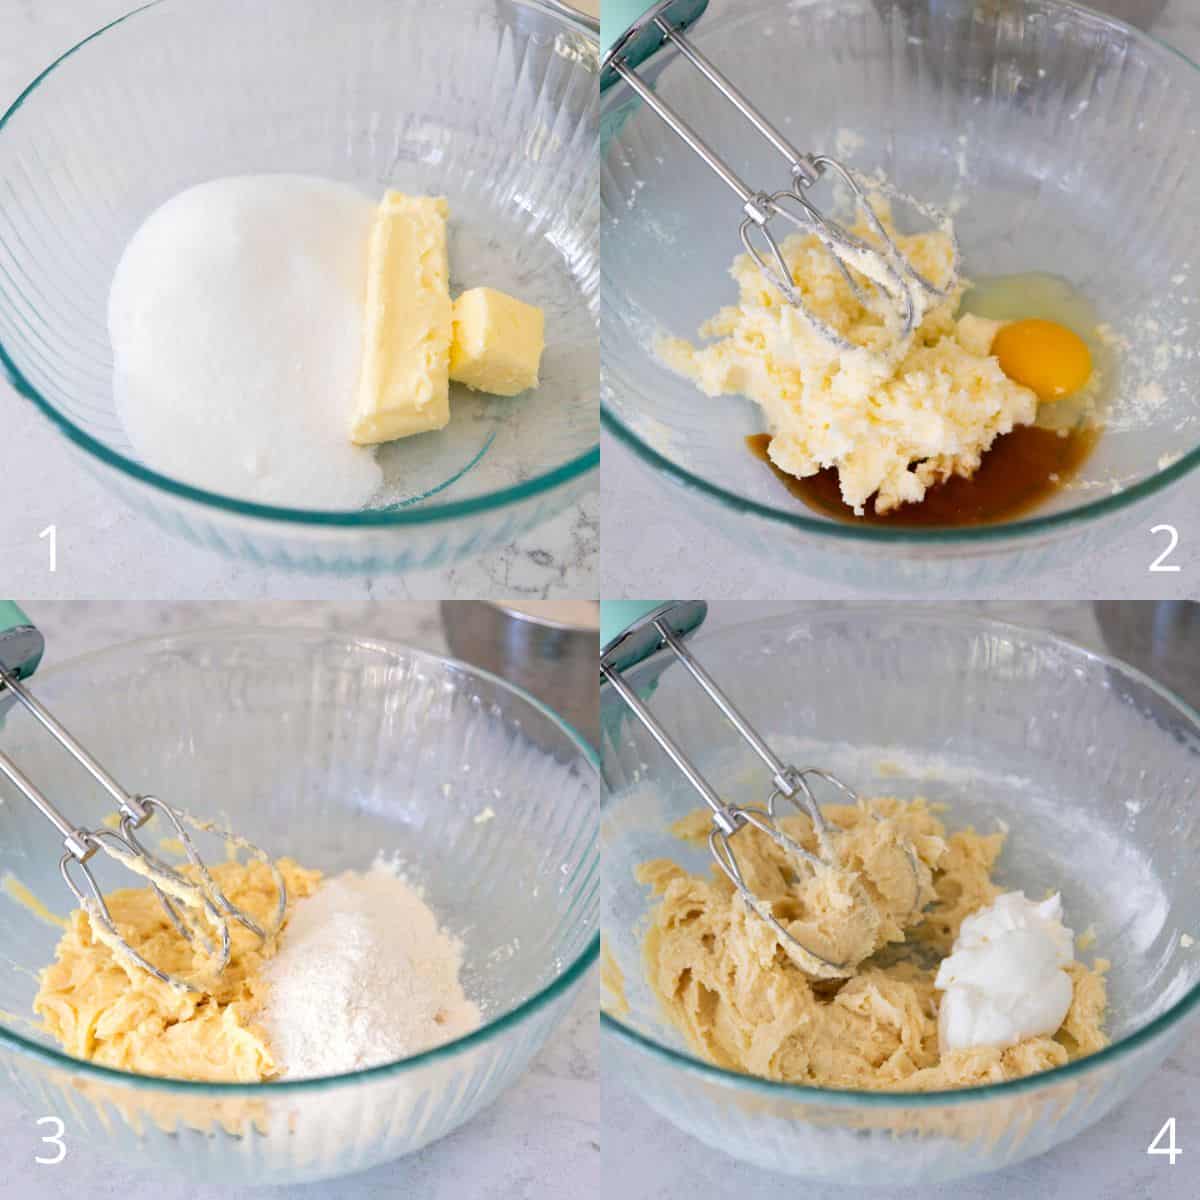
Reduce the mixing speed to low and add ½ of the flour mixture to the bowl. Beat them together and scrape the sides.
Add the sour cream to the bowl, beat together, and scrape the sides.
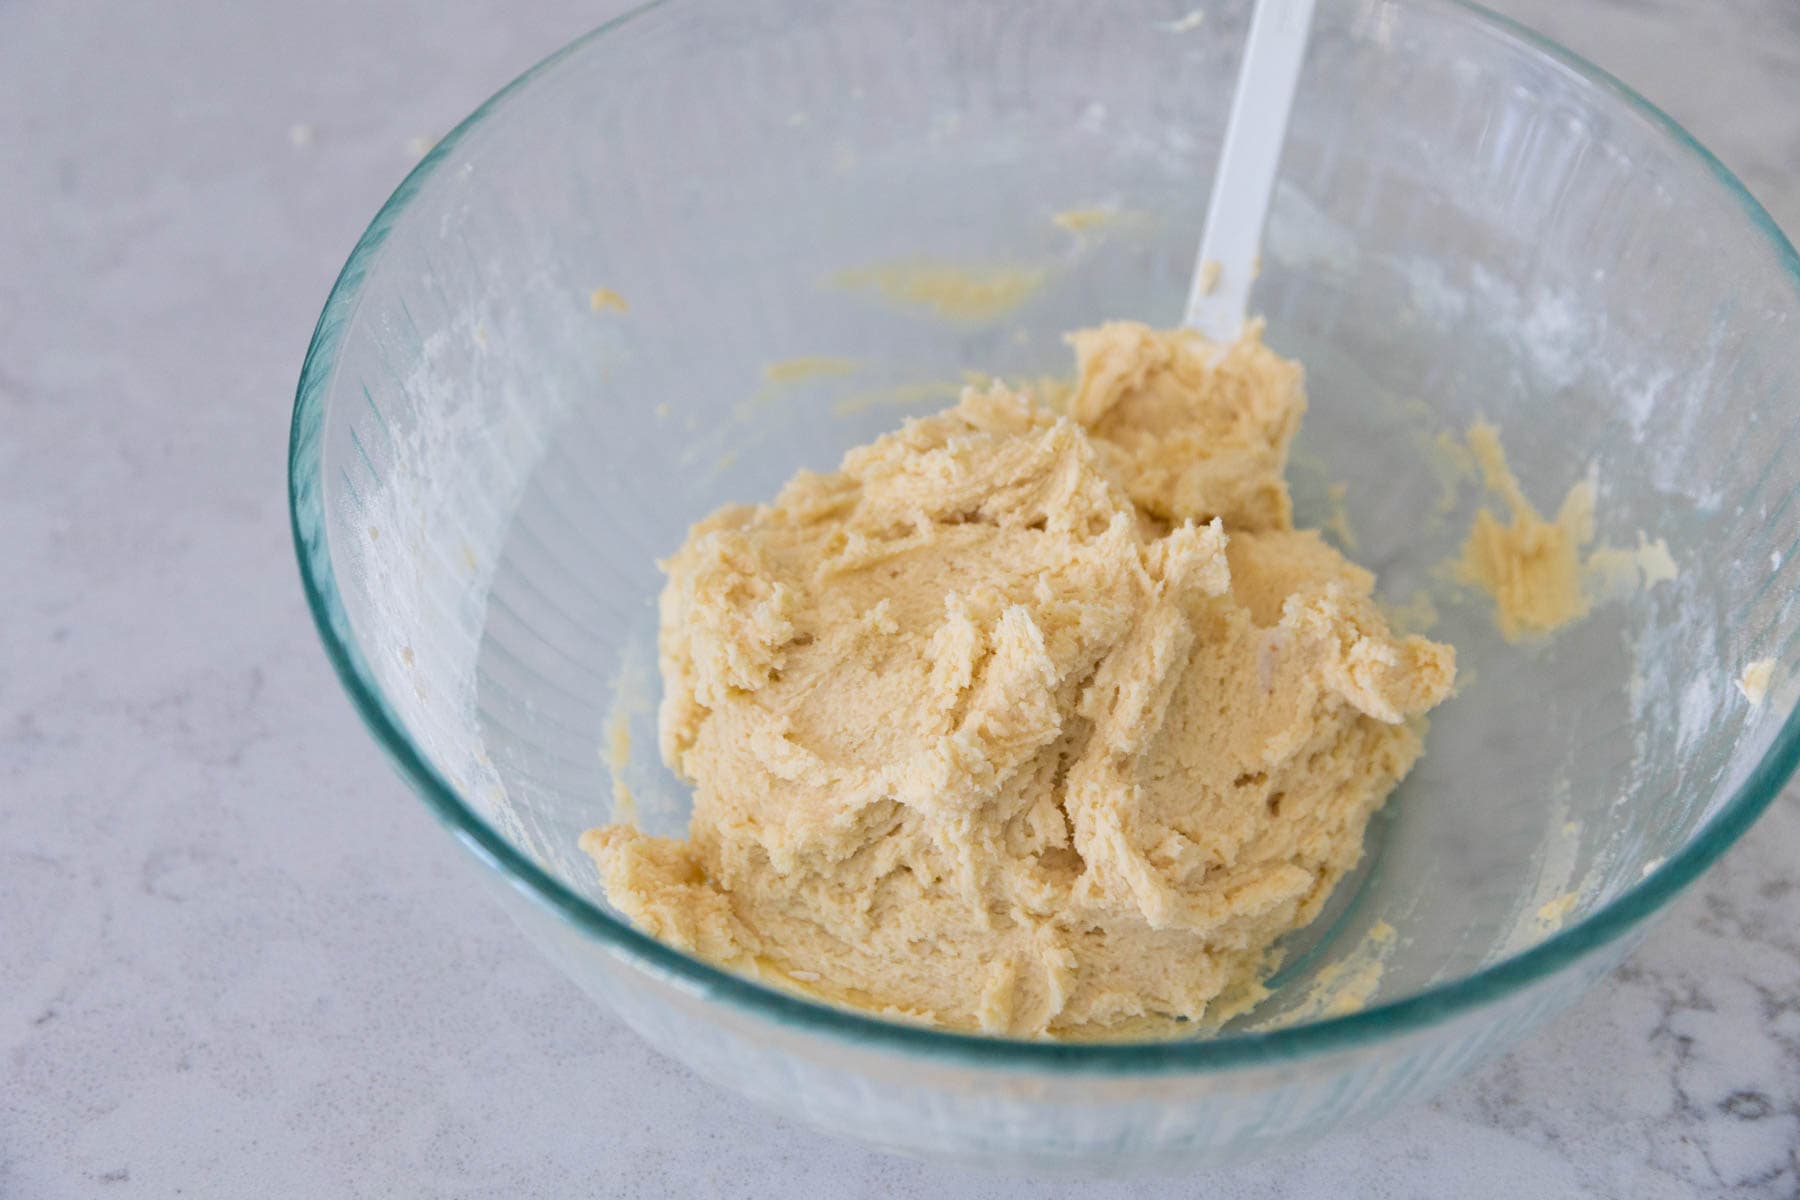
Finish by adding the last half of the flour mix into the bowl and beat together until there are no dry pockets left in the dough.
Use a ¼ dry measuring cup to scoop the cookie dough into portions.
Place 6 cookie dough mounds on each prepared cookie sheet. Be sure to keep them at least 4 inches apart from one another to allow for spread.
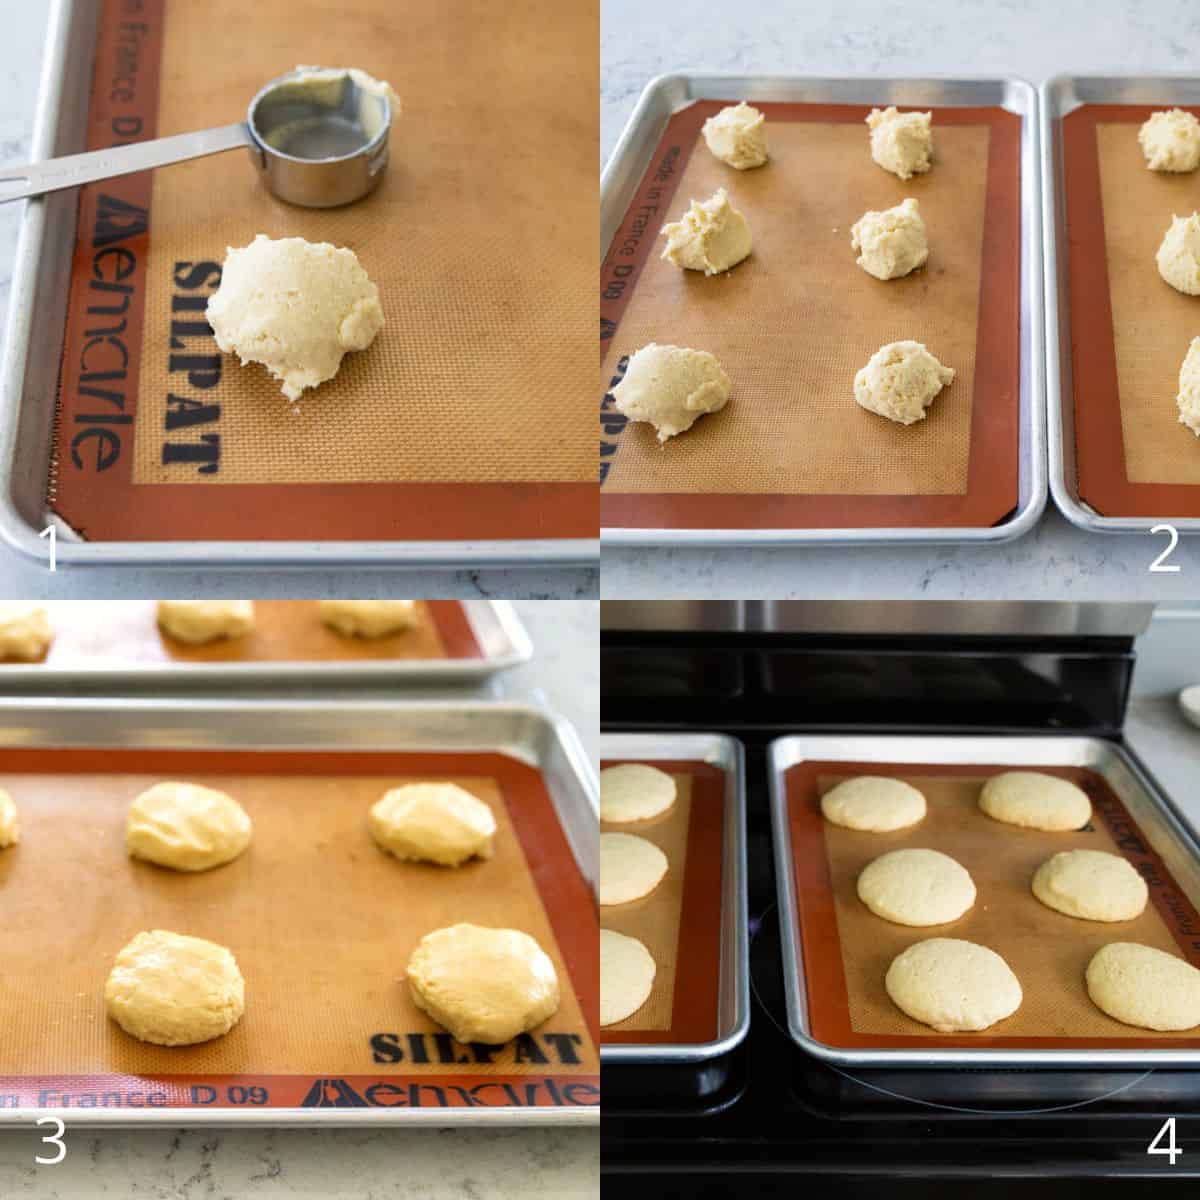
Slightly dampen your hands and gently press each cookie mound to start the flattening process before baking.
By gently patting down the cookie to help flatten it slightly before baking, the cookie won't spread too much and helps the middle of the cookie catch up to the outside for even baking.
Bake for 7 minutes and then rotate the two trays inside the oven, bringing the bottom one up and the top one down so everything bakes evenly.
Bake for an additional 7 -8 minutes or until the cookies are just barely turning golden brown along the edges.
Let them cool on the cookie sheets for 5 minutes and then transfer to a wire rack to cool completely before frosting.
Make the Black and White Icing
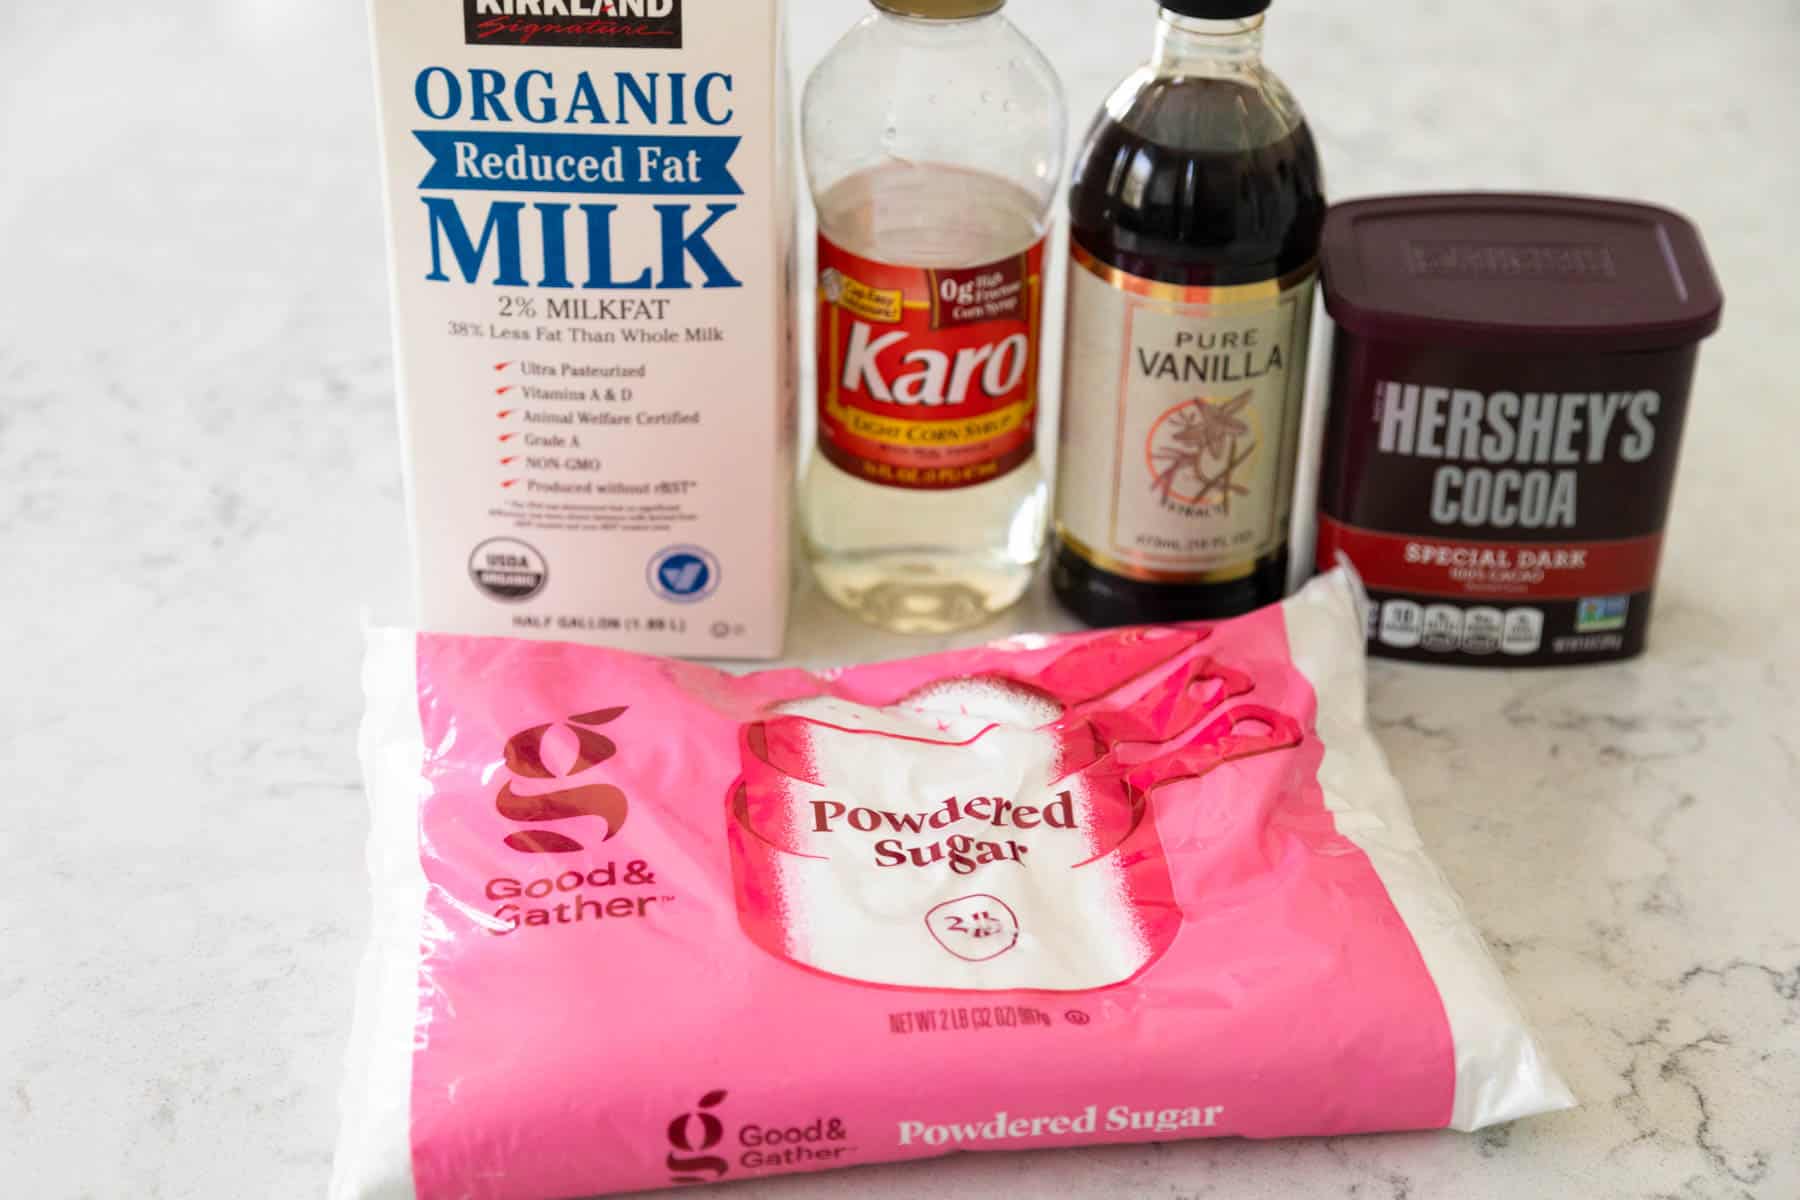
To make the black and white icing, you will need:
- Powdered Sugar
- Milk: The recipe calls for whole milk but I used 5 tablespoons of 2% milk and 1 tablespoon of heavy cream because that is what I had on hand.
- Corn Syrup
- Vanilla Extract
- Unsweetened Cocoa Powder
- Salt
Add the powdered sugar, just 6 tablespoons of the milk, corn syrup, vanilla, and salt to a large mixing bowl. Whisk them together until smooth.
Transfer 1 cup of the glaze to a medium bowl and set aside.
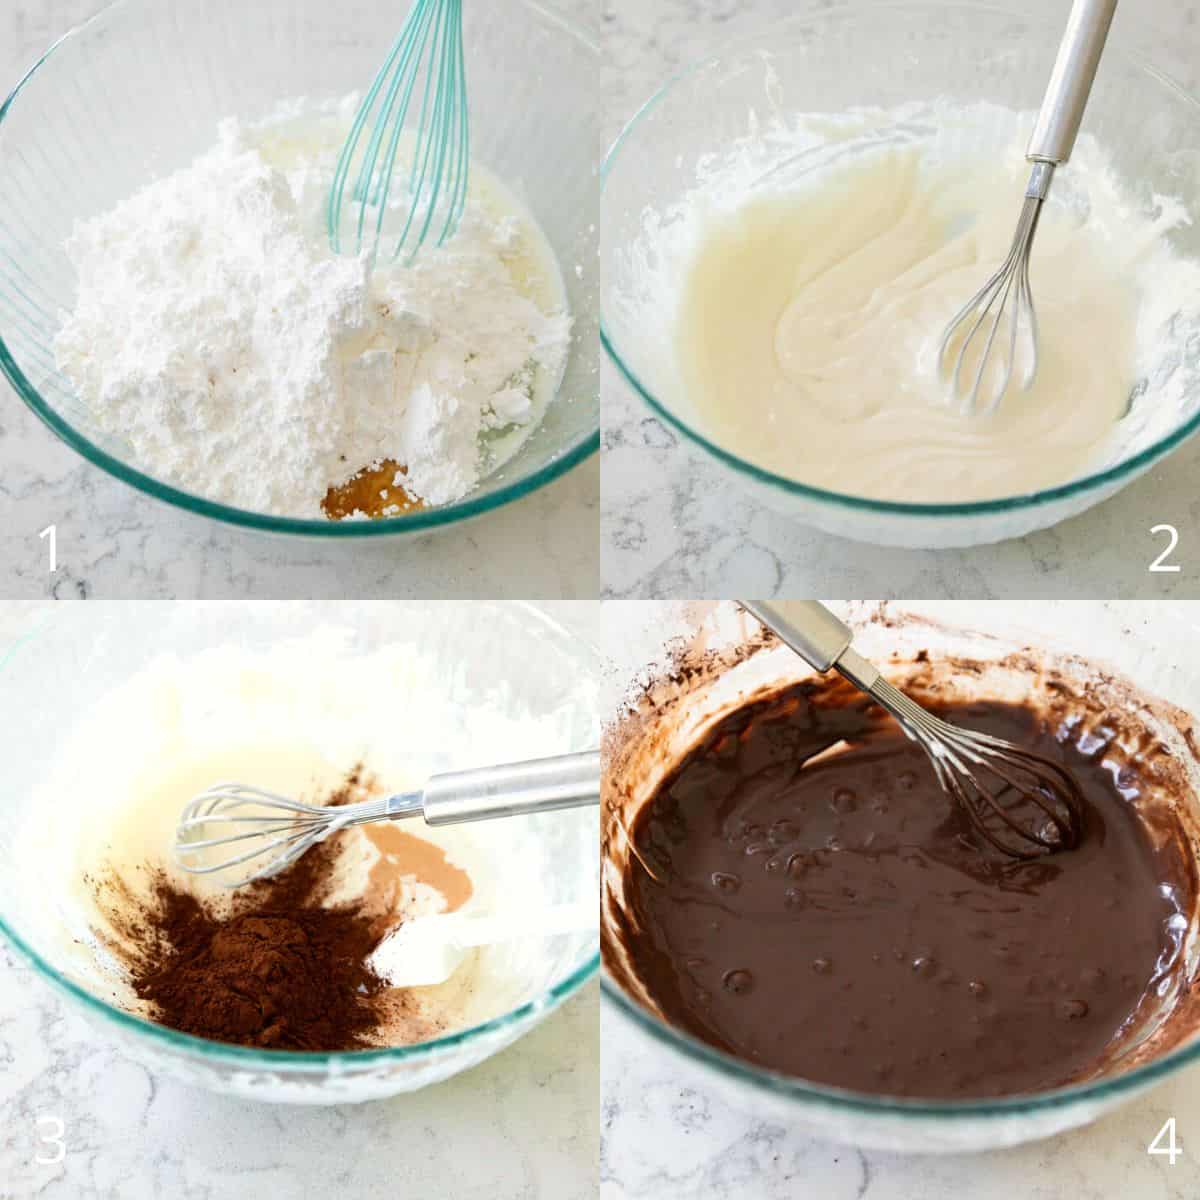
Add the remaining milk and cocoa powder to the original frosting bowl and whisk to combine until smooth.
Frost the Cookies with the Icing
Flip the cookie upside down, you'll be frosting the flat bottom side of the cookie which now becomes the top.
You will absolutely want to frost the white side of the cookie first.
Holding my first cookie over the bowl of the white frosting, I used a simple butter knife to spread the thick glaze over one half of the cookie in the neatest line I could by pushing the glaze along where I wanted it to be and using the knife to scrape it straight.
I tilted the cookie to the side and let the excess frosting drizzle off so it wouldn't puddle on the cookie top when I sat it back down on the tray to dry.
Don't worry, once you add the black icing, the line gets even crisper.
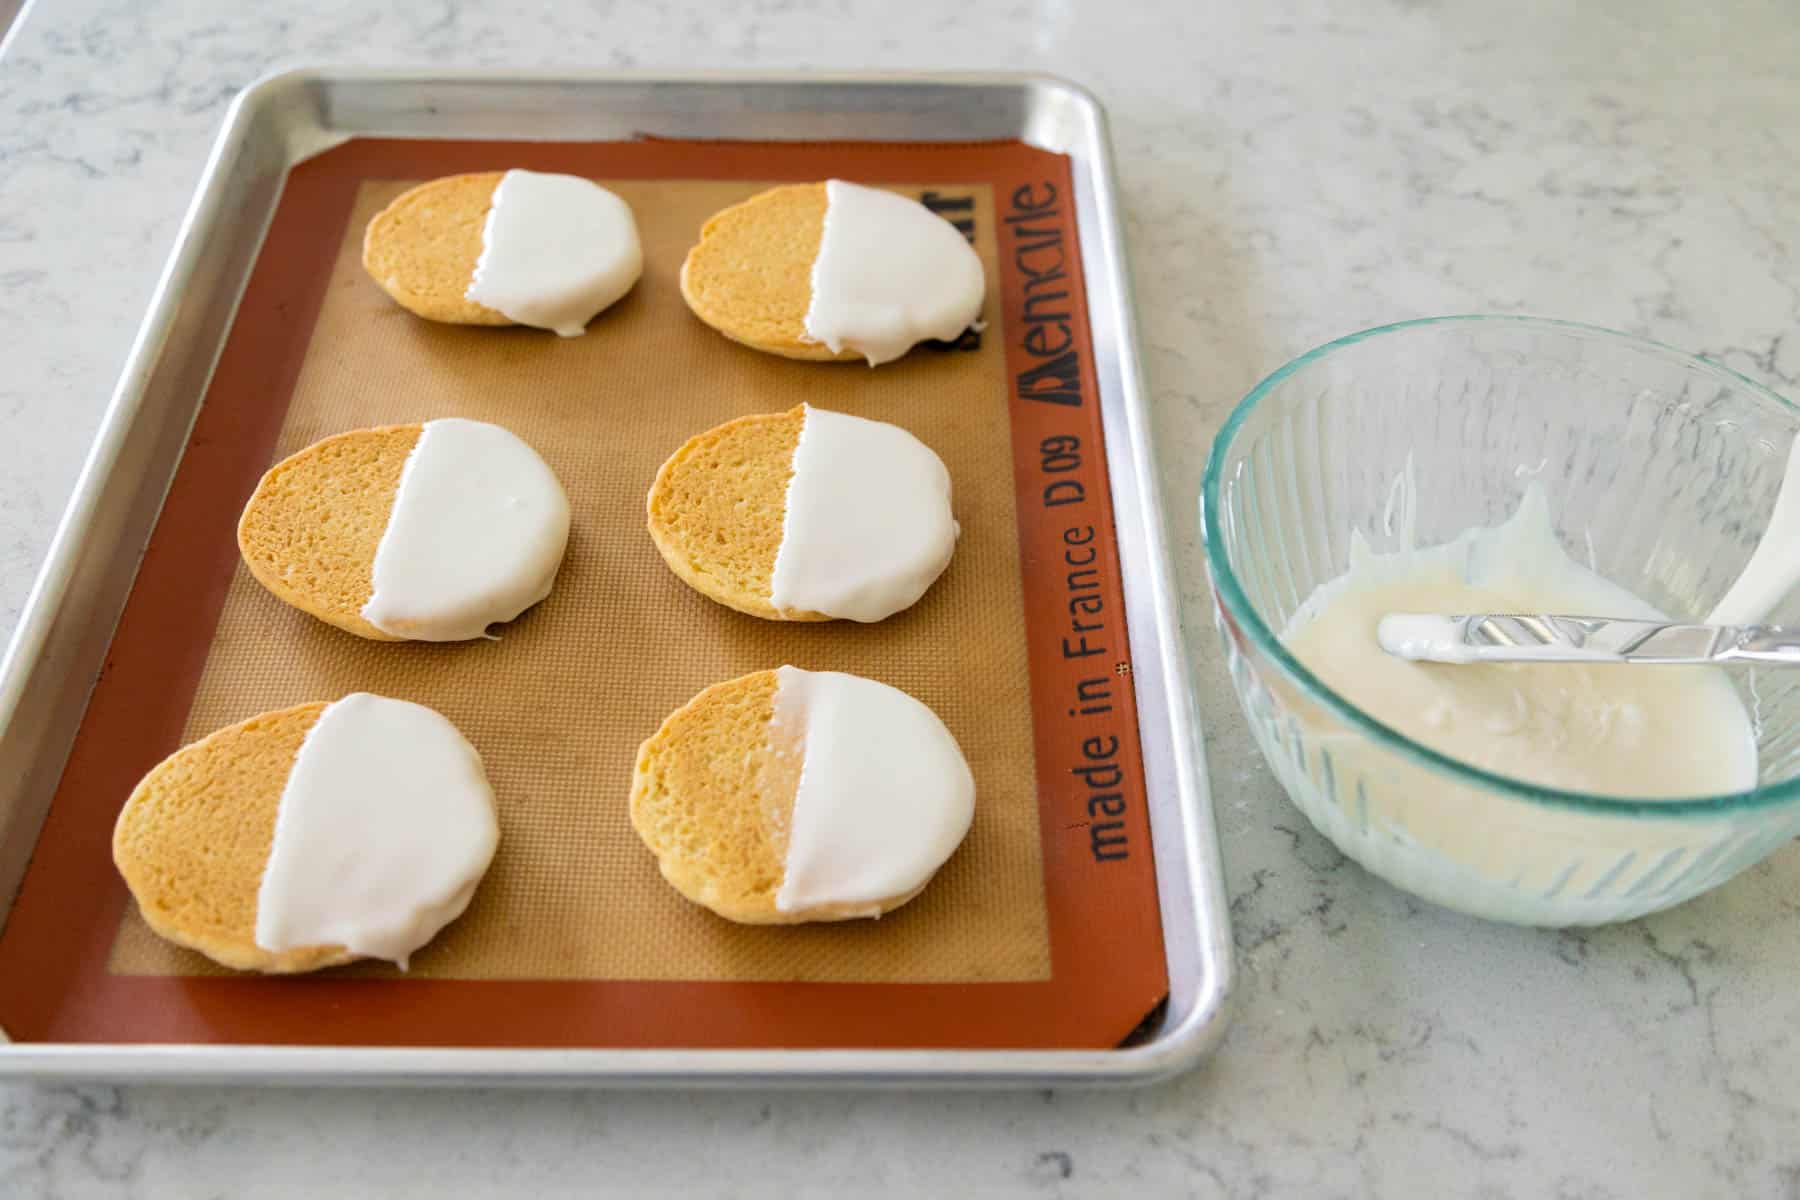
Place the white-frosted cookies in the fridge to cool completely for 15 - 20 minutes. You want the frosting to be completely set before attempting the chocolate half.
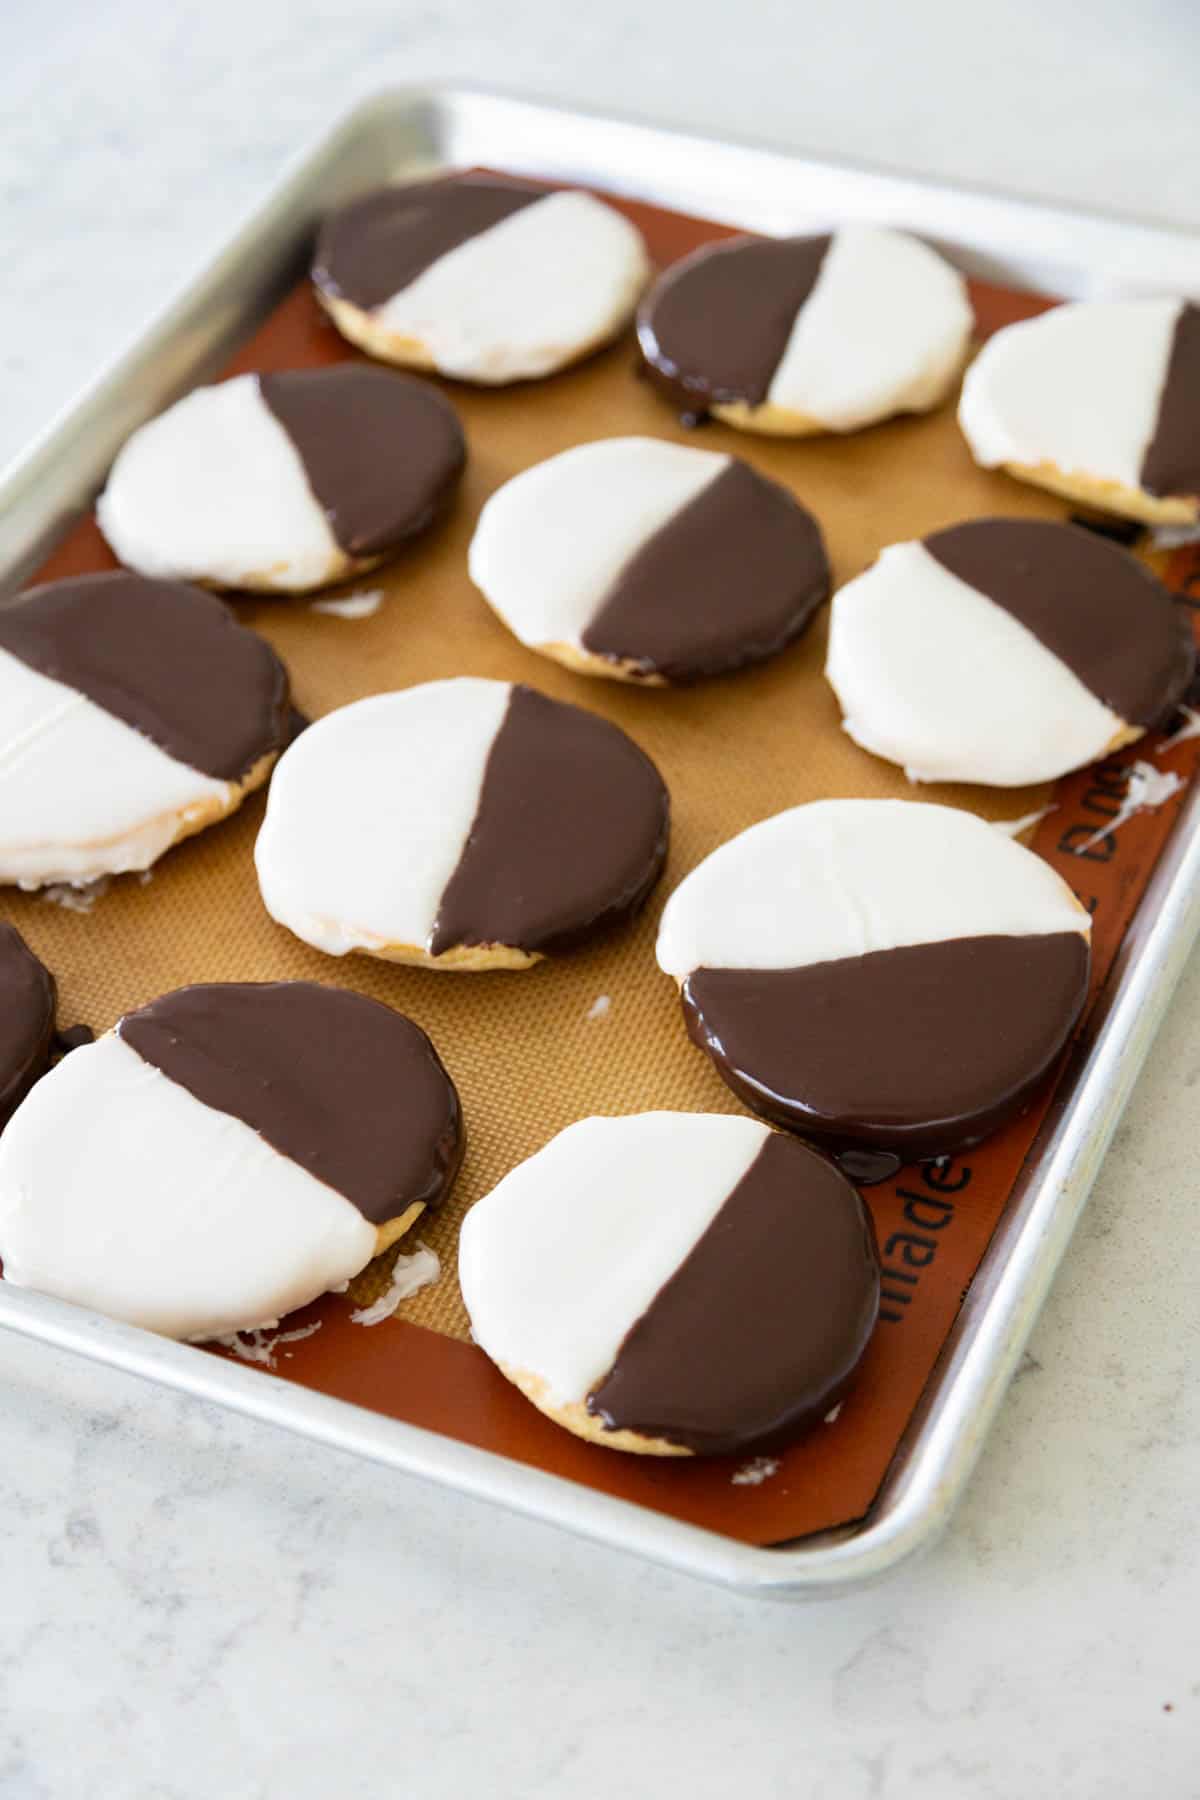
Hold each cookie one at a time over the bowl of the chocolate frosting.
Use a similar scraping technique to add the frosting to the other half and let the excess drizzle back into the bowl.
Note: It is a lot easier to get a straight line with the crisp chocolate frosting. If it isn't 100% straight, no worries! This just tells your guests you took the effort to bake them homemade!
Make Ahead Tips
You need the cookies to be 100% cool before you frost them.
This is not a cookie recipe you can rush. If the cookie is warm, the frosting will just melt all over and be a total mess.
You can bake and ice the cookies the day before and simply store them in the fridge on a platter.
They will keep in the fridge for 2 - 3 days.
They still taste great 4 - 5 days later, they just lose a little of their fresh texture.
What to Do with the Extra Icing
It is important to know that the frosting makes a lot more than you will actually need to frost the cookies.
I know that beginner bakers always do better with a little bit extra to work with.
You don't have to worry at all about having to scrimp and save your frosting, you'll be able to generously frost each cookie. Use the amount that feels right. If you need a little more to cover a mistake? You'll have plenty.
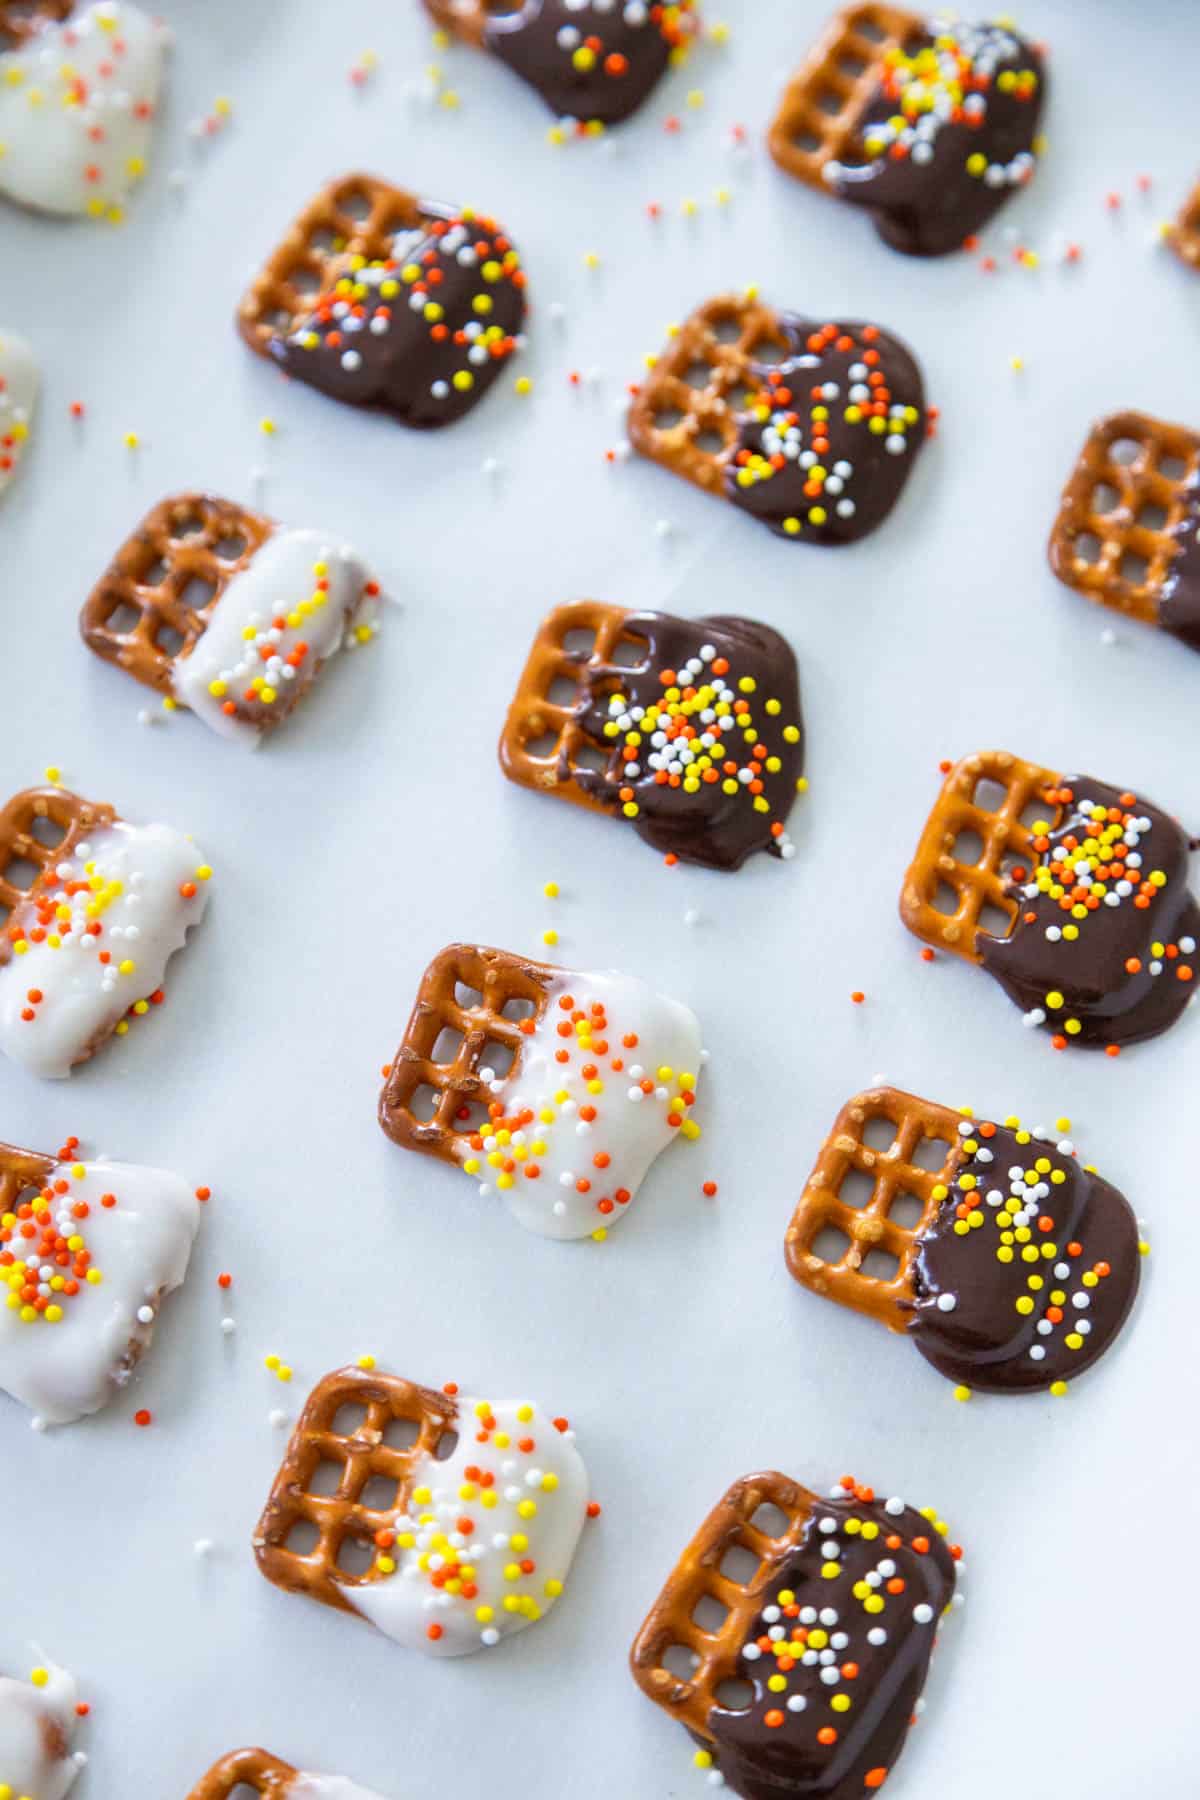
You can use the leftover frosting on Nila Wafer cookies for a miniature black and white cookie that would be absolutely adorable on your party tray.
Or you could dip salted pretzels and add some festive holiday sprinkles for a fun and easy no bake party treat.
Serving Suggestions
There are so many fun reasons to bake a batch of NYC black and white cookies.
I think they would make a striking and elegant addition to a Christmas cookies platter, especially since there's nothing more romantic than Christmas in New York!
I originally baked these for my New York themed Valentine's Day party but you could even customize them with pink food coloring to make pink and black or pink and white cookies.
The original bakery called them "half moon" cookies which makes them just spooky enough for a Halloween party for the family.
They'd be right at home for fun Harry Potter snacks for movie night, especially if you're watching Harry Potter and the Prisoner of Azkaban where werewolves are introduced to the plot.


More Classic New York Recipes
Looking for more classic NYC recipes for a party?
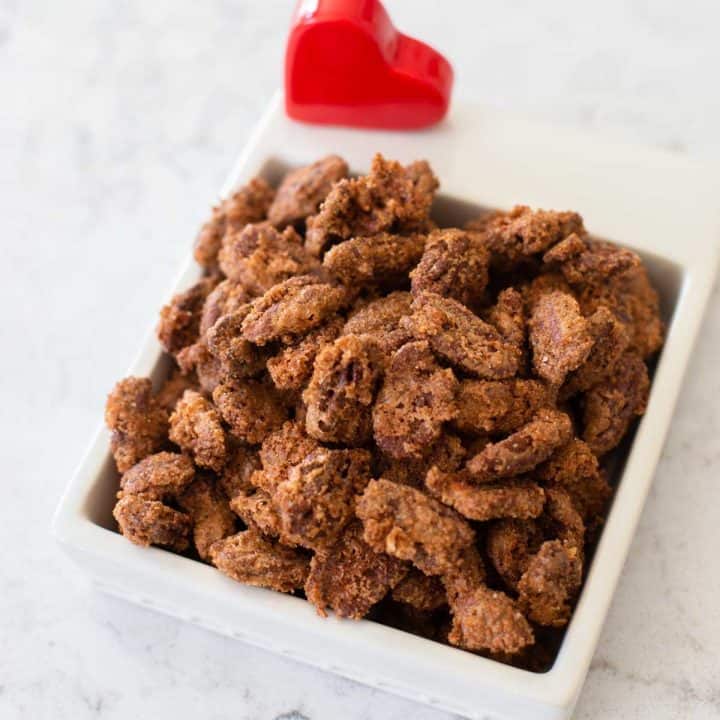
You can't go wrong with my candied nuts that are just like the kind sold on the sidewalk nut vendor carts.
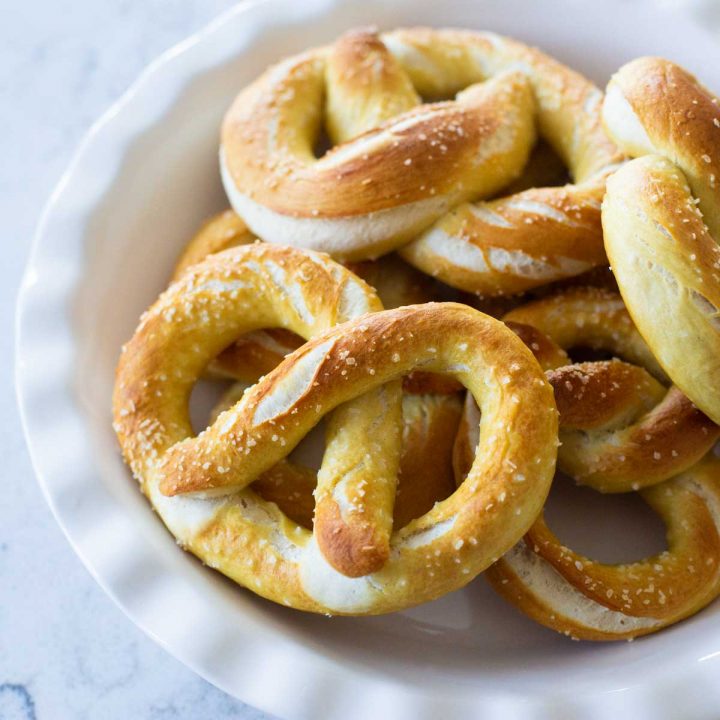
Hot pretzels are another fun NYC sidewalk snack.
And if there's one more food I think of every time I hear "New York"?? For sure it is NY Style Pizza. My classic cheese pizza would be a fun party recipe to include.

📖 Recipe
Black and White Cookies
Ingredients
For the Vanilla Cookies
- 1 3/4 cup flour
- 1/2 tsp baking powder
- 1/4 tsp baking soda
- 1/8 tsp salt
- 10 tbsp butter softened
- 1 cup sugar
- 1 egg
- 2 tsp vanilla extract
- 1/3 cup sour cream
For the Black and White Icing
- 5 cups powdered sugar
- 7 tbsp whole milk divided
- 2 tbsp corn syrup
- 1 tsp vanilla extract
- 1/2 tsp salt
- 3 tbsp dark chocolate cocoa powder
Instructions
Bake the Vanilla Cookies
- Preheat the oven to 350°F. Adjust the baking racks to the upper and lower third positions. Line two cookie sheets with parchment paper or a silicone baking liner and set aside.
- In a medium bowl, whisk together the flour, baking powder, baking soda, and salt. Set aside.
- Add the butter and the sugar to a large mixing bowl. Beat them together with a hand mixer on medium speed until fluffy. Scrape the sides of the bowl.
- Add the egg and vanilla and beat them into the butter until just combined.
- Add just half of the flour mixture to the bowl. Beat it together and scrape the sides.
- Add the sour cream to the bowl, beat together, and scrape the sides.
- Finish by adding the last half of the flour mix into the bowl and beat together until there are no dry pockets left in the dough.
- Use a 1/4 dry measuring cup to scoop the cookie dough into portions. Place 6 cookie dough mounds on each prepared cookie sheet. Be sure to keep them at least 4 inches apart from one another to allow for spread.
- Slightly dampen your hands and gently press each cookie mound to start the flattening process before baking.
- Bake for 7 minutes and then rotate the two trays inside the oven, bringing the bottom one up and the top one down so everything bakes evenly.
- Bake for an additional 7 -8 minutes or until the cookies are just barely turning golden brown along the edges.
- Let them cool on the cookie sheets for 5 minutes and then transfer to a wire rack to cool completely before frosting.
Make the Black and White Icing
- Add the sugar, just 6 tbsp of the milk, corn syrup, vanilla, and salt to a large mixing bowl. Whisk them together until smooth.
- Transfer 1 cup of the glaze to a medium bowl and set aside.
- Add the remaining milk and cocoa powder to the original frosting bowl and whisk to combine until smooth.
Frost the Cookies
- Flip the cookie upside down, you'll be frosting the flat bottom side of the cookie which now becomes the top.
- You will absolutely want to frost the white side of the cookie first. Holding my first cookie over the bowl of the white frosting, I used a simple butter knife to spread the thick glaze over one half of the cookie in the neatest line I could by pushing the glaze along where I wanted it to be and using the knife to scrape it straight.
- Tilt the cookie to the side and let the excess frosting drizzle off so it doesn't puddle on the cookie top when you set it back down on the tray to dry.
- Place the white-frosted cookies in the fridge to cool completely for 15 - 20 minutes. You want the frosting to be completely set before attempting the chocolate half.
- Hold each cookie one at a time over the bowl of the chocolate frosting. Use a similar scraping technique to add the frosting to the other half and let the excess drizzle back into the bowl.
- Chill the cookies until the frosting is completely set before serving, 1 hour minimum.
Recipe Notes
Save This Recipe to Your Recipe Box
Find this delicious recipe next time you visit by saving it to your very own recipe box on my site. All your favorites stored in one easy place!
This recipe is inspired by America's Test Kitchen's book "The Perfect Cookie."